As blogger it fancies me when people react on the post with comments. But the first thing you do with your post is placing it on a social platform like twitter. Instead of reacting on the blog itself, readers mostly react via twitter. Wouldn’t it be cool to have those twitter comments at your blog post? This article describes a technique using Azure Logic Apps to get the mentions on your blog posts into an Azure database.
From there you can easily show the mentions at your blog post through for example a component at the blog platform or by creating another Azure Logic App to write the mentions as comments at the blog post. Word Press has a great REST API to handle this.
We want to use an Azure Logic App for the functionality. This technique allows us to automate business processes by designing workflows that start from a specified trigger and then runs through a series of steps. Each step invokes an App Service API App and takes care of things like authentication.
Azure Logic Apps deliver a cool design tool which is easy to use. Already a large set of connectors to other platforms like Twitter, Facebook, BizTalk and SQL are implemented and available to us. By creating your own Azure API Apps, you can expand the Logic App with additional custom functionality. It gives endless possibilities.
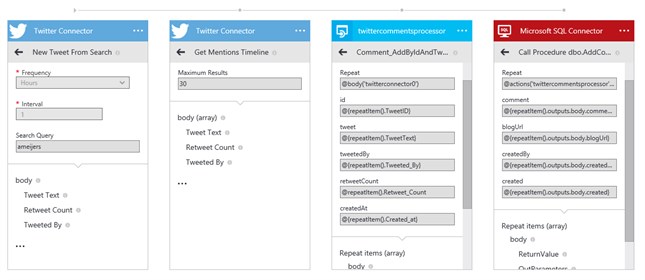
The following drawing will give you a heads up of what we will create.
A large part of the Azure Logic App is configuring existing connectors. Only a small portion of development is needed. You will need the following to accomplish the work.
- An Azure subscription
- Microsoft Visual Studio 2015
So let’s get started!
Create an Azure Logic App
Before we start adding triggers and actions, we need to create the Azure Logic App. Go to the Azure Portal and select on the left side “Logic Apps”. Add a new Logic App through the add button.

For this Logic App I decided to create a separate App Service Plan and Resource Group. The most important part is the selected Resource Group. When creating connectors, you need to specify which Resource Group they will use. This must be the same Resource Group as the one used for your Logic App. If not, you will not be able to select the connectors.
Create a Twitter Connector
To get the mentions from Twitter we need to use the Twitter Connector. We actually use it twice. The first Twitter Connector will connect to Twitter to get on a frequently base the newest tweets from search. The second Twitter Connector will get a number of mentions from the mentions timeline through the first Twitter Connector. To connect to Twitter, it is recommended to create a Twitter Application on Twitter.com. This will give you a consumer key and secret which can be used to configure the connector.
- Go to https://apps.twitter.com and login with your Twitter credentials
- Select the button “Create new App”
- Fill in all the necessary information. The Callback URL can be left empty
- Select the button “Create your Twitter Application” to create the Twitter Application
- Select your just created Twitter Application
- Go to the tab “Keys and Access tokens” to find the Consumer key and the Consumer secret.
The next step is creating the Twitter Connector.
- Go to the Azure portal using the URL https://portal.azure.com
- Select “New” à “Marketplace”
- Search for Twitter Connector
- Choose the button “Create” at the bottom

We need to configure the connector. There are three important parts. First of all, you need to specify a unique name for the Twitter Connector. Secondly you need to fill in the Consumer key and Consumer secret at the package settings. And as last make sure that you select the resource group you will be using for the Azure Logic App. As already mentioned before, if you don’t use the same resource group, you are not able to select the connector. In my case I have created a specific resource group called “TwitterComments”.
Getting mentions from Twitter
In this step we are going to use the Twitter Connector to create a trigger and an action. Open the Logic App by selecting it in the portal. Click on the area “Triggers and actions”. This will open the editor screen and allows you to select predefined Logic App templates. Choose “Create from Scratch” since we will create our own. At the right you will notice that you can select the Twitter Connector you created earlier.
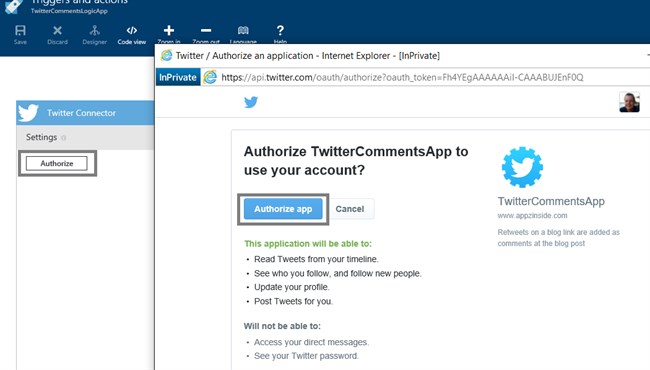
Because it is the first time you start using the Twitter Connector, you need to authorize the app to use a Twitter account. A popup will appear requesting your login details and asks you to authorize the app. Choose the trigger “New Tweet from Search” and configure it to your own will. Enter you own Twitter username (without the @ sign) in the search query field. Save your settings.
Again select the Twitter Connector at the right side to add a Twitter Connector as an additional action. This time select the action “Get Mentions Timeline” and enter a number of results you want to get back. Save your settings again. The result should look something like this.

Mention as a comment
We need to get the mentions into the Azure database. It is important to define when a mention can be seen as a comment for a specific blog post. A mention can be seen as a comment when the mention contains the URL of the blog post. There is a challenge with the URL. In most twitter messages a URL is shortened and cannot be compared to the original URL. In such cases we need to unshorten to URL to compare with the blog URL and store it as a key in the database which allows us to retrieve all mentions belonging to a certain post. We will be using an Azure API App for creating such custom functionality.
At first we create an API App inside the Azure portal.
- Go to the Azure portal using the URL https://portal.azure.com
- Select “API Apps” at the left menu
- Press the “Add” button to create a new API App

Again it is important to select the same Resource Group as the Logic App is using. Otherwise you will not be able to select your API App as an action in the Logic App designer tool.
The next step is using Visual Studio 2015 to create the Azure API App. Execute the following steps to create the API App.
1) Start Visual Studio 2015
2) Choose File à New à Project
3) Select the project type “ASP.NET Web Application” under the category “Web”, choose a location and press the “OK” button
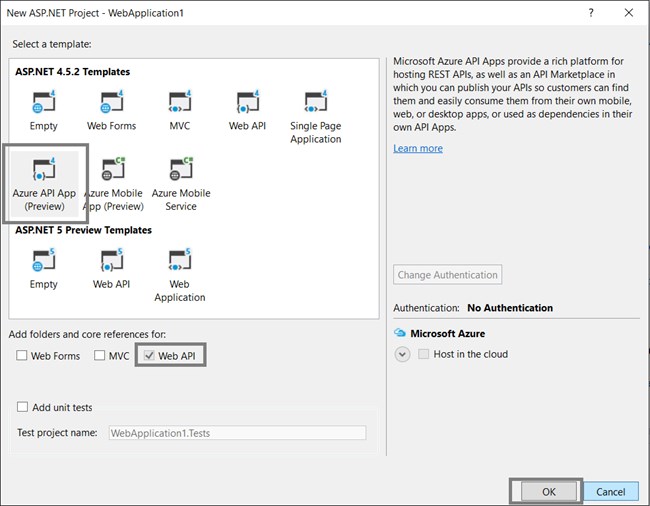
4)Select the template “Azure API App (Preview) and press the “OK” button
5)Visual Studio will now start to create the project structure. This process can take some time.
When the project is created by Visual Studio we will need to do some extra work to get our Azure API App up and running.
We need to create a model and a controller. The model represents the comment. Do a left mouse click on the folder “Models” in the Solution Explorer and select Add à Class. Use the following code:
|
public class Comment { public Comment() { created = DateTime.Now; } public string commentText { get; set; } public string blogUrl { get; set; } public string createdBy { get; set; } public DateTime created { get; set; } } |
The second step is creating a controller. Do a left mouse click on the folder “Controllers” in the Solution Explorer and select Add à Controller… The controller will contain some helper functions and the method which we will be calling inside the Azure Logic App. Let’s start with the code to retrieve the URL from a tweet.
|
private string URLFromTweet(string tweet) { string urlResult = “”; try { // get the url from the tweet string url = tweet.ToLower(); int start = url.IndexOf(“http://”); if (start >= 0) { int end = url.IndexOf(” “, start); if (end == -1) { end = url.Length; } // get the tweet from the original string due to lowercased of url // otherwise some urls will not resolve urlResult = tweet.Substring(start, end – start); } } catch (Exception) { } return urlResult; } |
Next we need some code to unshorten the URL. Initially is start looking for online services to handle such a request. But unfortunately these services where mostly not working or needed some payment. But getting the unshorten URL back is not that difficult. By requesting the URL through a WebRequest you can retrieve the original URL via the WebResponse.ResponseUri property.
|
private string UnshortenURL(string URL) { if (URL == “”) { return “”; } string unshortendUrl = URL; try { WebRequest request = WebRequest.Create(URL); WebResponse response = request.GetResponse(); unshortendUrl = response.ResponseUri.ToString(); response.Close(); } catch (Exception) { } return unshortendUrl; } |
The last helper function we need to have is the one which converts the tweet date. The date has a specific format like “ddd MMM dd H:mm:ss +0000 yyyy”. So the next function will give us the exact date from that tweet.
|
private DateTime ConvertTweetDate(string dateAsText) { DateTime dt = DateTime.Now; try { CultureInfo usCulture = new CultureInfo(“en-US”); string twitterDateTimeFormat = “ddd MMM dd H:mm:ss +0000 yyyy”; dt = DateTime.ParseExact(dateAsText, twitterDateTimeFormat, usCulture); } catch (Exception) { } return dt; } |
Finally, we need to create the HttpGet method in the Controller. This method is exposed in the Azure Logic App designer tool when the API App is added as an action to the Logic App. The method expects some variables and returns a Comment object. When a URL is found in the tweet, it is checked against my blog URL. You can change this to your own blog URL.
|
[HttpGet] public Comment Add(string id, string tweet, string tweetedBy, int retweetCount, string createdAt) { Comment comment = new Comment(); string shortenedUrl = URLFromTweet(tweet); string unshortenUrl = UnshortenURL(shortenedUrl); if (unshortenUrl != “”)
// check if url is a blog post at your blog if (unshortenUrl.StartsWith(“http://www.appzinside.com/”)) { comment = new Comment(); comment.blogUrl = unshortenUrl; comment.createdBy = tweetedBy; comment.commentText = tweet; comment.created = ConvertTweetDate(createdAt); } } return comment; } |
After building the project, we need to publish the project to the earlier created Azure API App in the Azure portal. Do a left mouse click on the project and selecting the option “Publish…”
Select the publish target “Microsoft Azure API Apps (Preview). A new dialog will appear to select an existing Azure API App. If you are not already logged in, log in with the same account used as for your Azure portal. Select the earlier created API App as the destination and press the “OK” button.
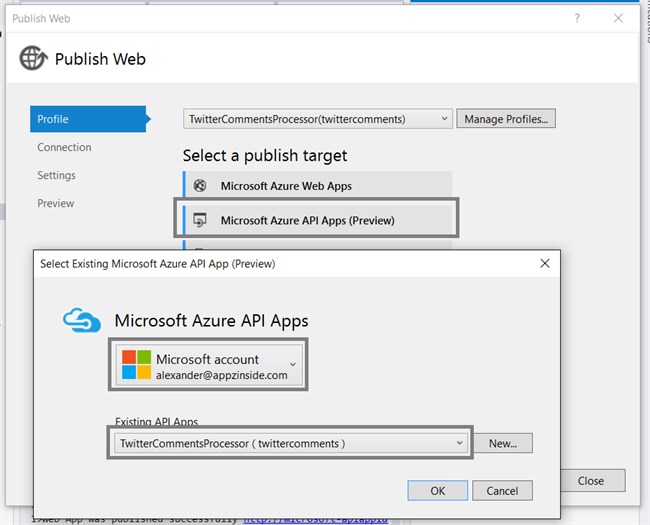
That will download the publishing profile for that Azure API App and arranges all settings for you in the next step. It is possible to validate your connection settings. By clicking on the “Validate Connection” button.
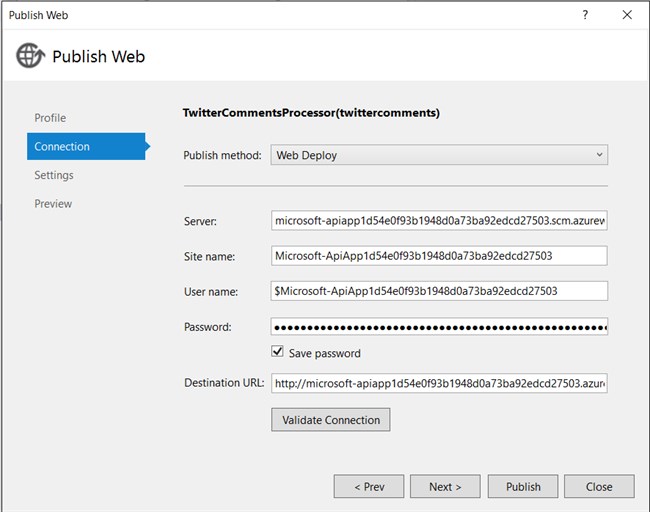
Press the “Next >” button to move to the next step in the wizard. In this step you can choose the configuration between debug and release.
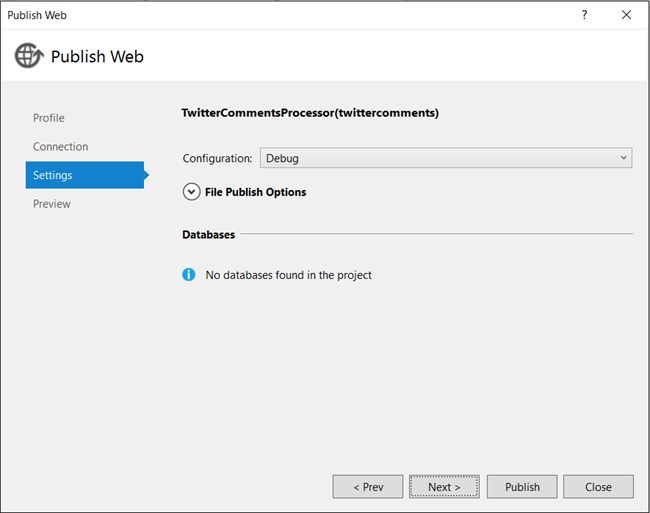
Having the ability to do some remote debugging later on choose for the debug configuration. Now press the “Publish” button for publishing the API App to the Azure portal.
Go back to the Azure portal and open the Logic App by selecting it in the portal. Click on the area “Triggers and actions”. It already contains the two Twitter Connectors created earlier. You will notice that your Azure API App appears on the right side of the Logic App designer tool. Click it once to add an instance to the Logic App.
The method you defined in the Controller appears as an action in the connector. Select the method and the action allows you to fill in the fields as specified in the method. This action gets its data from the previous Twitter Connector action. That Twitter Connector action returns a body containing fields. If you closely you notice the (array) text. It means that the Twitter Connector returns an array of body objects.

This means that we need to iterate through the result of that array. By clicking on the … and selecting “Repeat over a list” we are able to iterate over the array. The following values need to be filled into the fields.
| Field | Value |
| Repeat | @body(‘twitterconnector0’) |
| id | @{repeatItem().TweetID} |
| tweet | @{repeatItem().TweetText} |
| tweetedBy | @{repeatItem().Tweeted_By} |
| retweetCount | @{repeatItem().Retweet_Count} |
| createdAt | @{repeatItem().Created_at} |
As you can see the “Repeat” field is connected to the body of the previous Twitter Connector. The name of that Twitter Connector is in my case “twitterconnector0”. Change the name to the one in your Azure Logic App. All the other fields reference to the repeatItem() which is actually a body object from that array. The fields referenced like “TweetText” and “Created_at” can be found easily by hovering over the small information symbol behind each field in the result part of the previous Twitter Connector.

Save your work and continue to the last step of this Azure Logic App.
Storing comments into an Azure Database
The last action of the Logic App is storing the comments into an Azure database. There are a few things we need to setup before storing the comments through a connector.
- Make sure you have an Azure SQL Server or create one
- Create an Azure SQL Database with the name “TwitterComments”
- Create a table with the name “dbo.Comments”
- Create a stored procedure with the name “dbo.AddComment”
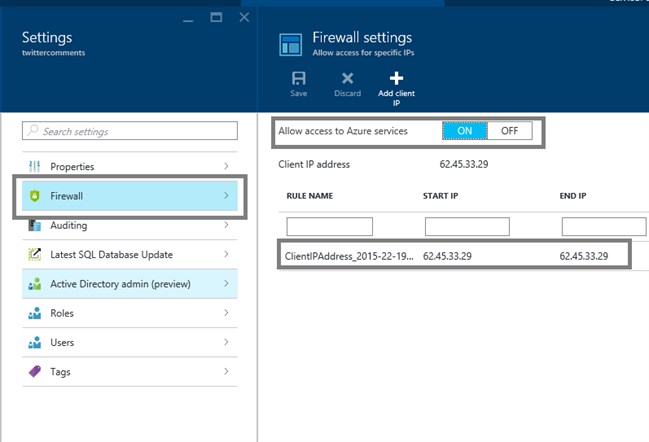
I presume for now that you have arranged step 1 by yourself. An Azure SQL Server in your Azure Portal is created in a few clicks. Make sure that you allow access to Azure services for that server. The setting is found by selecting the Azure SQL Server in your Azure portal. Click on the server name and select “Firewall” in your settings. Check if the option is set to “ON” and your client IP address is added. The last setting allows us to manage the database remotely from the client.
The next steps will be executed from Visual Studio 2015. It has a great SQL Server Object Explorer to handle everything you need. First of all, we need to add the Azure SQL Server as a connection in the explorer by do a right mouse click on “SQL Server” and select “Add SQL Server…”.

Enter the server name (in my case twittercomments.database.windows.net) and your credentials. Press the “Connect” button to connect to the database server.
Create a new table by right mouse click on “Tables” and select “Add new table”. Replace the contents of the T-SQL tab with the following.
|
CREATE TABLE [dbo].[Comments] ( [Id] INT IDENTITY (1, 1) NOT NULL, [Comment] VARCHAR (MAX) NULL, [Created] DATETIME NULL, [CommentBy] VARCHAR (50) NULL, [BlogUrl] VARCHAR (MAX) NULL, [Hash] VARCHAR (MAX) NULL, PRIMARY KEY CLUSTERED ([Id] ASC) ); |
Press the update button to update the table.
The connector allows you to insert directly into a table in a database. But we need to prevent comments are not added multiple times. The problem is that we don’t know exactly in which order the comments are placed in the database. Using the comment creation date to determine if the comment you want to add is newer or not is not going to work.
We will need to create a unique key per comment and store that in the table. An unique key is generated based on the fields “CommentBy” and “CreatedAt”. The stored procedure will check if there is already a record present with that same key. If not the comment is added to the table.
Create a new stored procedure by right mouse click on “Stored Procedures and select “Add new stored procedure”. Replace the contents of the T-SQL tab with the following.
|
CREATE PROCEDURE dbo.AddComment @comment nvarchar(max), @blogUrl nvarchar(max), @createdBy nvarchar(50), @created datetime AS declare @result int declare @hash nvarchar(max) if (@blogUrl is null or @blogUrl = ”) begin return 0 end SET @hash = CONVERT(nvarchar(max), @created) + @createdBy SET @result = (SELECT COUNT(dbo.Comments.Hash) from dbo.Comments where @hash = dbo.Comments.Hash ) IF (@result = 0) BEGIN INSERT INTO dbo.Comments ( Comment, Created, CommentBy, BlogUrl, Hash ) VALUES ( @comment, @created, @createdBy, @blogUrl, @hash ) END RETURN 0 |
Press the update button to update the stored procedure. When you have finished these steps, the SQL Server Object Explorer will look like the following.

The next step is creating a Microsoft SQL Connector from the marketplace in the Azure portal.
- Go to the Azure portal using the URL https://portal.azure.com
- Select “New” à “Marketplace”
- Search for Microsoft SQL Connector
- Choose the button “Create” at the bottom
You will need to fill in a few things. At first give the connector a name and make sure that the same Resource Group is selected as the Resource Group of the Azure Logic App. Otherwise you are not able to select your connector.

Secondly you need to specify the connection information to the Azure SQL Server. Enter the name of the server, your credentials and the database name used.
Finally, we need to specify which tables and stored procedures are allowed to be modified. And there you go. You have a Microsoft SQL Connector configured.
Go into the Azure portal and open the Azure Logic App. Click on the area “Triggers and actions”. It already contains the two Twitter Connectors and the Azure API App created earlier. You will notice that your Microsoft SQL Connector appears on the right side of the Logic App designer tool. Click it once to add an action based on the Microsoft SQL Connector.
Click on the action “Call procedure dbo.AddComment (JSON)”. Because the previous action, your custom Azure API App, outputs an array based on “Repeat Items”, you need to repeat over that array.

This means that we need to iterate through the result of that array. By clicking on the … and selecting “Repeat over a list” we are able to iterate over the array. The following need to be filled in.
| Field | Value |
| Repeat | @actions(‘twittercommentsprocessor’).outputs.repeatItems |
| comment | @{repeatItem().outputs.body.commentText} |
| blogUrl | @{repeatItem().outputs.body.BlogUrl} |
| createdBy | @{repeatItem().outputs.body.createdBy} |
| created | @{repeatItem().outputs.body.created} |
As you can see the “Repeat” field is connected to the repeated items of the previous Twitter Connector. The name of that Twitter Connector is “twittercommentsprocessor”. Change the name to what you have chosen for your Azure API App. All the other fields reference a field inside the body inside the repeatItem(). The fields referenced like “blogUrl” and “created” can be found easily by hovering over the small information symbol behind each field in the result part of the previous Azure API App connector.

Save your work and we are finished!
Test your Logic App
We can test the Logic App by opening the Azure Logic App in the Azure portal and click on the “Run Now” button at the top. You will notice an active run added under Operations. If you click on that active run, you are able to track its progress at the right side.
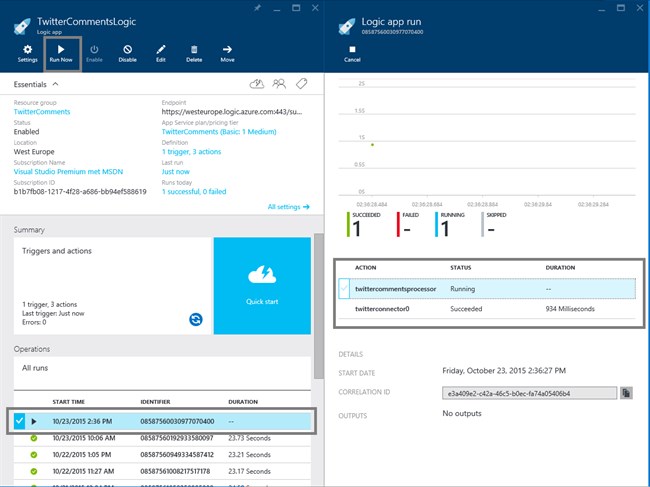
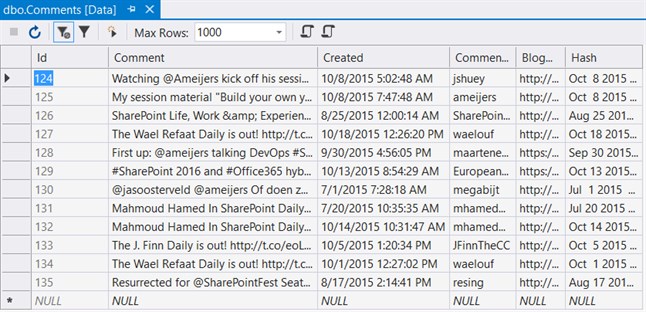
Each of the actions and its progress is shown at the right side. If everything went well, all actions have a “Succeeded” status. The result in the table will be something like this.
Debug your API App
If an action fails, you are able to click on the action in the “Logic app run” pane and another pane is opened. It allows you to investigate what went wrong. If you want to debug your API App during the process of the Logic App, you can attach the debugger through the Cloud Explorer in Visual Studio 2015. Do a left mouse click on the API App and choose “Attach debugger”.

I noticed in some cases that after a number of times attaching the debugger you receive an error and it won’t attach. Restarting your Visual Studio environment will resolve the issue.
Wrap up
Azure Logic Apps gives use endless possibilities by implementing automated business processes. Using the connectors allows us to process data from different sources, transform the data and store it wherever you want. The technique is easy and even without any custom functionality users will be able to build complicated flows to resolve their business problems.
If you want to try out Azure Logic Apps before getting an Azure subscription, you can do this at https://tryappservice.azure.com/.
More information
Azure Logic Apps and their connectors are well documented and contains clear examples of implementation and configuration. More information can be found here.
What are Logic Apps?
https://azure.microsoft.com/en-us/documentation/articles/app-service-logic-what-are-logic-apps/
List of Connectors and API Apps to use in your Logic Apps
https://azure.microsoft.com/en-us/documentation/articles/app-service-logic-connectors-list/
Create an ASP.NET API app in Azure App Service
https://azure.microsoft.com/en-us/documentation/articles/app-service-dotnet-create-api-app/

