A bill-of-materials, in terms of software, was a new term for me up until recently. The idea is that you can collect all dependencies of your software product and do a security as well as a legal audit of those dependencies. Modern software products (web products in particular) use an extensive amount of open-source dependencies. This means the bill-of-materials (BOM) is cumbersome to generate and validate. To help with the auditing process there are tools available for automatically generating BOMs and analyzing all the OSS dependencies within them.
Tools for the Job
There are several commercial tools available for this process. I didn’t actually have a chance to try either of these but they came up frequently in my searching.
There are also a couple options that I found that are free or open-source.
WhiteSource Bolt
This solution integrates into AzureDevOps and GitHub to provide automatic auditing. I hooked this up in my Azure DevOps instance and ran it during one of my builds. You need to add a build step in order for it to do it’s magic.
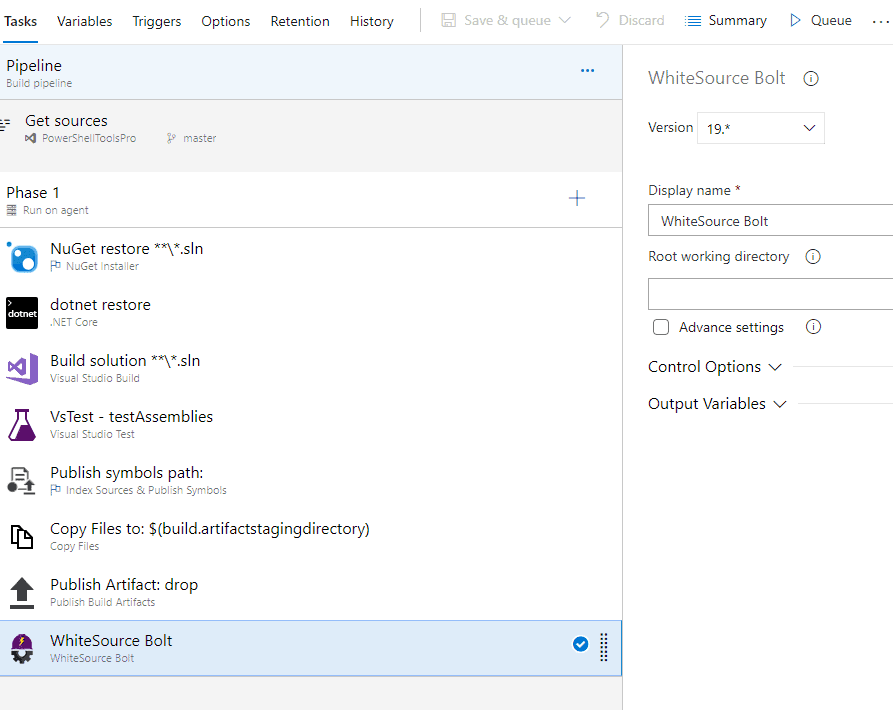
After running a build, you can navigate over to the WhiteSource Bolt section under your Pipelines nav menu item. The report is nice. Pretty standard break down of all the packages. It was really easy to get this up and running.
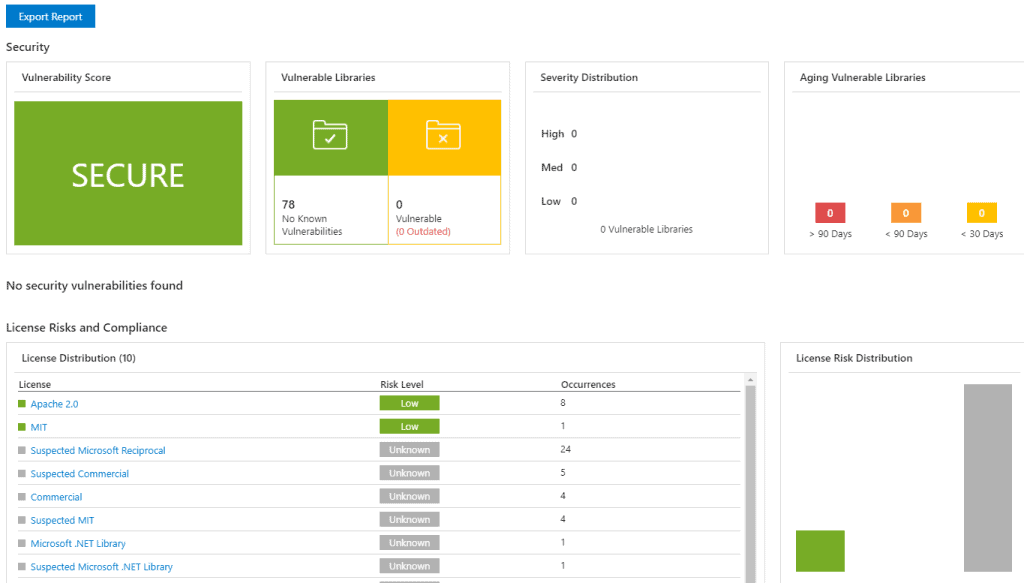
WhiteSource Bolt seems like a great little solution if you are running Azure DevOps or TFS on-prem. The problem is that we are running TFS with a TeamCity build system so we couldn’t take advantage of the WhiteSource build steps.
CycloneDX + OWASP – Dependency-Track
This is the solution I actually went with. CycloneDX provides a set of tools for creating BOMs for various types of projects. They have global tools for repositories such as NPM, NuGet and Pip.
The remainder of this post will focus on our experience thus far with it.
Generating a Bill-Of-Materials
We have a product that uses various package management solutions. They are primarily NPM, NuGet and Pip. Installing the CycloneDX BOM generators is very easy. These are the command lines for each language.
Node.js (NPM)
npm install -g @cyclonedx/bom
dotnet (NuGet)
dotnet tool install --global CycloneDX
Python (Pip)
python -m pip install cyclonedx-bom
After the tools are installed, we can generate BOMs by executing each one of these over the project directories.
Node.js (NPM)
cyclonedx-bom -o bom.xml
dotnet (NuGet)
dotnet cyclonedx -o bom.xml
Python (Pip)
python -m pip freeze > requirements.txt
python -m cyclonedx-py -o bom.xml
The BOM.xml that is generated looks a little bit like this.
<?xml version="1.0" encoding="UTF-8"?>
<bom xmlns="http://cyclonedx.org/schema/bom/1.0" version="1">
<components>
<component type="library">
<group>aspnet</group>
<name>signalr</name>
<version>1.0.0</version>
<description>
<![CDATA[ASP.NET Core SignalR Client]]>
</description>
<hashes>
<hash alg="SHA-1">26b10a32014a65c540cc5053cffa883c320788ce</hash>
</hashes>
<licenses>
<license>
<id>Apache-2.0</id>
</license>
</licenses>
<purl>pkg:npm/%40aspnet/signalr@1.0.0</purl>
<modified>false</modified>
</component>
<component type="library">
<group>nivo</group>
<name>stream</name>
<version>0.42.1</version>
<description>
<](https://www.npmjs.com/package/@nivo/stream)]]>
</description>
<hashes>
<hash alg="SHA-1">95c54c5b816e66758979e6af990a92fe83b24ce1</hash>
</hashes>
<licenses>
<license>
<id>MIT</id>
</license>
</licenses>
<purl>pkg:npm/%40nivo/stream@0.42.1</purl>
<modified>false</modified>
</component>
Once I generated some BOMs by hand it was time to take a look at Dependency-Track. There is a docker container that you can pull and run to get started.
First steps with Dependency-Track
To get up and running in docker with DT, you can run the following commands.
docker pull owasp/dependency-track
docker volume create --name dependency-track
docker run -d -p 8080:8080 --name dependency-track -v dependency-track:/data owasp/dependency-track
Once it’s up and running you can visit the UI in your web browser by going to http://localhost:8080. I created a new project and then uploaded a couple BOMs that I had generated earlier.
The result was a nice little dashboard about all the packages included in our product. This includes some info about known vulnerabilities and license information.
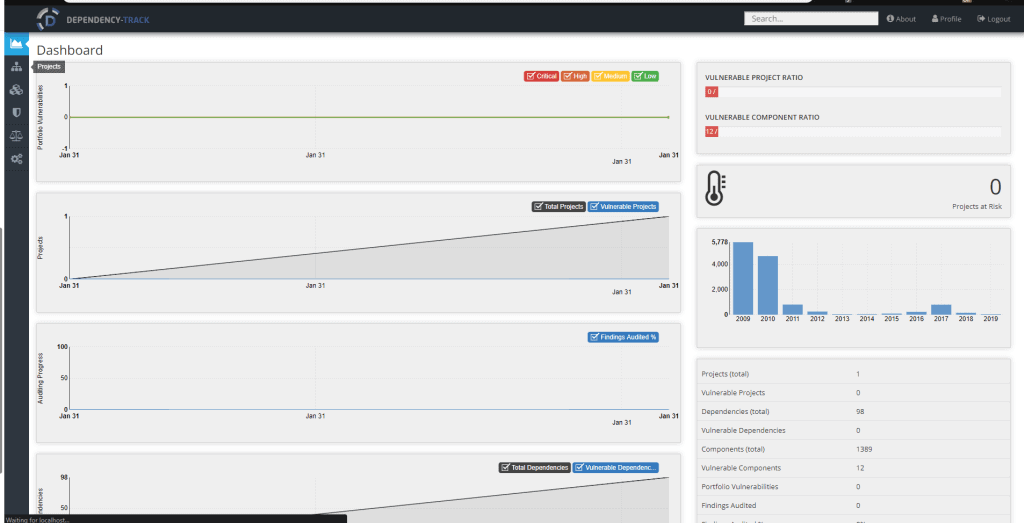
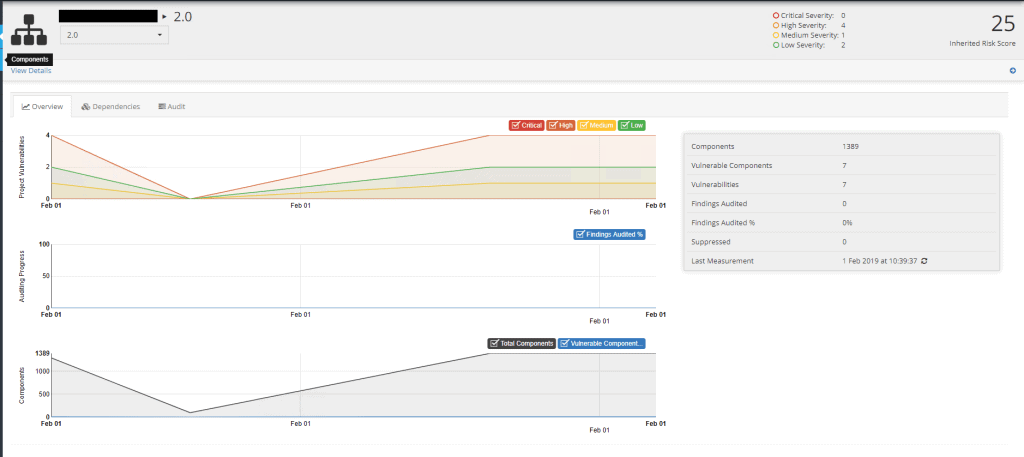
You can visit the Components page to see all the components, including version number, that are included with your products. Your project will have a nice little overview of all the vulnerabilities, dependencies and licenses.
A Production Dependency-Track Instance
The Java VM requires at least 4GB of memory and 2 CPU cores so you will want to provision accordingly.
You’ll need to install the following:
- Java SRE 8 or later (x64)
- Dependency-Track – I opt’d for the self-contained version but you can install Tomcat if you want to manage that directly
- PostreSQL – I opt’d for PG but MySQL and MSSQL are also supported
After installing all the software, I then configured PostgreSQL with a user for DT and created an application.properties file for DT. I only modified the database options so it would connect to PG successfully.
alpine.database.url=jdbc:postgresql://localhost:5432/dtrack
alpine.database.driver=org.postgresql.Driver
# alpine.database.driver.path=C:/Program Files (x86)/PostgreSQL/pgJDBC/postgresql-42.2.2.jar
alpine.database.username=dtrack
alpine.database.password=Password1234
Note: You don’t actually need a database as DT comes with an embedded DB but it’s recommended for production installations.
Finally, I setup a bat file to launch DT on system startup.
java -Xmx4G -Dalpine.application.properties=C:\dt\application.properties -jar C:\dt\dependency-track-embedded.war The first time DT starts up it downloads a bunch of resource from the internet to aid in CVE detection. This took awhile.

Integrating with CI
According to the OWASP team, it’s best practice to integrate this into a CI. Every time a new build is complete, you can upload a BOM to the project and it will track the new dependencies. You’ll have a nice little overview of how they change over time and can get notified of new issues via Email, Slack, Webhooks or teams.
There is a Jenkins plugin already available for this but since we are using TeamCity, I wrote a little PowerShell script.
First, it installs the global tools.
# Install tools
dotnet tool install --global CycloneDX
npm install --global @cyclonedx/bom
python -m pip install cyclonedx-bom
Next, it creates a clean output directory.
# Clean up output dir
$OutputDirectory = Join-Path $PSScriptRoot "boms"
Remove-Item $OutputDirectory -Force -Recurse -ErrorAction SilentlyContinue
New-Item $OutputDirectory -ItemType Directory
Finally, it starts going through each of the projects I wanted audited and produces BOMs.
Set-Location (Join-Path $PSScriptRoot "..\..\\Python")
$Output = Join-Path $OutputDirectory "bom.xml"
python -m pip freeze > requirements
python -m cyclonedx-py -i requirements.txt -o $Output
Join-Bom -bom $Output
Remove-Item (Join-Path $OutputDirectory "bom.xml") -Force

Set-Location (Join-Path $PSScriptRoot "..\..\web")
$Output = Join-Path $OutputDirectory "bom.xml"
cyclonedx-bom | Out-File $Output
Join-Bom -bom $Output
Remove-Item (Join-Path $OutputDirectory "bom.xml") -Force

#Bom for .NET Framework
Set-Location  "$PSScriptRoot\..\..\dotnet"
dotnet cyclonedx StealthDEFEND.sln -o $OutputDirectory
Join-Bom -Bom (Join-Path $OutputDirectory "bom.xml")
Remove-Item (Join-Path $OutputDirectory "bom.xml") -Force
Since every time you upload a new BOM it updates the entire list of packages for the project, you need to combine your BOMs into a single file for upload. That’s where my Join-Bom function comes in handy. It just creates a single XML file from multiple BOMs.
function Join-Bom {
    param(
        $bom
    )

    $BomContents = Get-Content $bom -Raw

    if ($null -eq $Global:MasterBom) {
        $Global:MasterBom = $BomContents
    }
    else {
        Foreach ($Node in $BomContents.bom.components.ChildNodes) {
            $MasterBom.bom.components.AppendChild($MasterBom.ImportNode($Node, $true)) | Out-Null
        }
    }
}
After the entire discovery process is complete, I can then send my info up as a Base64 encoded string to Dependency-Track’s REST API.
function Send-Bom {
    Invoke-RestMethod -Method Put -Uri "$url/api/v1/bom" -Headers @{
        'X-API-Key' = $ApiKey
    } -ContentType "application/json" -Body ([PSCustomObject]@{
        project = $ProjectGuid
        projectVersion = $ProjectVersion
        bom = ([Convert]::ToBase64String([Text.Encoding]::UTF8.GetBytes($MasterBom.OuterXml)))
    } | ConvertTo-Json)
}
You’ll need to grab an API key for your Automation system. This can be found in the DT options under Access Management->Teams->Automation.
I just integrated this as one of our build steps and now we have automatic auditing of all our dependencies. Our development team can review warnings and provide fixes or feedback to the issues discovered. With over 1300 dependencies, this will make it much easier to track.
About the Author:
PowerShell MVP. Developer of PowerShell Tools for Visual Studio and Universal Dashboard. Software Architect @stealthbits. 140.6. Owner of Ironman Software, LLC
Reference:
Driscoll, A. (2019). Producing and Auditing a Bill-Of-Materials For Software Products. Available at:
https://poshtools.com/2019/02/01/producing-and-auditing-a-bill-of-materials-for-software-products/ [Accessed: 16th May 2019].




 Using a SharePoint Online list as a Knowledge source via ACTIONS in Copilot AI Studio
