Quite often customers ask me about how to create custom Workflow Custom Actions, for SharePoint Designer 2013, using Microsoft Visual Studio. Because on the network there are a lot of contents, some of them not very complete or clear … let me try to clarify this topic, or add some more entropy 
Thus, I will show you how to create a Custom Action to Move a file from one document library to another. Because the move action requires write permissions on the source and target folders, and because you are not guaranteed that the user running the workflow has appropriate permissions … I will show you also how to create this Action elevating your identity and acting as the app only. Where the app will be the workflow app. For further details about this topic, you can also read the following document on MSDN: Create a workflow with elevated permissions by using the SharePoint 2013 Workflow platform.
Pre-requirements
First of all, you should have to properly configure your environment. Thus, because the current Custom Action needs to use app permissions, you have to configure the target web site to support App Step sequences. In order to do that, open your site and navigate to the Site Settings page. There, select the “Manage Site Features” option in the “Site Actions” group of actions. In the resulting page, at the very end, you should see a feature called “Workflows can use app permission”. Activate that feature.
i
Then, you will have to configure the permissions for the workflow app. Go back to the Site Settings page and click on the “Site app permissions” link in the “Users and Permissions” group of actions. If you have already created and published at least one workflow with the new SharePoint 2013 workflow engine, you should find an app named “Workflow” (or whatever you say “Workflow” in your language, if you are using a localized UI for SharePoint 2013). If you do not find an app with name “Workflow”, open Microsoft SharePoint Designer 2013 and create a fake workflow, publish it and go back to the “Site app permissions” page. Here you can see how your page should look like.
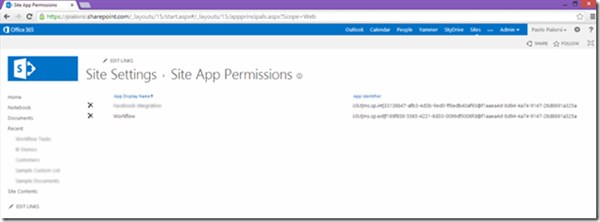
Copy the ID of the “Workflow” app, which is the value between the last | and @ in the App Identifier field. In my sample image it is “f189f858-5565-4221-8d33-0099df9306fd”.
Change the web browser URL in order to navigate to the page /_layouts/15/appinv.aspx, which is not available in the “Site Settings” page. You will be prompted with the following form.
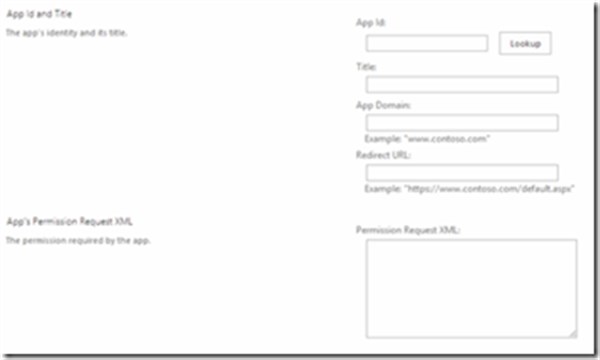
Fill the “App Id” field with the ID you have just copied, click the “Lookup” and compile the “Permission Request XML” with an XML permission request like the following one:
<AppPermissionRequests>
<AppPermissionRequest Scope=”http://sharepoint/content/sitecollection/web”
Right=”FullControl” />
</AppPermissionRequests>
Or something like that, in order to properly configure the permissions you want to assign to the “Workflow” app. For further details about the available permissions for apps, you can read my book 
As soon as you will click on the “Create” button, you will be prompted to trust the “Workflow” app. Click the “Trust it” button, if you want to trust it and assign the declared permissions to it.
Implementing the Move File Custom Action
Now you are ready to implement the custom action. This action will use the REST APIs provided by SharePoint 2013 in order to retrieve a reference to a file in a library, and will invoke the Move To method of the File class (Microsoft.SharePoint.Client) in order to move that file somewhere else.
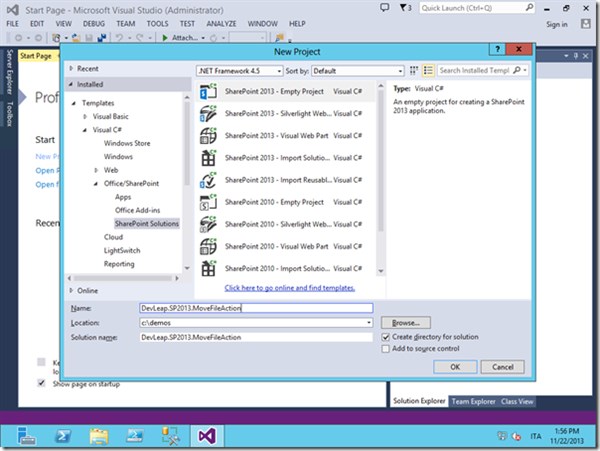
Start Microsoft Visual Studio 2013, choose “New Project” and select a “SharePoint 2013 – Empty Project” template.
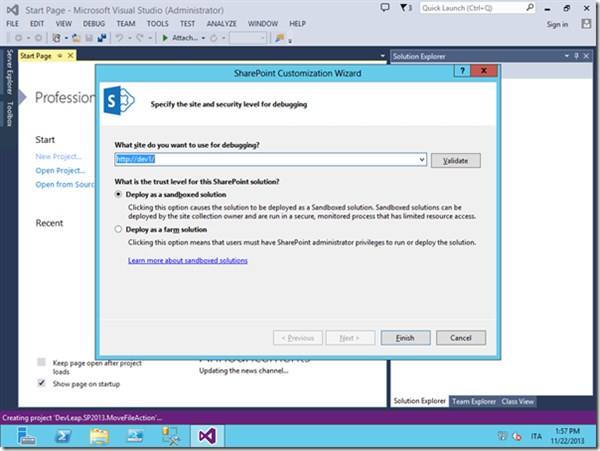
Select to create a Sandboxed Solution, in order to being able to leverage the custom action both on-premises and on Office 365.
Right click on the project item in the Solution Explorer and add a new item. Choose the “Workflow Custom Activity” template. Name the new item “MoveFileActivity”.
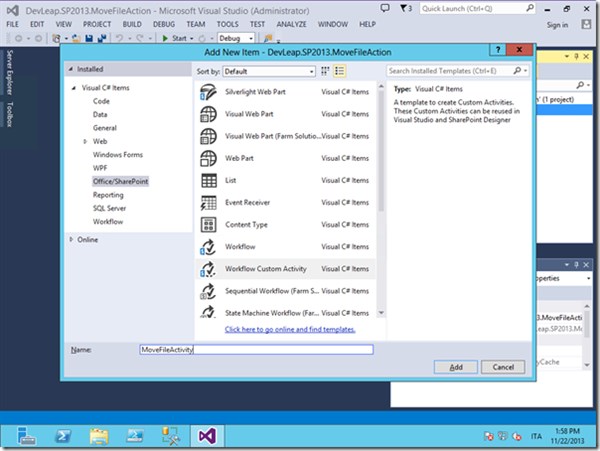
That action will add a new feature and a new feature element made of three files:
•Elements.xml: it is the feature element used to provision the new activity.
•MoveFileActivity.actions4: it is an XML file that will be used to describe the custom action. We will talk about it later in this article.
•MoveFileActivity.xaml: it is the real markup-based (XAML) custom activity.
Keep in mind that now, with SharePoint 2013 and the new workflow engine based on Workflow Manager, any custom activity suitable for SharePoint 2013 on-premises and online has to be markup based. You can also implement code-based activities, but those will be suitable for on-premises farms only.
On the designer area of Visual Studio you will find an activity designer with a Sequence activity ready to go. In the lower side of the designer, click on the Arguments tab in order to add some input arguments that will be used by SharePoint Designer 2013 to provide a reference to the file to move, and to the target library.
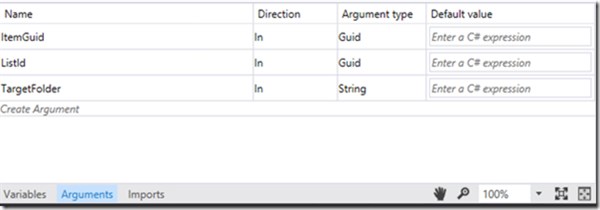
The arguments will be:
•ItemGuid – In – System.Guid
•ListId – In – System.Guid
•TargetFolder – In – System.String
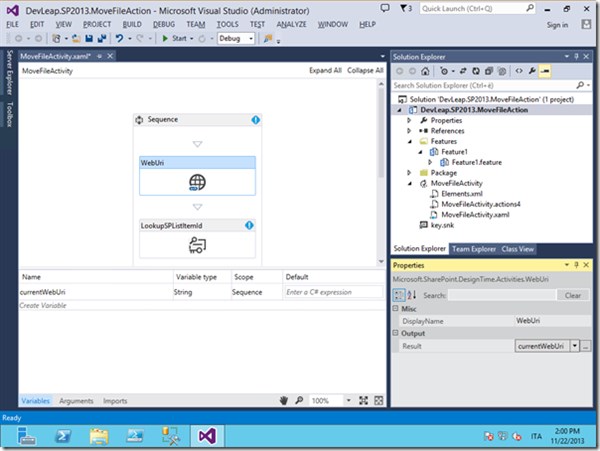
Then, you can open the toolbox and drag’n’drop on the designer surface the following activities:
•WebUri (available under the “SP – Current Context” group of activities)
•LookupSPListItemId (available under the “SP – List” group of activities)
•AppOnlySequence (available under the “SP – Utilities” group of activities)
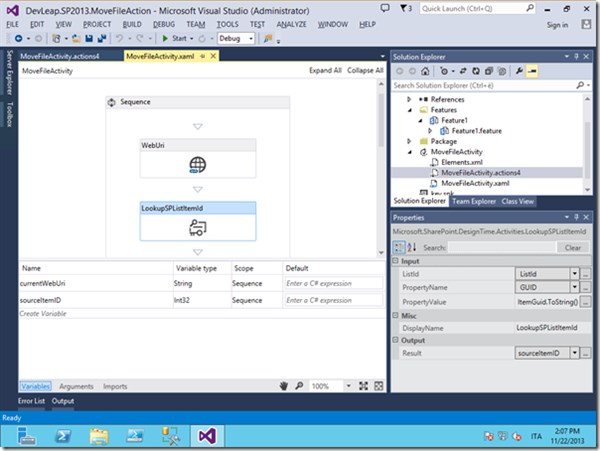
Now you can retrieve the ID of the source item using the LookupSPListItemId activity. Provide the ListID and the ItemGuid values as filters for selecting the ID. Save the result in a variable named ItemId, of type System.Int32, like shown in the following screenshot.
Now you are ready to compose the URL of the REST request for moving the file. As already stated, the REST API that we will use is the MoveTo method of the File class of the client object model. The URL of that method, from a REST perspective, will look like the following one:
{currentWebUri}/_api/web/lists/GetById(guid'{ListId}’)/Items({sourceItemID})/File/MoveTo(newUrl='{targetFolder}’,flags=’1′)
Where the tokens wrapped in { } will be the variables and arguments just defined, and the last parameter named flags with a value of ‘1’ means: overwrite any already existing file on the destination. You can find the full documentation of the MoveTo method here.
Thus, you are ready to prepare the REST request. Within the AppOnlySequence drag’n’drop a new Sequence activity, and inside it define the following activities:
•Assign (available under the “Primitives” group of activities)
•BuildDynamicValue (available under the “DynamicValue” group of activities)
•HttpSend (available under the “Messaging” group of activities)
The Assign activity will be used to compose the target URL of the REST API to invoke. Define a String variable named restAPIUri and assign it the following value:
String.Format(“{0}_api/web/lists/GetById(guid'{1}’)/Items({2})/File/MoveTo(newUrl='{3}’,flags=’1′)”, currentWebUri, ListId, sourceItemID, TargetFolder)
Now define a variable named restHttpHeaders of type DynamicValue and assign it an item with path “Accept” and value “application/json;odata=verbose”, using the BuildDynamicValue activity. That header will instruct the REST API to respond using JSON (JavaScript Object Notation).
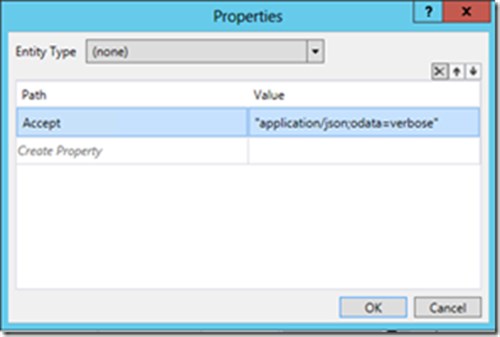
Now you are ready to configure the HttpSend activity like the following.
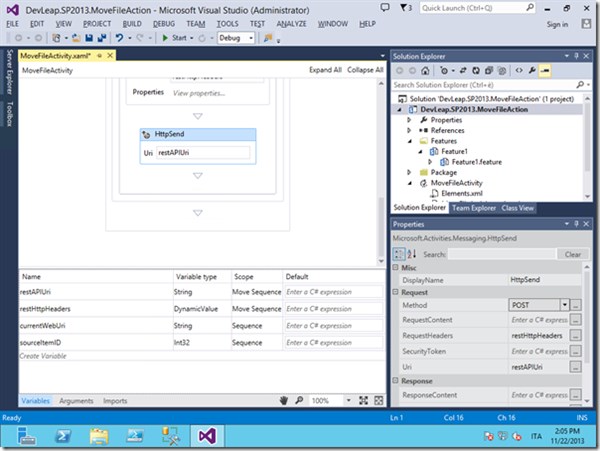
The HTTP Method property will have a value of “POST”, the Uri will be the restAPIUri variable, and the RequestHeaders will be the restHttpHeaders variable. In some cases, depending on the REST API you are invoking, you should have to provide some other HTTP Headers like X-RequestDigest, IF-MATCH, etc. It is out of scope of this article to cover this topic, too. However, consider that to retrieve such information you can still use one or more HttpSend activity instances. For example, to retrieve a value for the X-RequestDigest you can invoke the /_api/ContextInfo URI via POST and parse the JSON response.
Publishing the Custom Action
So far, you are almost ready. You simply need to publish the Custom Action. In order to accomplish this task you have to define the .actions4 file mentioned above. This file is mainly an XML based definition of the action, of its input and output arguments, and of the bindings between the UI of SharePoint Designer 2013 and the arguments expected by the action. Unfortunately there are not so much documents online available about the schema of .actions4 files. However, you can read the following article: WorkflowActions4 schema reference.
Nevertheless, the best thing to do – in order to understand the schema and to learn the supported values for elements and attributes of .actions4 files – is to inspect the out of the box available .actions4 files deployed by the standard setup of SharePoint 2013. The .actions4 files are deployed in the SharePoint15_RootTEMPLATE{Language LCID}Workflow folder. There you can open already existing files using Notepad or any other text editor … and do inspection.
Here you can see the .actions4 file for the current custom action.
<Action Name=”MoveFileActivity”
ClassName=”DevLeap.SP2013.MoveFileAction.MoveFileActivity”
Category=”Files” AppliesTo=”all”>
<RuleDesigner Sentence=”Move item from %1 to %2″>
<FieldBind Field=”ListId,ItemGuid” Text=”this document” Id=”1″
DesignerType=”ChooseDoclibItem” DisplayName=”Item” />
<FieldBind Field=”TargetFolder” Text=”target” Id=”2″
DesignerType=”TextArea” DisplayName=”Target” />
</RuleDesigner>
<Parameters>
<Parameter Name=”ListId” Type=”System.Guid” Direction=”In” DesignerType=”Hide” />
<Parameter Name=”ItemGuid” Type=”System.Guid” Direction=”In” DesignerType=”ListItem”
Description=”ID of the list item used by this action.” />
<Parameter Name=”TargetFolder” Type=”System.String, mscorlib” Direction=”In”
Description=”Target Folder where the file will be moved to.” />
</Parameters>
</Action>
As you can see the ClassName and Name attributes map to the corresponding elements in the Visual Studio 2013 project. Within the RuleDesigner element are defined the fields to prompt to the end users, while in SharePoint Designer 2013, in order to fill out the item to move (field with Id 1) and the target folder (field with Id 2). Furthermore, in the Parameters section you can see the real input arguments expected by the custom action, whose Name attribute map to the Field attributes of the FieldBind elements.
Build the project, publish the .WSP package and upload it onto the target SharePoint 2013 Site Collection inside the list of Sandboxed Solutions (“Site Settings” -> “Web Designer Galleries” -> “Solutions”), whether it is on-premises or on SharePoint Online. Activate the solution and the target feature, as well. Start SharePoint Designer 2013, or close and restart it, and create a new workflow definition. You will find the new action available in the “Files” group of actions. In the following figure, you can see the output in SharePoint Designer 2013.
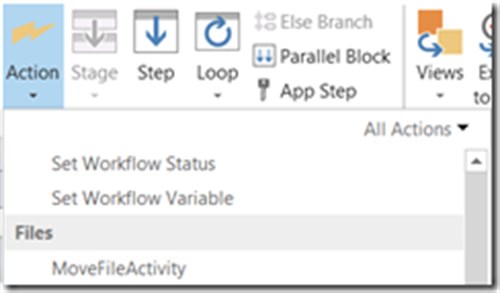
Sometime, the custom action do not show up in SharePoint Designer 2013. In that situation, try to clear the cache of the tool simply by deleting the folder named with the name of the target site collection and available under the folder userprofileappdatalocalmicrosoftwebsitecachesitename.
That’s all … Enjoy with your custom actions!
Here you can download the code related to this article.
If you have any questions or feedback on Paolo’s article please leave a comment below. We would love to hear from you.
Paolo Pialorsi is co-programme chair for ESPC14. Come meet Paolo at ESPC14 for only €995.
 Paolo Pialorsi is the founder of PiaSys (www.pialorsi.com), a company focused on Microsoft SharePoint and .NET development. He’s a consultant, trainer, book author and speaker at the best international conferences about Microsoft technologies. He writes articles for IT magazines, authored several books for Microsoft Press (the latest is “Microsoft SharePoint 2013 Developer Reference”) and posts regularly on his technical blog (http://www.sharepoint-reference.com/Blog/). You can follow Paolo on Twitter (@PaoloPia).
Paolo passed more than 40 Microsoft certification exams and achieved the following certifications: Microsoft Certified Solutions Master on SharePoint, MCP, MCT, MCSD.NET, MCSE, MCSA, MCAD, MCTS on several Microsoft technologies and IBM Certified Developer on XML technologies.




 Using a SharePoint Online list as a Knowledge source via ACTIONS in Copilot AI Studio
