Curious about Azure Bicep Parameters? Dive into this guide to simplify the Azure Bicep Parameters concepts. From hands-on examples to a clear explanation, we’ve got it all covered. Explore Bicep and make Azure management a breeze!  !
!
Introduction
Remember that mysterious squiggly line we encountered in our previous article?, The one that had us wondering and promising, “We’ll get to that later”? Well, guess what? Later is now! 
Last time, we dipped our toes into the Bicep world and learned why it’s becoming the go-to tool for managing Azure resources. Today, we’re diving deeper, and by the end of this article, you’ll be flexing your Bicep muscles with parameters like a pro. 
So, grab your favorite beverage 
 and let’s continue our quest to make Azure management a breeze. Ready to jump in? Let’s go!
Understanding Parameters in Infrastructure as Code
Now that we’re diving deeper into Azure Bicep, let’s talk about parameters in Infrastructure as Code (IaC). Parameters are a key concept that can significantly improve the flexibility and reusability of your code.
What Are Parameters in IaC?
In IaC, a parameter is essentially a variable that allows you to input different values when you deploy your code. This means you can use the same code for various scenarios without having to rewrite it each time.
The Importance of Parameters
Let’s consider a practical example. Say you have a Bicep script for creating a resource group. Typically, a resource group requires two key pieces of information:
- A name
- A location
Without parameters, you’d need to write a separate script for each unique combination of name and location. That’s not only inefficient but also prone to errors.
By introducing parameters, you gain several advantages:
- Reusability: You can maintain a single script that handles various inputs.
- Efficiency: You save time by not having to create multiple versions of essentially the same script.
- Reduced Errors: With fewer scripts to manage, there’s less chance of introducing mistakes.
Practical Application
In practice, parameters allow you to write your Bicep script once and then customize it at deployment time. You define the structure of your infrastructure, and the parameters allow you to specify the details when you’re ready to deploy.
This approach makes your Bicep scripts more versatile and easier to maintain over time. As we progress, you’ll see how this can significantly streamline your Azure resource management process.
In the next section, we’ll look at how to define these parameters in Azure Bicep. Ready to make your Bicep scripts more flexible and powerful? Let’s dive in!

How to Define Parameters in Azure Bicep
Now that we understand the importance of parameters, let’s look at how to actually implement them in your Azure Bicep code. The process is straightforward, but there are a few key points to keep in mind.
Basic Parameter Declaration
In Azure Bicep, you declare parameters at the beginning of your file. Here’s the basic syntax:
1 | param parameterName parameterType |
Copy
Let’s break this down:
paramis the keyword that tells Bicep you’re declaring a parameter.parameterNameis the name you choose for your parameter.parameterTypespecifies what kind of data the parameter will accept.
For example, to declare a parameter for a resource group name, you might write:
1 | param resourceGroupName string |
Copy
This tells Bicep to expect a string value for resourceGroupName when the script is deployed.
Common Parameter Types
Bicep supports several parameter types. Here are some you’ll use frequently:
string: For text valuesint: For whole numbersbool: For true/false valuesarray: For lists of valuesobject: For complex data structures
Setting Default Values
You can also assign default values to your parameters. This is particularly useful for values that don’t change often. Here’s how you do it:
1 | param location string = 'australiaeast' |
Copy
In this case, if no value is provided for location during deployment, Bicep will use ‘australiaeast’ as the default.
Using Default Values Wisely
Default values can be very helpful, but it’s important to use them judiciously. Here are a few tips:
- Use defaults for values that are commonly used but might occasionally need to change. For instance, if you usually deploy to ‘australiaeast’ but sometimes need to use other locations, a default value makes sense.
- Avoid using defaults for sensitive information like passwords or API keys. These should always be provided at deployment time for security reasons.
- Consider your use case. If a parameter will almost always need to be specified explicitly, it might not need a default value.
By thoughtfully using parameters and default values, you can create Bicep templates that are both flexible and convenient to use. In our next section, we’ll put this knowledge into practice by creating a resource group using parameters. Ready to see parameters in action?
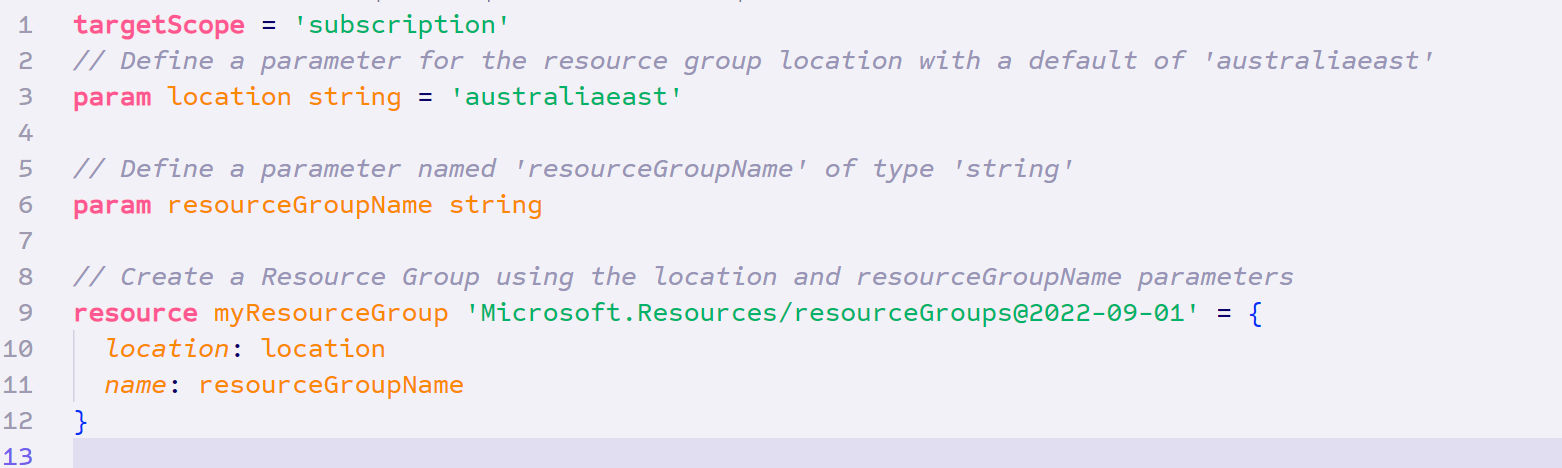
Creating a Resource Group with Parameters
Now that we understand how to define parameters, let’s put this knowledge into practice. We’ll create a Bicep script that deploys a resource group using parameters for flexibility.
Here’s our Bicep script:
targetScope = 'subscription'

// Define a parameter for the resource group location with a default of 'australiaeast'
param location string = 'australiaeast'

// Define a parameter for the resource group name
param resourceGroupName string

// Create a Resource Group using the location and resourceGroupName parameters
resource myResourceGroup 'Microsoft.Resources/resourceGroups@2022-09-01' = {
  location: location
  name: resourceGroupName
}
Let’s break this down:
targetScope = 'subscription': This line tells Azure that we’re working at the subscription level, which is necessary for creating resource groups.- We define two parameters:
location: A string with a default value of ‘australiaeast’.resourceGroupName: A string without a default value, meaning it must be provided during deployment.
- We create the resource group using these parameters:
location: locationuses our location parameter to set where the resource group will be created.name: resourceGroupNameuses our resourceGroupName parameter to set the name of the resource group.
With just these few lines, we’ve created a flexible template for deploying resource groups. Notice how we’ve eliminated the ‘squiggly line’ warning in Visual Studio Code by using parameters instead of hardcoded values. Yay 
Deploying Your Parameterized Template
To deploy this template, save it as main.bicep in your working directory. We’ll use this file name in our deployment command.
When you’re ready to deploy, you’ll use Azure CLI to run the deployment. Here’s an example command:
az deployment sub create --location australiaeast --template-file main.bicep --parameters resourceGroupName='MyNewResourceGroup'
Let’s break this down:
--template-file main.biceppoints to your Bicep file.--parameters resourceGroupName='MyNewResourceGroup'provides a value for the resourceGroupName parameter.
Note on –location: You might wonder why we’re specifying a location in the deployment command when we already have a location parameter in our Bicep file. The
--locationin this command actually refers to where Azure should store the deployment metadata, not where your resources will be created. This is a more advanced topic that we’ll explore in a future article. For now, it’s fine to use the same location as your resources.

By using parameters in this way, you can easily deploy resource groups with different names or in different locations, all using the same Bicep template. This is the power and flexibility that parameters bring to your Infrastructure as Code!
After running this command, Azure will create a new resource group based on your parameterized template. You can check the Azure portal to see your newly created resource group.
Putting Parameters to Work
Now that we understand how parameters work, let’s see them in action. We’ll deploy our resource group template to multiple locations, showcasing the flexibility that parameters bring to our Infrastructure as Code.
Deploying to the Default Location
Let’s start by deploying our resource group using the default location we set in our Bicep file. Run the following command:
az deployment sub create --location australiaeast --template-file main.bicep --parameters resourceGroupName='myResourceGroupWUS' location='westus'
In this case, we’re only specifying the resourceGroupName parameter. Our resource group will be created in Australia East, as per our default location parameter value.
Deploying to a Different Location
Now, let’s deploy another resource group, but this time to a different location. We can override our default location like this:
az deployment sub create --location australiaeast --template-file main.bicep --parameters resourceGroupName='myResourceGroupWUS' location='westus'
Here, we’re passing both the resourceGroupName and location parameters. This will create our resource group in the West US region instead of the default Australia East.
Checking Our Results
After running these commands, head over to the Azure portal. You should see two new resource groups:
myResourceGroupAUEin the Australia East regionmyResourceGroupWUSin the West US region
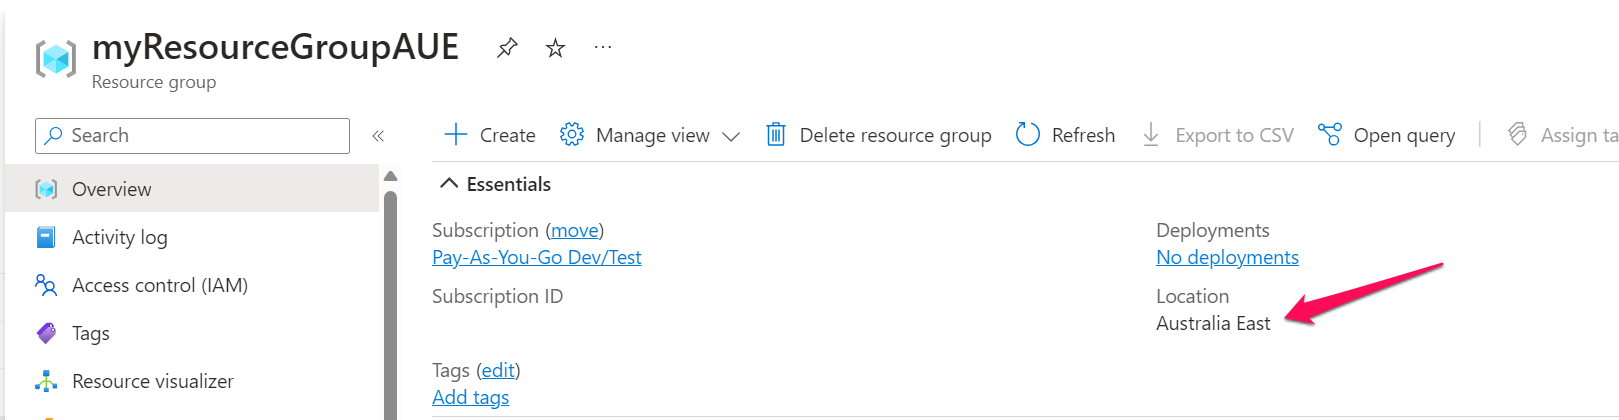
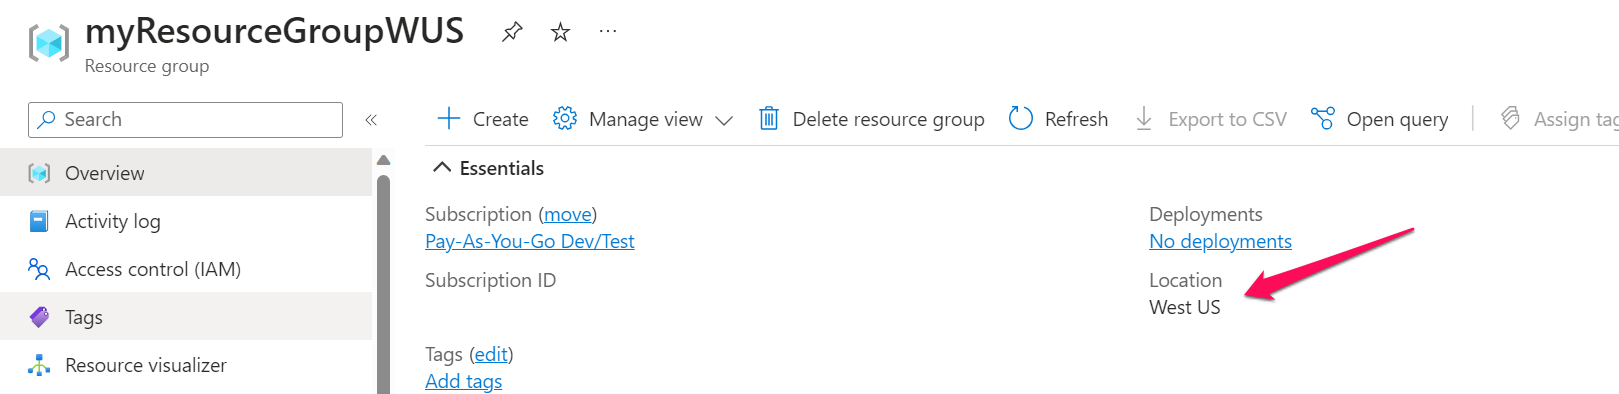
And just like that, we’ve used the same Bicep template to deploy resources to different locations! This demonstrates the power of parameters – they allow us to reuse our code while still maintaining flexibility in our deployments.
The Power of Parameterization
By parameterizing our Bicep template, we’ve gained the ability to:
- Deploy resources consistently across different environments
- Quickly adapt to changing requirements (like needing to deploy to a new region)
- Reduce errors by eliminating the need to manually edit our template for each deployment
This flexibility is a key benefit of using Infrastructure as Code, and it’s why parameters are such an important feature in Azure Bicep.
Tips for Parameter Best Practices
As you start working with parameters in your Azure Bicep templates, here are a few key tips to keep in mind:
1. Use Clear Names
Choose parameter names that explain what they’re for. It’ll make your code easier to understand later.
param resourceGroupName string // Clear and descriptive
param name string // Less clear
2. Use Default Values Wisely
For parameters that usually stay the same but might need to change sometimes, use default values.
param location string = 'australiaeast' // Good if you usually deploy to Australia East
3. Keep Sensitive Info Secure
For sensitive data like passwords, use the @secure() decorator. This helps keep your information safe.
@secure()
param databasePassword string
4. Add Descriptions
Use the @description() decorator to explain what each parameter is for. Your future self (and your teammates) will thank you!
@description('The name of the environment. This will be used to name the resources in Azure.')
param environmentName string
5. Don’t Overdo It
Not everything needs to be a parameter. Use them for values that are likely to change between deployments.
By following these simple tips, you’ll create Bicep templates that are easier to understand and use. Remember, the goal is to make your code clear and flexible. As you get more comfortable with Bicep, you can explore more advanced parameter features.
Wrapping Up: Your Bicep Parameters Journey
Well, there you have it! We’ve taken quite a journey through the world of Azure Bicep parameters. Let’s quickly recap what we’ve covered:
- We learned what parameters are and why they’re so useful in Infrastructure as Code.
- We explored how to define parameters in Azure Bicep, including setting default values.
- We put our knowledge to work by creating a flexible resource group deployment template.
- We deployed our parameterized template to different locations, showcasing the power of parameters.
- Finally, we covered some simple best practices to keep your Bicep code clean and effective.
Remember that mysterious squiggly line from our first article? Look at you now, writing clean, flexible Bicep code that makes that squiggly line disappear!
What’s Next?
Now that you’ve got a handle on parameters, you’re well on your way to creating more flexible and reusable Bicep templates. But our Azure Bicep journey is far from over!
In our next article, we’ll be diving into another powerful feature of Bicep: Variables. While parameters let us input values from outside our template, variables help us work with values within the template itself. They’re another key tool in making your Bicep code more efficient and easier to read.
Until next time. See you in the next article where we’ll unravel the mystery of Bicep variables
About the Author:
Ahmed Muhi is an Auckland-based cloud consultant with a deep-rooted background as a network architect. Guiding Clients in their Cloud Journey to both AWS and Azure. Specializing in Azure solutions, Ahmed’s professional journey of over 15 years is fuelled by a relentless passion for learning new skills and technologies, particularly around Cloud-Native, Networking, and Security technologies within the Azure platform .
.
When he’s not guiding clients through the intricacies of the Cloud, Ahmed loves to create content. His blog and YouTube channel (https://www.youtube.com/@iamachs/) 
 serve as platforms where he shares his knowledge and experiences. Ahmed volunteers his time to running the Aotearoa Azure Meetup, and he also co-hosts “Azure All Stars,” a podcast aimed at illuminating the efforts of those in the Azure world and fostering inspiration among newcomers.

Apart from being a cloud enthusiast, Ahmed loves to clear his mind with a good run 
Reference:
Muhi, A. (2023). Getting to understand Azure Bicep Parameters. Available at: https://www.iamachs.com/p/azure-bicep/part-2-understand-parameters [Accessed: 3th July 2024].


 Using a SharePoint Online list as a Knowledge source via ACTIONS in Copilot AI Studio
