In the first post in this series – a post titled Fabric Data Factory Design Pattern – Basic Parent-Child – I demonstrated one way to build a basic parent-child design pattern in Fabric Data Factory by calling one pipeline (child) from another pipeline (parent). In the second post, titled Fabric Data Factory Design Pattern – Parent-Child with Parameters, I modified the parent and child pipelines to demonstrate passing a parameter value from a parent pipeline when calling a child pipeline that contains a parameter. In the third post, titled Fabric Data Factory Design Pattern – Dynamically Start a Child Pipeline, I modified the original parent pipeline, adding a pipeline variable to dynamically call the child pipeline using the child pipeline’s pipelineId value.
In this post, I modify the dynamic parent pipeline from the previous post to explore calling several child pipelines that may be called by a parent pipeline. In this post, we will:
- Clone the child pipeline (twice)
- Copy the cloned child pipeline id values
- Clone the dynamic parent pipeline from the previous post
- Add and configure a pipeline variable for an array of child pipeline ids
- Add and configure a ForEach
- Move the “Invoke Pipeline (Preview)” activity
- Configure the “ForEach”
- Configure the “Invoke Pipeline (Preview)” Activity to Use “ForEach” Items
- Test the execution of a dynamic collection of child pipelines
Clone the Child Pipeline (Twice)
If you’ve been following our demonstrations in this series, please connect to Fabric Data Factory and find the “child-1” pipeline in the “wsPipelineTest” workspace. If you haven’t been following along, we can still be friends. You can find where we created the “wsPipelineTest” workspace and the “child-1” pipeline in the earlier post titled Fabric Data Factory Design Pattern – Basic Parent-Child.
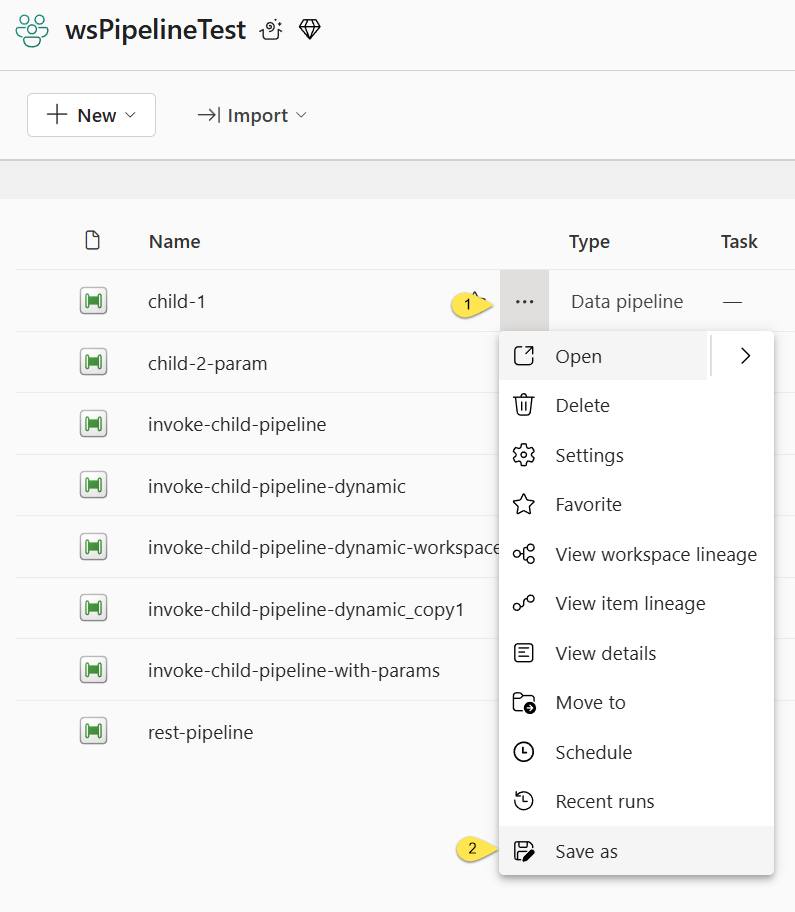
To clone the first child pipeline: connect to Fabric, sign in, enter the Data Factory capacity, and then open the “wsPipelineTest” workspace created in an earlier post.
- Click the ellipsis beside the “child-1” pipeline
- Click “Save as”:
When the “Save as” dialog displays,
- Name the cloned pipeline “child-2”
- Click the “Save” button.
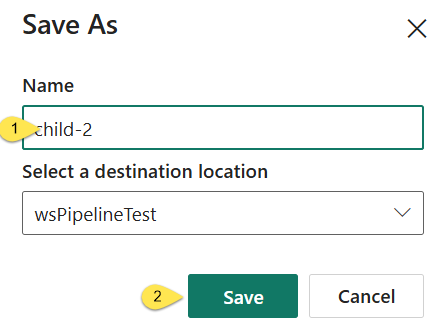
Repeat these steps to clone the second child pipeline named “child-3” from the “child-1” pipeline.
Copy the Cloned Child Pipeline ID Values
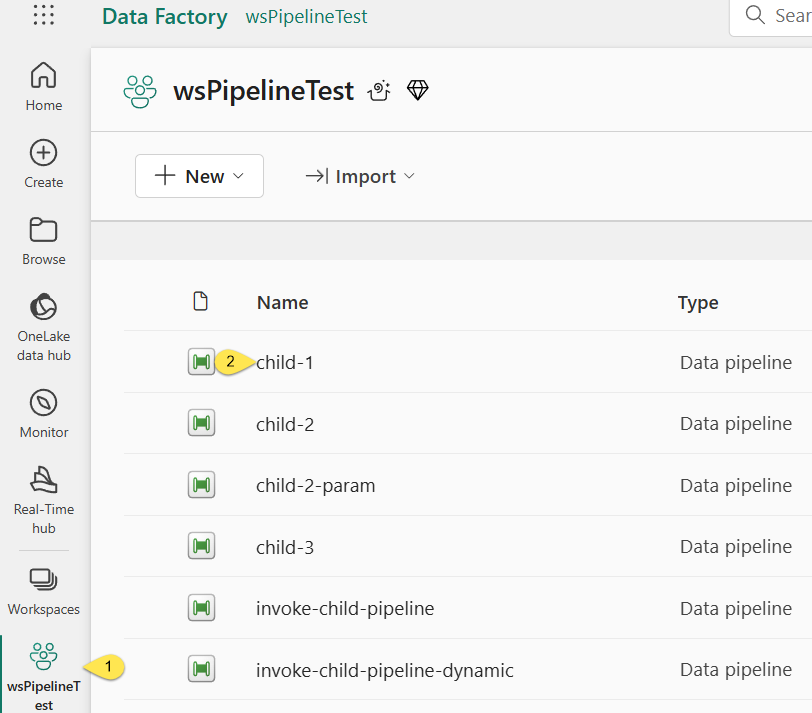
Since we will be dynamically calling three child pipelines in this demonstration, we need to obtain the pipelineId values for the “child-1” pipeline and the freshly-cloned child pipelines. We’ll begin with the “child-1” pipeline’s pipelineId value. Repeat the process for the “child-2” and “child-3” pipelines.
- Click on the “wsPipelineTest” workspace in the left menu
- Click on the “child-1” pipeline link:
When the “child-1” pipeline displays,
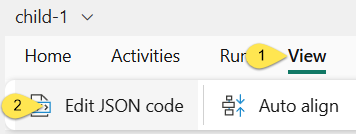
- Click the “View” tab
- Click “Edit JSON code”:
When the “Edit JSON code” dialog displays,
- Highlight the JSON “objectId” property (listed beneath the pipeline “name” JSON property) value
- Right-click the “objectId” property value and then click “Copy”:
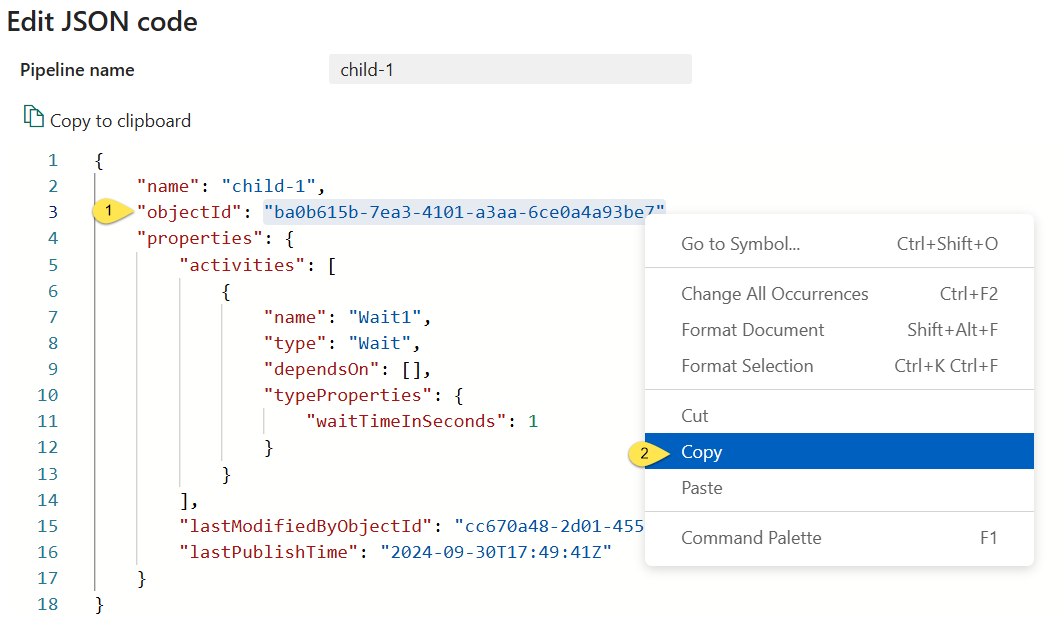
The “objectId” property value should now be on your clipboard. For each child pipeline Id value, you will need to paste this value into a text editor (like Notepad) for safe keeping until you need them (later in this post).
Close the “Edit JSON code” dialog.
Repeat the process to acquire and store each child “pipelineId” (“objectId”) property value. When I finish capturing the “pipelineId” values for my child pipelines, my Notepad appears:

Clone a Parent Pipeline
Revisit the “wsPipelineTest” workspace.
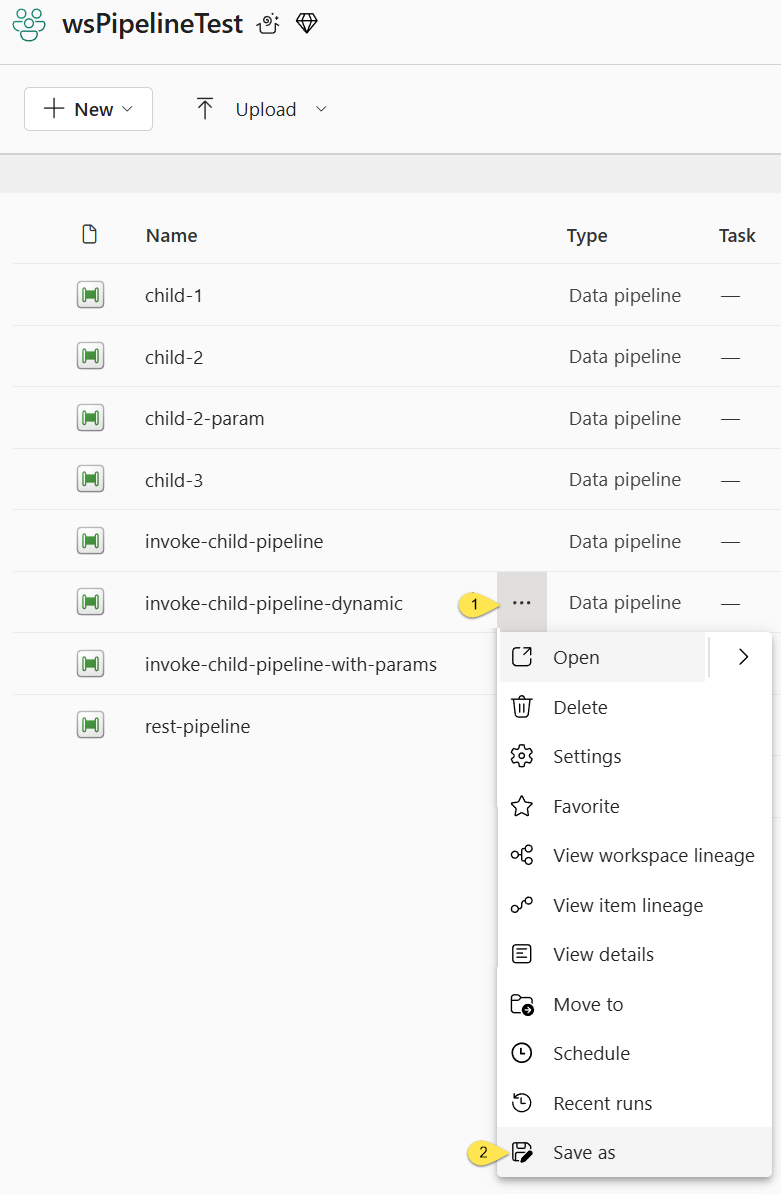
- Click the ellipsis beside the “invoke-child-pipeline-dynamic” pipeline (from the previous post titled “Fabric Data Factory Design Pattern – Dynamically Start a Child Pipeline“)
- Click “Save as”:
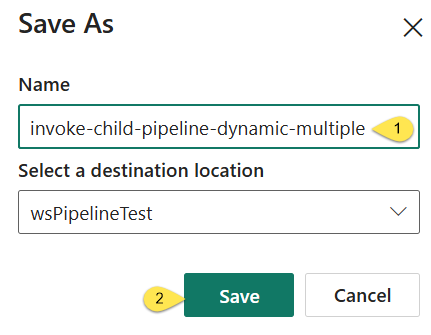
When the “Save as” dialog displays,
- Rename the cloned pipeline “invoke-child-pipeline-dynamic-multiple”:
- Click the “Save” button:
Add and Configure a Pipeline Variable for an Array of Child Pipeline Ids
When the “invoke-child-pipeline-dynamic-multiple” pipeline displays,
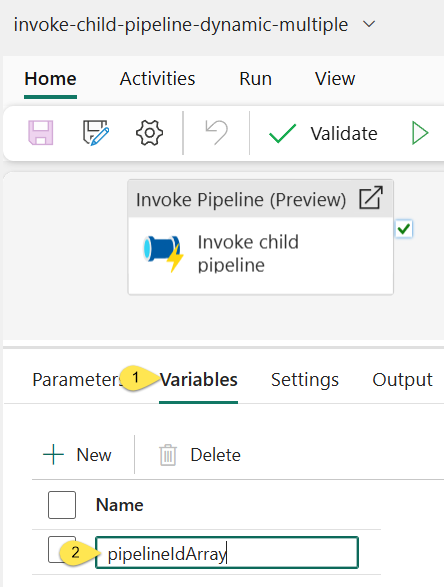
- Click the “Variables” tab
- If you’ve been following our demonstrations in this series, edit the variable named “pipelineId” – setting the “Name” property value to “pipelineIdArray”
Arrays in Data Factories
I learn stuff from other people all. the. time.
As member of a much larger data community, I feel obligated to give credit where credit is due.
Disclaimer: I do not always remember the individual from whom I learn stuff. In this case, I remember that I learned about arrays in data factories from Rayis Imayev‘s (excellent) blog post titled “Working with Arrays in Azure Data Factory.” You should check out Rayis’ post – and his blog – to learn more about arrays and other cool stuff in data factories.
In Azure Data Factory and Fabric Data Factory, arrays in default value fields are represented as text values enclosed in square brackets (“[value1,value2,…]”). Returning to Notepad, which contains the “pipelineId” property values from the child pipelines I wish to dynamically call, I may construct the default value for the “pipelineIdArray” variable by following these steps:
- Copy the “child-1” pipeline Id value, paste it below my list of pipeline Id values, and then append a comma (“,”)
- Copy the “child-2” pipeline Id value, paste it after the comma that follows the “child-1” pipeline Id value, and then append a comma (“,”)
- Copy the “child-3” pipeline Id value, and then paste it after the comma that follows the “child-2” pipeline Id value
- Add an opening square bracket (“[“) at the beginning of the list of pipeline Id values, and then add a closing square bracket (“]”) at the end of the list of pipeline Id values:

Return to the “invoke-child-pipeline-dynamic-multiple” pipeline editor.
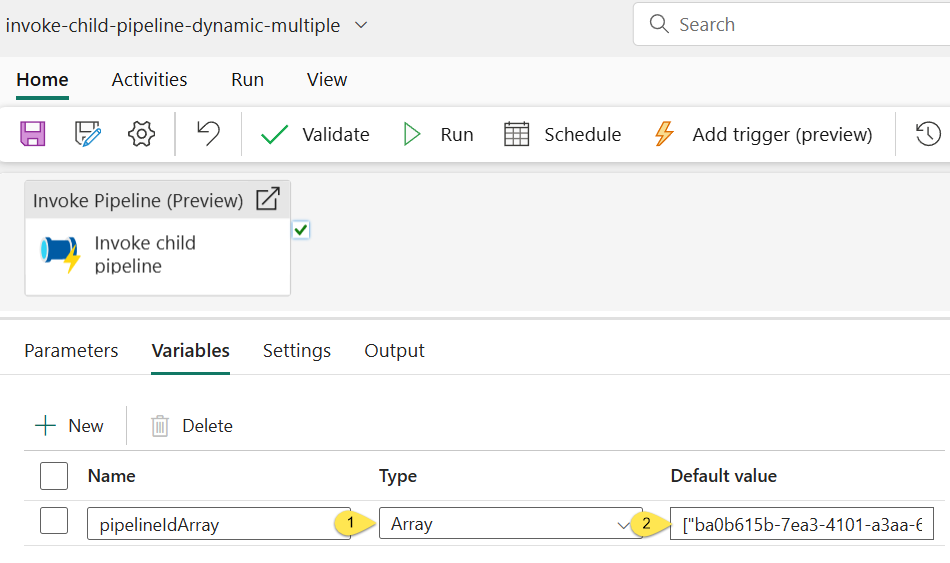
- Make sure the new “pipelineIdArray” variable’s “Type” property is set to “Array” (If you recall, “String” is the default Type)
- Copy the new array value constructed in Notepad and paste that value into the new “pipelineIdArray” variable’s “Default value” property:
Add and Configure a ForEach
To add a “ForEach” to the “invoke-child-pipeline-dynamic-multiple” pipeline,
- Click on the Activities tab
- Click the “ForEach” icon:

Note there is no need to click-and-drag activities onto the Fabric Data Factory surface (as we do when adding activities to Azure Data Factory pipelines).
Move the “Invoke Pipeline (Preview)” Activity
When the ForEach displays,
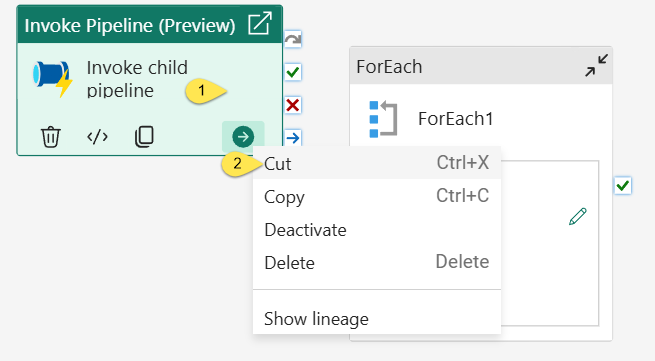
- Right-click the existing “Invoke Pipeline (Preview)” activity
- Click “Cut”:
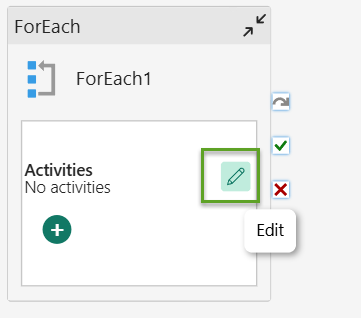
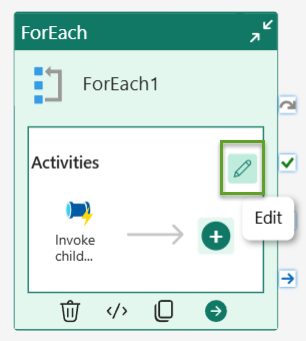
In the “Activities” block of the “ForEach”, click the “Edit” icon (you may have to click the icon twice – first to select the “ForEach”, and again to click the icon – to open the “Activities” editor):
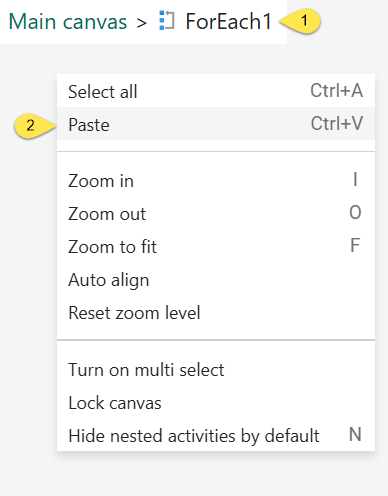
- Right-click inside the “ForEach” Activities, which is labeled “Main canvas > ForEach1” by breadcrumbs at the top of the pipeline editor surface
- Click “Paste”:
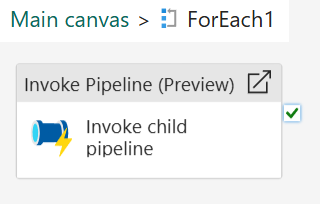
The “Invoke Pipeline (Preview)” activity is pasted into the “Activities” in “Main canvas > ForEach1”:
Configure the “ForEach”
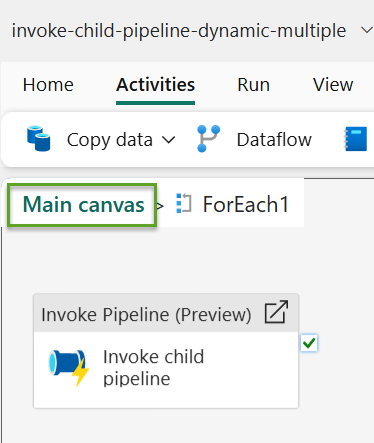
Click “Main canvas” in the breadcrumbs to return to the “invoke-child-pipeline-dynamic-multiple” pipeline’s main canvas:
Once the “invoke-child-pipeline-dynamic-multiple” pipeline’s main canvas displays,
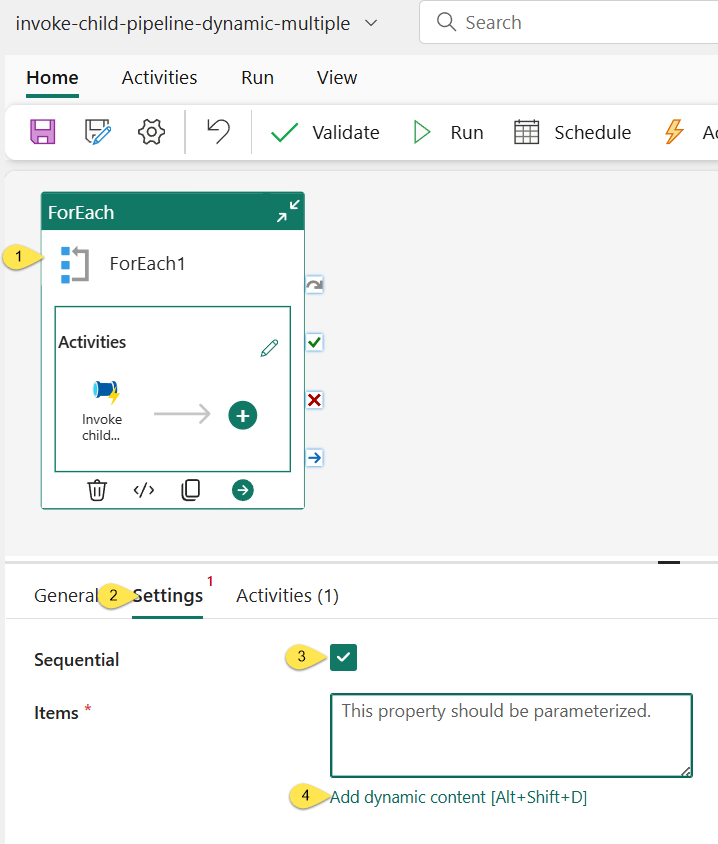
- Click on the “ForEach”
- Click the “Settings” tab
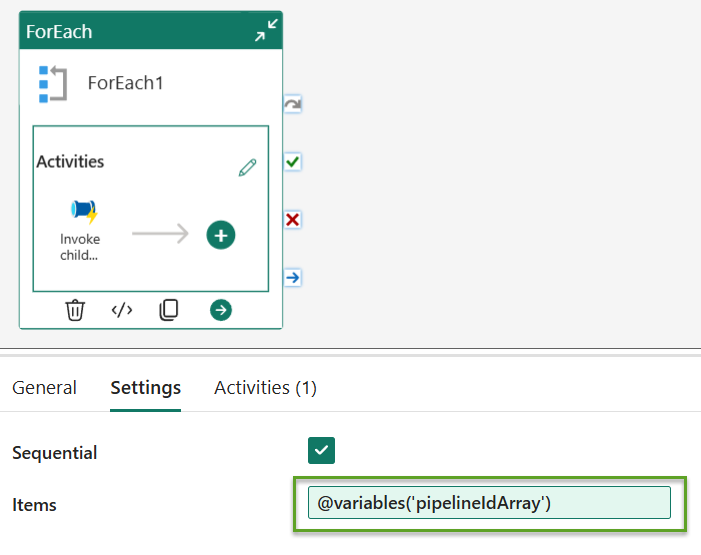
- For the purposes of this demonstration, set the “Sequential” property to true by checking the “Sequential” property checkbox. The “Sequential” property will ensure the “pipelineId” values in the “pipelineIdArray” variable (that we are about to configure) will be consumed in the order in which they appear in the array.
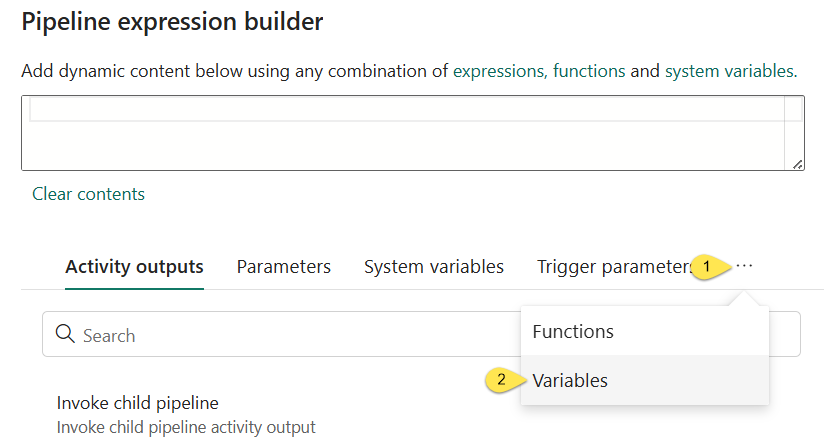
- Click inside the “Items” value textbox and then click the “Add dynamic content [Alt+Shift+D]” link to surface the “Pipeline expression builder” blade:
- Click the tabs ellipsis
- Click “Variables” to open the “Variables” tab:
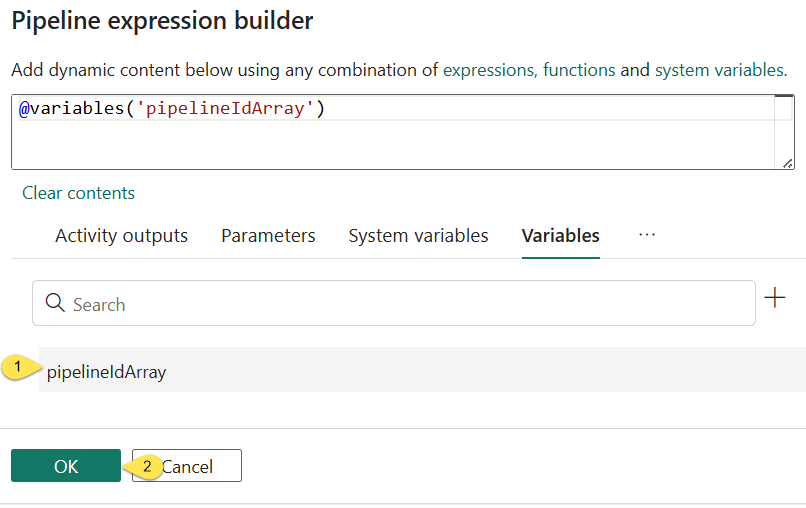
When the “Variables” tab displays,
- Click the “pipelineIdArray” variable to set the Pipeline expression value to “
@variables('pipelineIdArray')“ - Click the “OK” button to save the expression to the “Items” property value of the “ForEach”:
The “Items” property displays the value “@variables('pipelineIdArray')“:
Configure the “Invoke Pipeline (Preview)” Activity to Use “ForEach” Items
Click the Activities edit icon to open the “ForEach” activities editor:
When the “ForEach” activities editor opens,
- Click the “Invoke Pipeline (Preview)” activity
- Click the “Settings” tab:
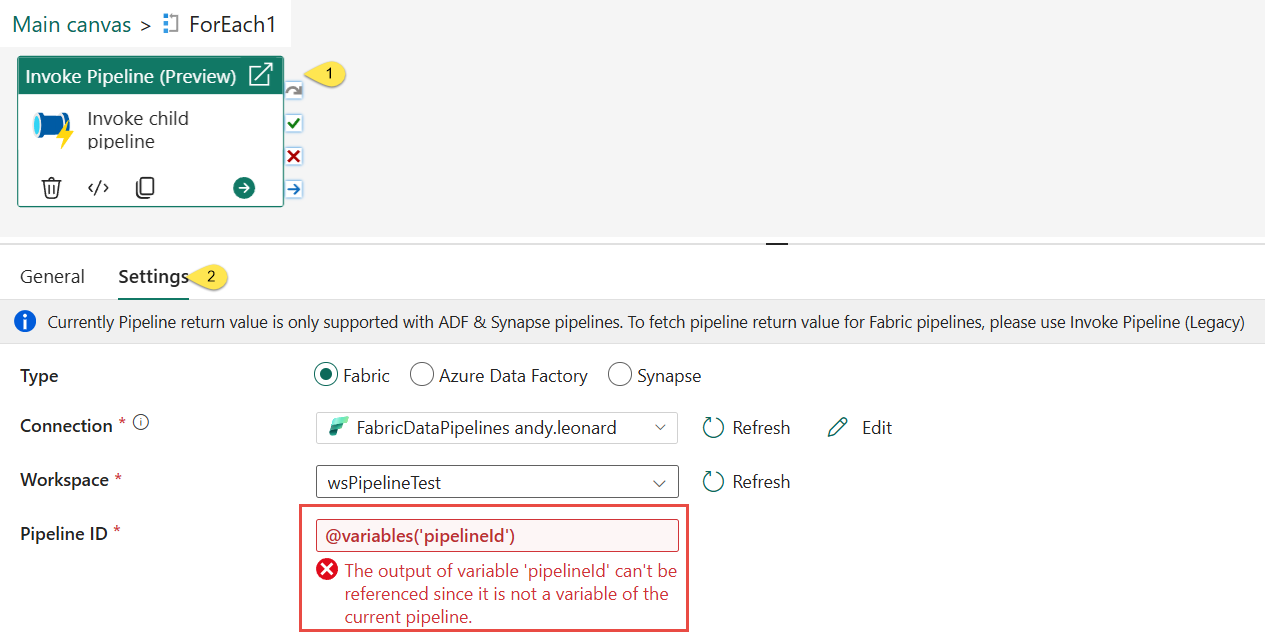
Note the expression from the previous version of the pipeline now displays an error.
Why?
Earlier, we renamed the pipeline variable named “pipelineId”, changing it to “pipelineIdArray”. The error message is accurate:The output of variable 'pipelineId' can't be referenced since it is not a variable of the current pipeline.
Click the “Pipeline ID” property value textbox – the textbox that now contains the (errant) expression “@variables('pipelineId')” to open the “Pipeline expression builder” blade.
When the “Pipeline expression builder” blade opens, click the “Clear contents” link to clear the expression displayed in the expression value textbox:
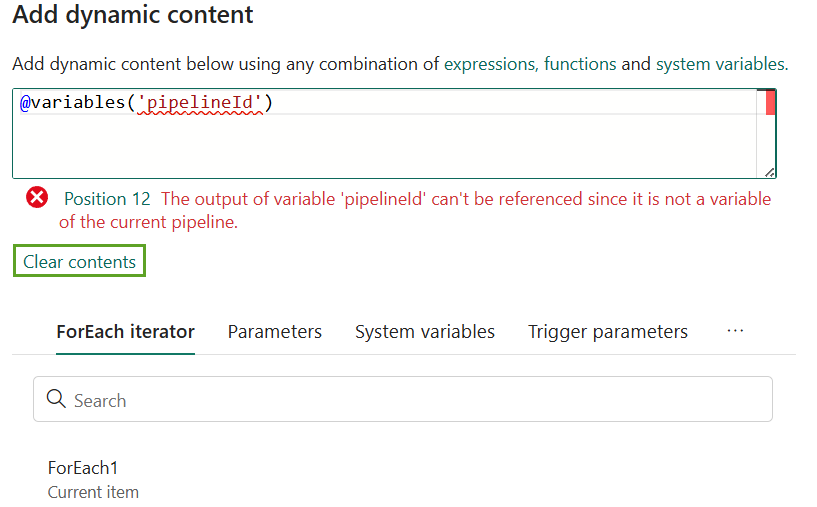
Expressions are validated at design-time. The design-time validation now raises a new error; “Please specify an expression” because the expression textbox has been cleared and now contains no expression:
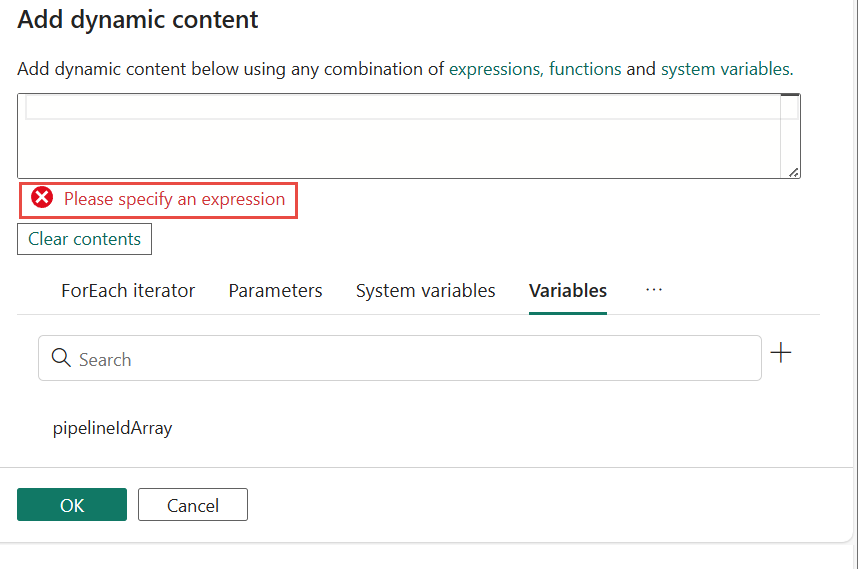
- Click “ForEach1 Current item” to set the expression value to “
@item()“ - Click the “OK” button to close the “Add dynamic content” blade:
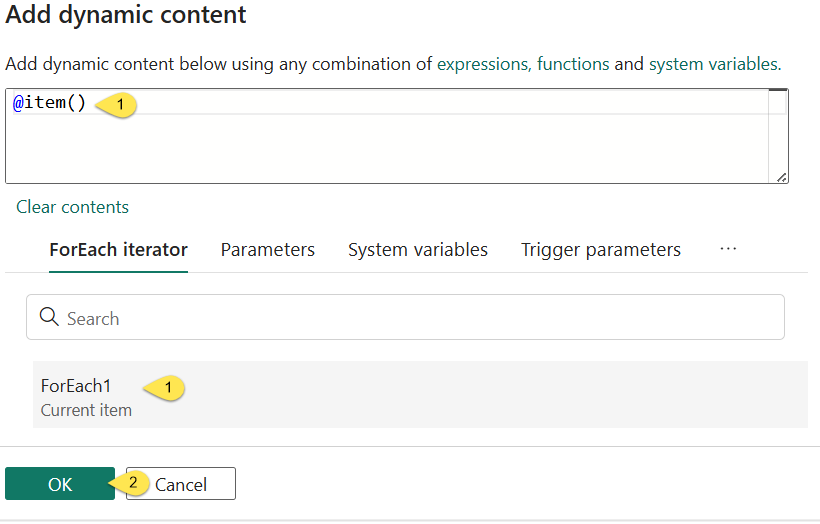
During pipeline execution, the “ForEach” activity’s current item – @item() – will now be passed to the “Invoke Pipeline (Preview)” activity’s “Pipeline ID” property value:
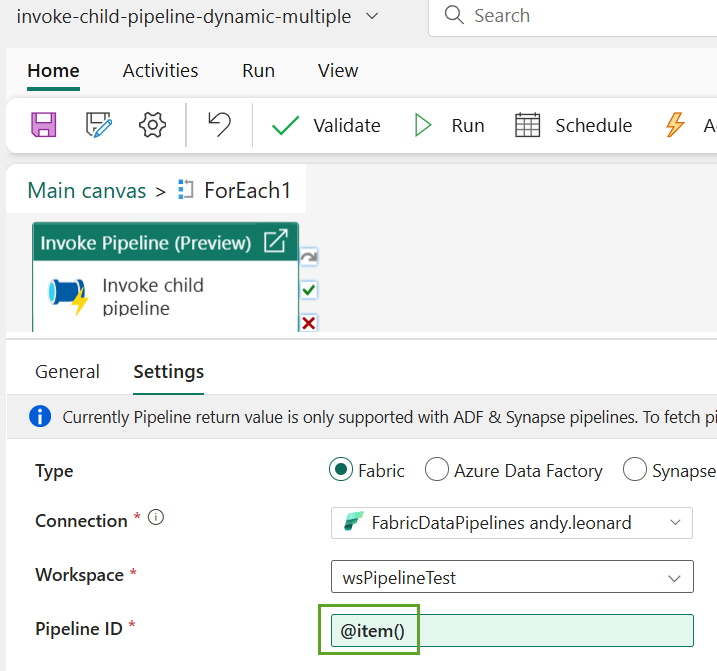
If you recall, we configured the “ForEach” activity “Items” property using a dynamic expression. The expression dynamically sets the “ForEach” activity’s “Items” property to the contents of the pipeline variable named “pipelineIdArray”.
As the “ForEach” iterates, the current “ForEach” item – @item() – will be loaded with a new value from the “pipelineIdArray” variable configured in the “ForEach” activity’s “Items” property.
Test the Execution of a Dynamic Collection of Child Pipelines
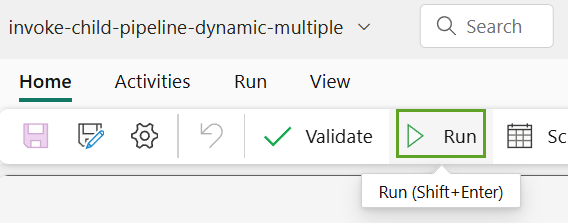
Let’s test-execute this puppy. Click the “Run” button to take it out for a test drive:
If all goes as hoped and planned, the test-execution succeeds:
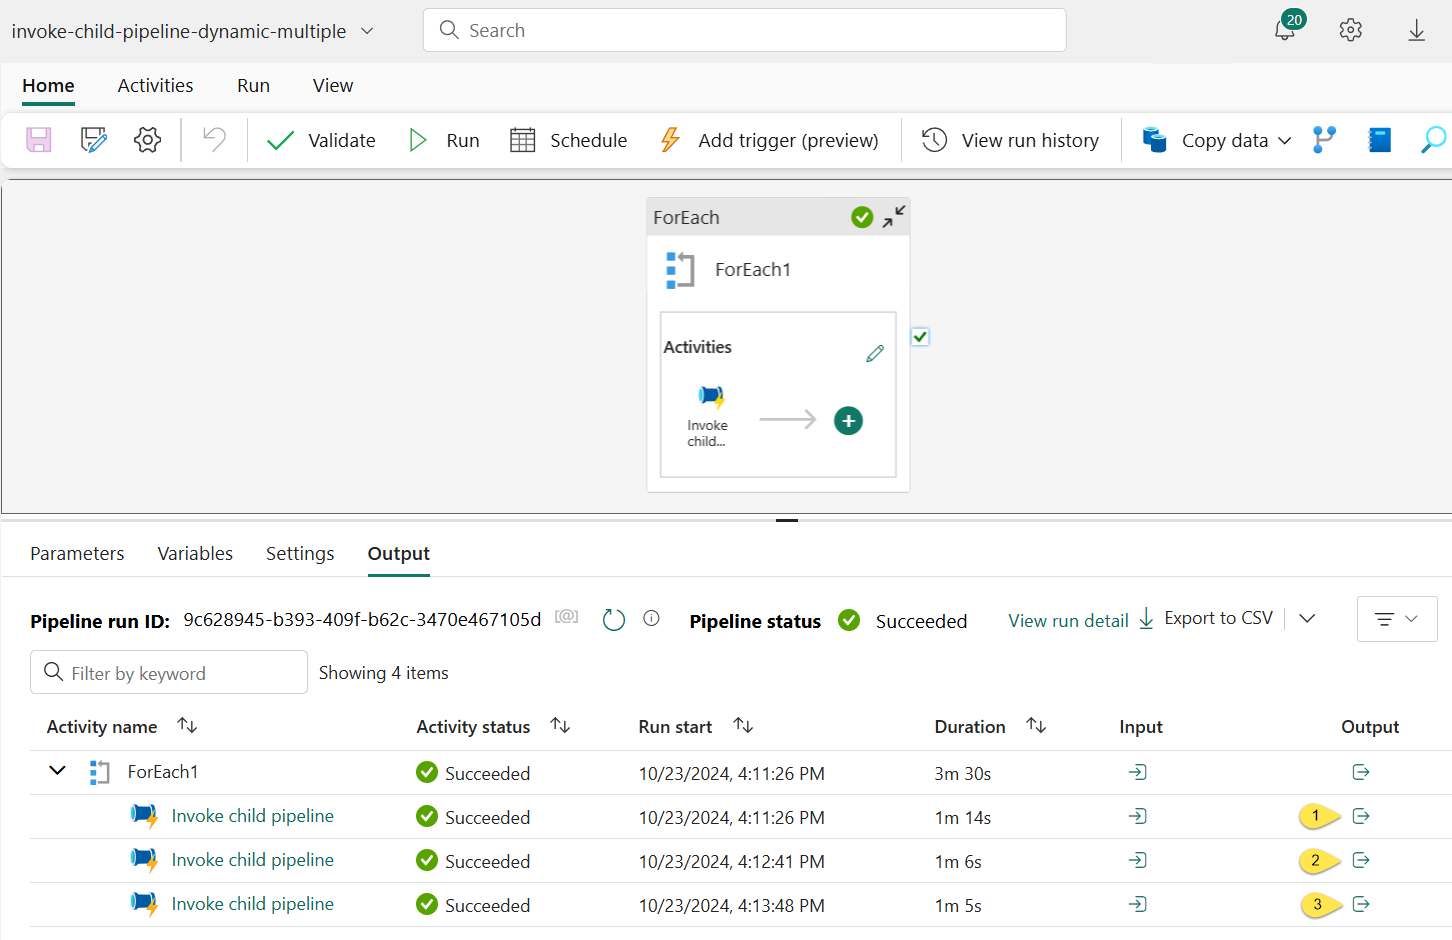
Click each Output (labeled 1, 2, and 3) to view the Output dialog (here, I click the first in the list, the Output icon labeled “1” in the image above):
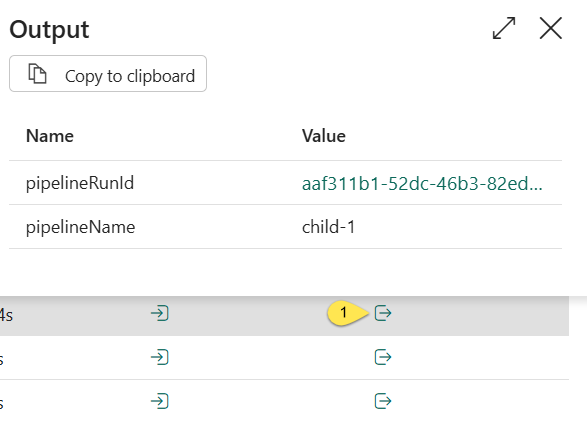
Clicking the “pipelineRunId” value link opens the “Monitoring hub” for the test-execution of the “child-1” child pipeline: 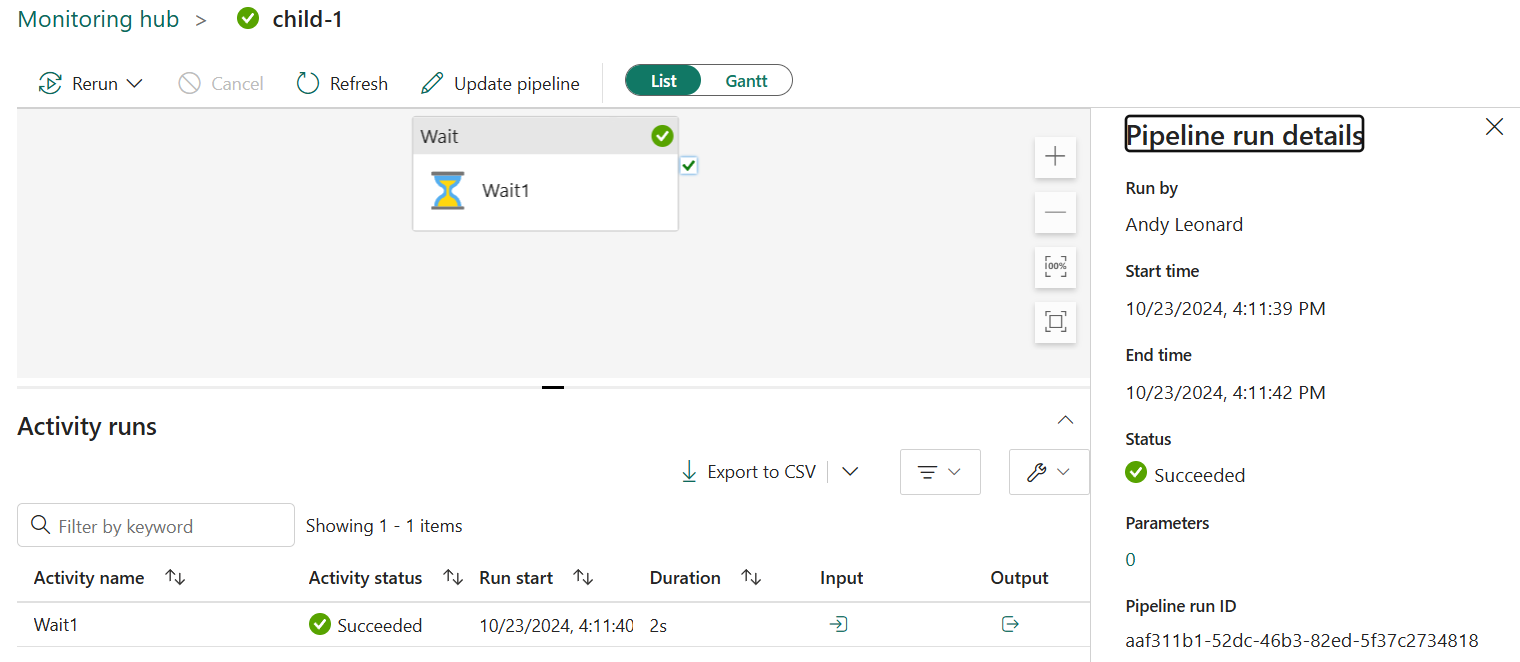
Click “Monitor” on the left menu to view the latest executions:

The latest data pipelines executed are (in execution order):
- invoke-child-pipeline-dynamic-multiple
- child-1
- child-2
- child-3:
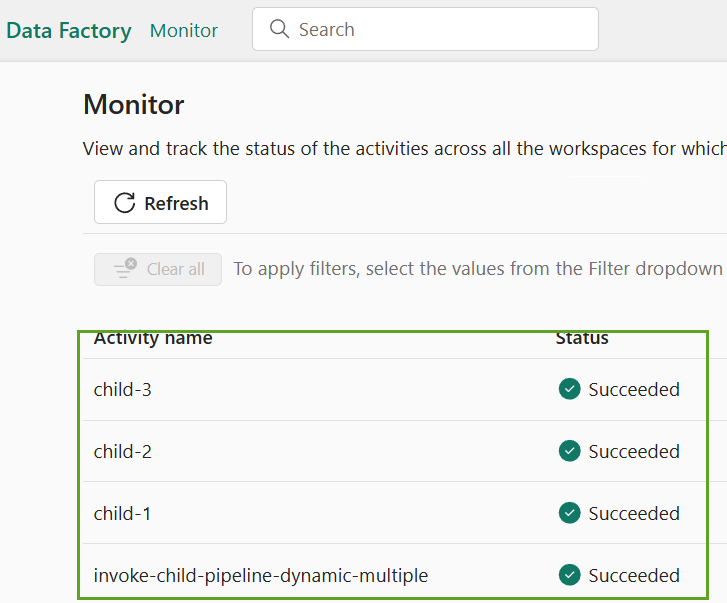
“Monitor” displays the latest execution first.
As hoped, the text-execution was successful.
About the Author:
Andy Leonard
I write books about data technology, SSIS, and Azure Data Factory. I deliver data integration training and consulting. I specialize in SSIS, Azure Data Factory (ADF), and Azure-SSIS. I lead an awesome team at Enterprise Data & Analytics. Reach me at Andy.Leonard@EntDNA.com.
Reference:
Leonard, A (2024). Fabric Data Factory Design Pattern – Dynamically Start a Collection of Child Pipelines. Available at: Fabric Data Factory Design Pattern – Dynamically Start a Collection of Child Pipelines – AndyLeonard.blog() [Accessed: 04th November 2024].


