How do you develop a python library in Microsoft Fabric while maintaining the full ability to test code prior to packaging?
This topic is something that I’ve been challenged with for the last year and the internet, community, ChatGPT, etc., no once is talking about it, therefore, for the longest time I didn’t even think it was possible.
Note, for this blog I’ll be focusing on Python, however many of the same concepts apply to building Scala libraries, the only functional difference is how the library is ultimately packaged into a JAR.
Why Package Code as Libraries?
Before I get into the how, let’s first understand why we might want to do this in the first place.
Libraries are essentially collections of packaged software. They quickly become the cornerstone of almost every programming language because they enable developers to encapsulate valuable code into reusable modules. By packaging code into libraries, developers can efficiently share and distribute their solutions within the community or their organization. This approach promotes consistency, enhances code reusability, and ensures that the code is delivered in a repeatable and testable manner, ultimately accelerating development processes and improving software quality.
Once a library is packaged, bringing potentially thousands of lines of complex and valuable code into your kernel of choice is as simple as a single line of code or a few clicks in the UI. In Fabric, we can accomplish this via a couple of methods depending on where the library is hosted.
PyPi (Open Source Python Library Repository)
%pip install <library_name>
Wheel File in OneLake Lakehouse
%pip install /lakehouse/<lakehouse_name>/Files/<wheel_file_name.whl>
Wheel File in Environment 
Wheel File in Builtin Notebook Files
%pip install /builtin/<wheel_file_name.whl>
Now, there are tons of open-source libraries out there which make data engineering easier (i.e., Pandas, Polars, NumPy, SQLAlchemy, Rich, etc.), but why would you want to package up organizational code? Honestly, for the same reasons that libraries like Pandas get packaged, just at more of a micro scale where the community of users you want to formalize a distribution of code to is your own business, team, or maybe you just want to make your own code more portable and reusable.
Some may wonder, why wouldn’t I just use %run <notebook name> or mssparkutils.notebook.run(<notebook name>)? These can be great methods to chain together a sequence of notebooks. However, there are many reasons why a packaged library could be ideal over the alternative:
-
Modularity and Reusability: Libraries allow you to modularize your code into well-defined functions and classes that can be reused across different notebooks and projects. This leads to more maintainable and organized code.
-
Version Control: With libraries, you can manage versions of your code more effectively. This makes it easier to track changes, roll back to previous versions, and ensure consistency across different environments.
-
Testing and Quality Assurance: Libraries can be thoroughly tested using standard testing frameworks before they are deployed. This ensures that the code is reliable and minimizes the risk of bugs when reused in different contexts.
-
Performance Optimization: Importing a library can be more efficient than running entire notebooks, as it avoids the overhead of executing the notebook cell-by-cell. This can lead to faster execution times.
-
Dependency Management: Libraries can declare their dependencies explicitly, making it easier to manage and resolve dependencies. This is particularly useful in complex projects with multiple interdependent components.
-
Documentation and Discoverability: Libraries often come with documentation that describes their functionality and usage. This makes it easier for other developers to understand and use the code, enhancing collaboration and knowledge sharing.
-
Encapsulation and Abstraction: Libraries encapsulate functionality, hiding the implementation details and exposing a clean API. This abstraction makes it easier to use the code without needing to understand its inner workings.
-
Scalability: As projects grow, maintaining and running large notebooks can become cumbersome. Libraries help in scaling your codebase by breaking it into manageable, independent modules.
-
Consistency and Best Practices: Libraries promote the use of consistent coding standards and best practices, which leads to higher-quality code and easier maintenance.
-
Distribution and Sharing: Libraries can be distributed and shared easily with others, either within your organization or publicly. This facilitates collaboration and enables others to benefit from your work.
Does a library take more work to develop and maintain? Yes, however, depending on the use case, it may be entirely worth it, and give you all of the above benefits which are lacking when using %run <notebook name> or mssparkutils.notebook.run(<notebook name>). That said, these other methods are fantastic for prototyping libraries and quickly allowing multiple notebooks to share common code or simply just stringing together a set of notebooks that need to run with defined dependencies.
Developing a Python Library for Fabric
There are many blogs out there which document how a Python library can be built locally, best practices, structure, etc. For this post, I’m going to focus on the uncharted area, specifically how this can all work in the context of a cloud-based Spark platform, in this case, Microsoft Fabric.
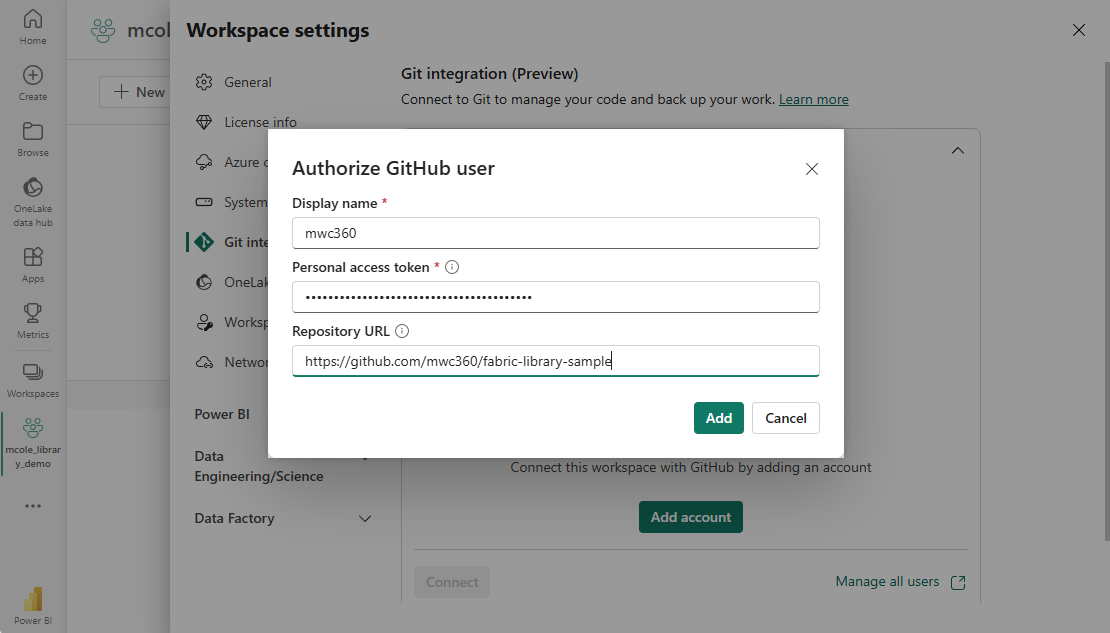
Enabling GIT Integration
Before we start building the library, it’s not a bad idea to start with connecting your Fabric Workspace to a GIT repo. We will need this later on to package up our library, so we may as well start with a connected workspace. I’m using GitHub, but you can of course use Azure DevOps instead.
Developing the Library
To build a library we will need the ability to store various different text based files in Fabric such as:
-
Source Code Files: These are typically Python files (.py) containing the actual code for your library. Each module or class in your library would be written in these text files.
-
Configuration Files: These might include files like setup.py for defining the setup script, requirements.txt for listing dependencies, and possibly pyproject.toml for specifying project metadata and build requirements. These files are also text-based and contain configuration information in plain text.
-
Documentation Files: Documentation for your library, such as README files (README.md or README.rst), are text files that provide information on how to install, use, and contribute to the library.
-
License Files: If you are distributing your library, you might include a license file (LICENSE), which is a text file specifying the terms under which the library can be used and distributed.
-
Test Files: These include unit tests and other test scripts, typically written in Python (.py) or other text-based formats depending on the testing framework used.
-
Manifest Files: These might include MANIFEST.in, which is a text file used to include or exclude files from the distribution package.

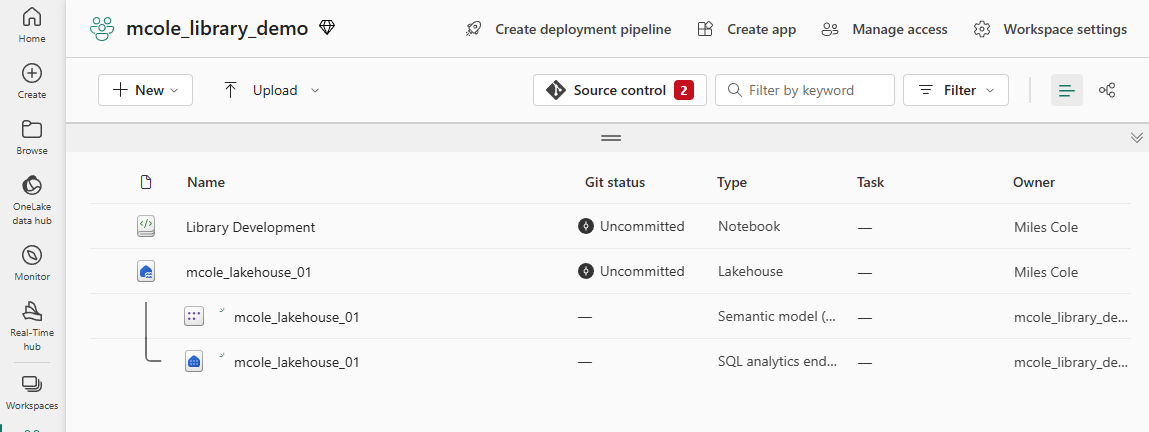
In addition to creating a new Notebook I’ve also created a Lakehouse and set it as the default Lakehouse on the Notebook.
Having an attached Lakehouse is required to run a Notebook since the Spark Session needs a Lakehouse for temporary file storage.
While we can see the Built-in resources in the Fabric UI, we need a way to interactively edit files and run our notebook to import and test the library. This currently isn’t possible in the Fabric UI, however, there’s a beautiful application called VS Code. Everyone knows and loves VS Code, and the Fabric product team has clearly taken note. VS Code is tightly integrated into Fabric so that you can develop your notebooks in VS Code, either on the web or locally.

Now that we are in the VS Code web editor, we can now edit files that are in the Built-in resources, which is critical for agile library development.
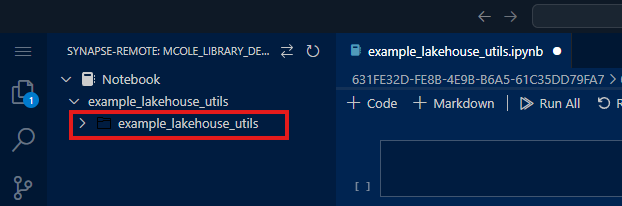
For this sample, I’m going to build a simple library called example_lakehouse_utils that has a couple of functions used to recursively and efficiently collect file metrics on a folder directory. I frequently use this type of function to collect stats on various data engineering processes, such as identifying the impact of various Parquet compression and distributed write algorithms.
I’ve started by creating a folder to be the root directory of my library called example_lakehouse_utils.
Folders should be named without spaces or dashes. We’ll see later that the folder structure directly corresponds to how we can import the code into our Notebook for testing. Using spaces or dashes will result in the
importcommand failing.
Next, I would create a Python file and start defining my functions. However, the Add Resource File button in the VS Code web editor only allows for importing a file from your computer. Rather than creating a file locally and importing it, we can quickly create a file programmatically using mssparkutils. VS Code Desktop does support directly creating a file.
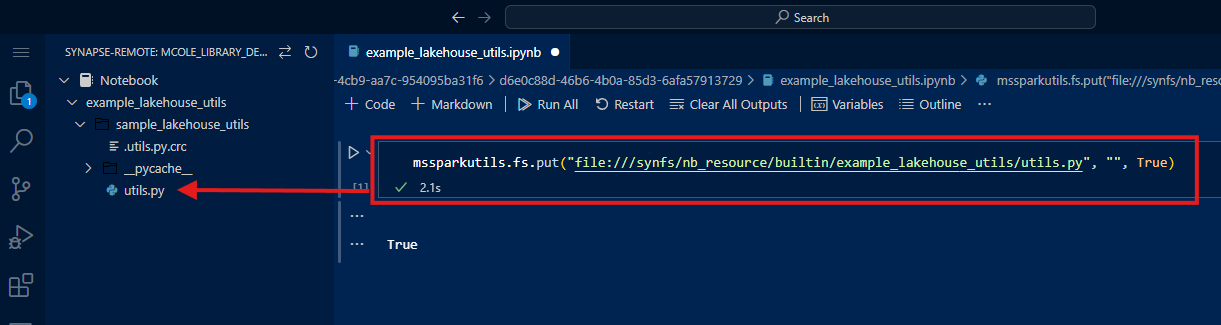
mssparkutils.fs.put("file:///synfs/nb_resource/builtin/<folder_path>/<file_name>", "", True)
Now we can click the Open Resource in Browser icon next to the newly created file and even enable split tab view to see and edit the files at the same time. I prototyped my code in the Notebook editor and then pasted it into the utils.py file.
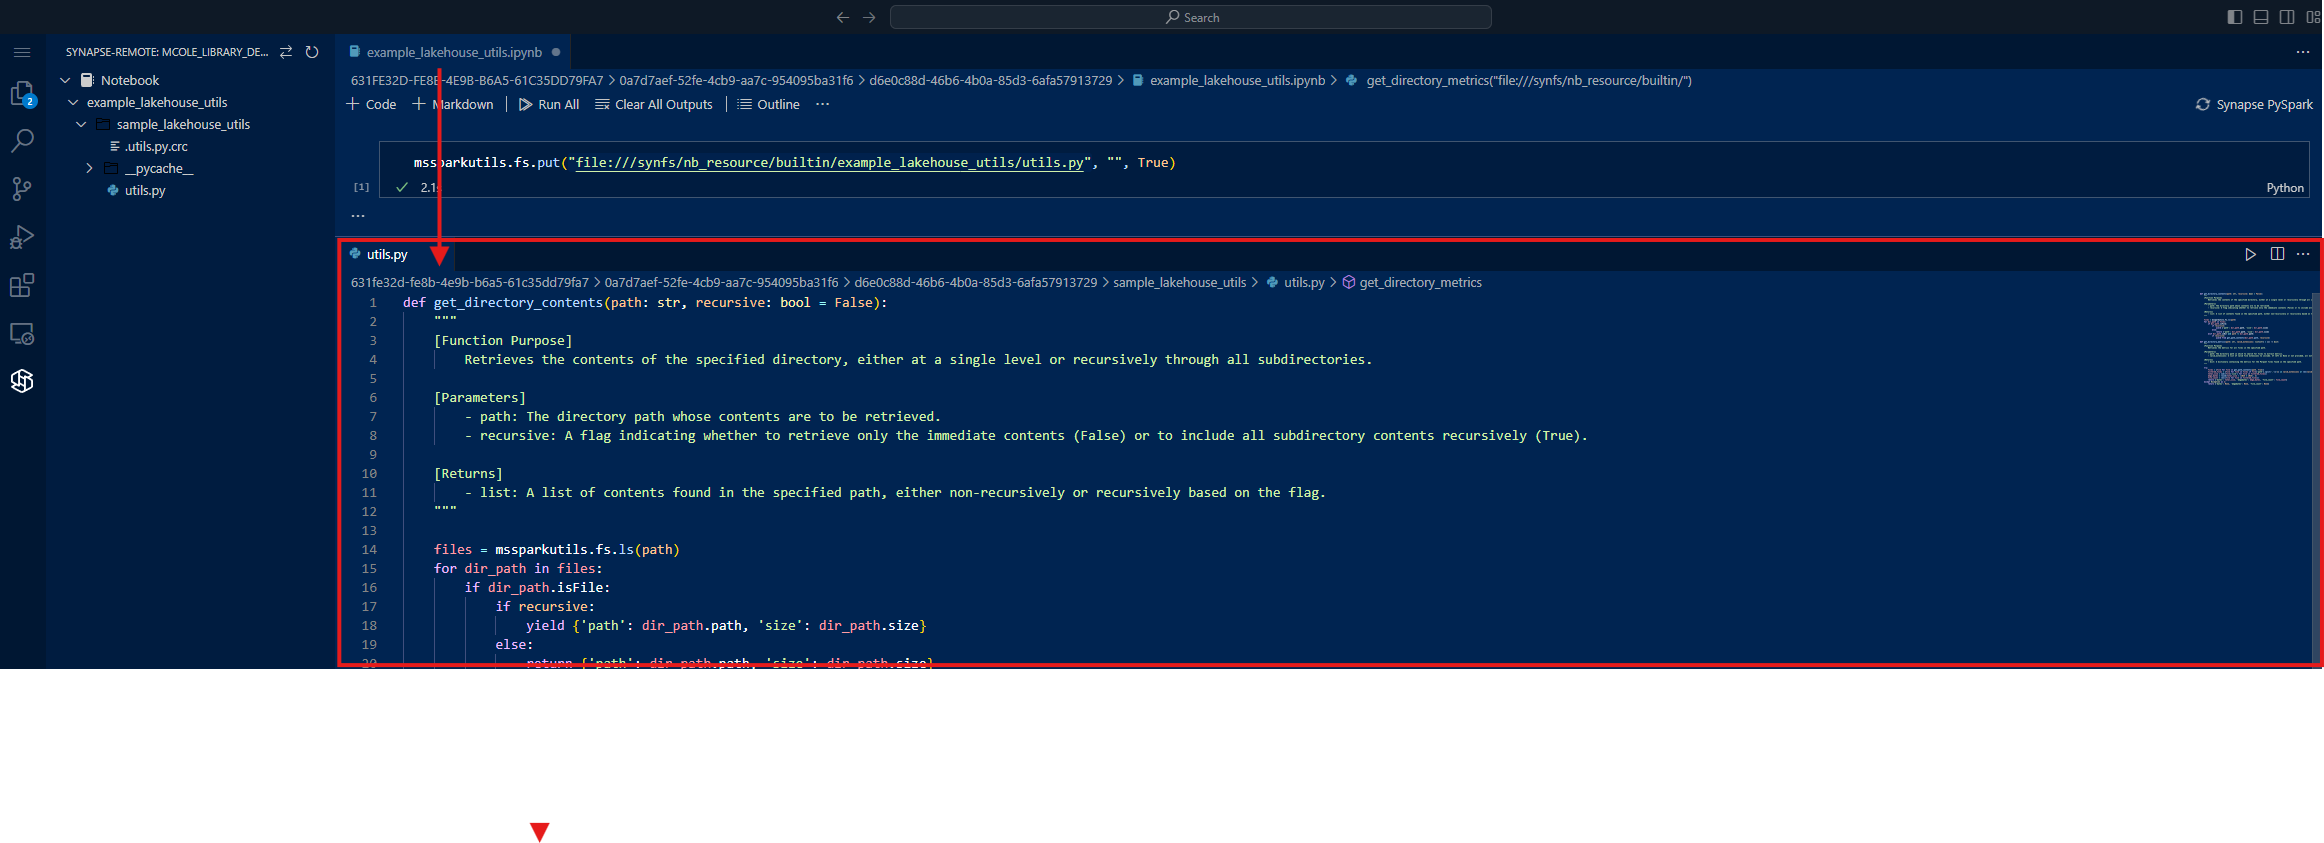
Now I can test if the code can be successfully imported as a module and run before I package it up as a formal distribution of the library (Python wheel file).
To import the module, use dot notation to drill down through the folders of your Built-in resources.
import builtin.example_lakehouse_utils.utils as utils
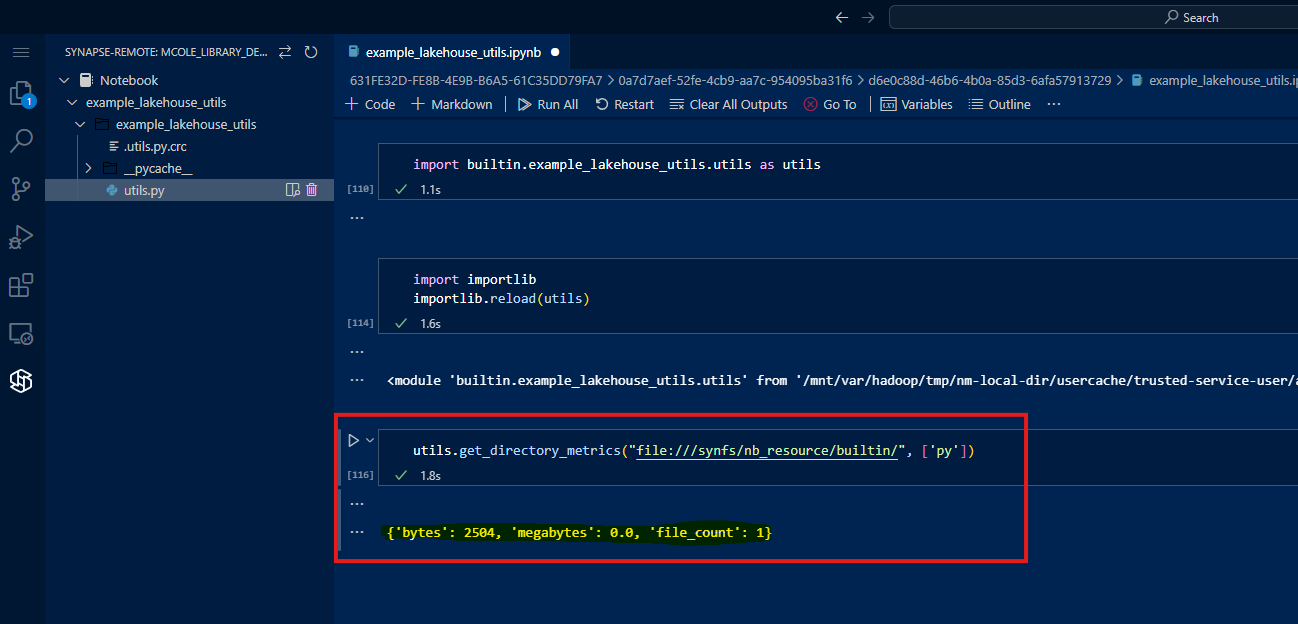
Now I can call one of my functions via the utils alias.
utils.get_directory_metrics("file:///synfs/nb_resource/builtin/")
Running this code gives me a perplexing error:
NameError: name ‘mssparkutils’ is not defined
The code runs fine when I run it in my Notebook, but not when called via an imported module. This is of key importance in being able to test imported library modules in the runtime that they are designed for. My functions contain multiple references to mssparkutils. In a Jupyter notebook or interactive environment, certain objects like mssparkutils are automatically available in the global namespace. This is the same for dbutils in Databricks. However, when you move the code to a standalone script or a module, these objects are not automatically imported, leading to a NameError. We can fix this by adding the following lines of code to the top of our utils.py module to explicitly make them available.
from IPython.core.getipython import get_ipython
mssparkutils = get_ipython().user_ns.get("mssparkutils")
I updated my utils.py file and reran the import cell, but I still get the same error. This is because modules are cached after they are imported so that repeat import statements can import from the cache rather than having to load the module from the source repository again. To force the reload of the module from the source instead of the cache, we can add a cell with the following code into our Notebook.
import importlib
importlib.reload(utils)
This allows for specifying a specific module by name or alias to reload.
Now when I run the previously failing function, it succeeds because the module has been reloaded since the last code change.
To summarize the Library development process in the Notebook:
- Import your module(s) into the notebook (only required the first time a module is added to a Notebook session).
- Update the code in your module(s).
- Reload module(s) via
importlib.reload(<module name or alias>). - Call classes, methods, and functions of your module(s) to ensure everything works properly.
- REPEAT ^^^
Once we have things working, we could then commit our Fabric Item changes to GIT. 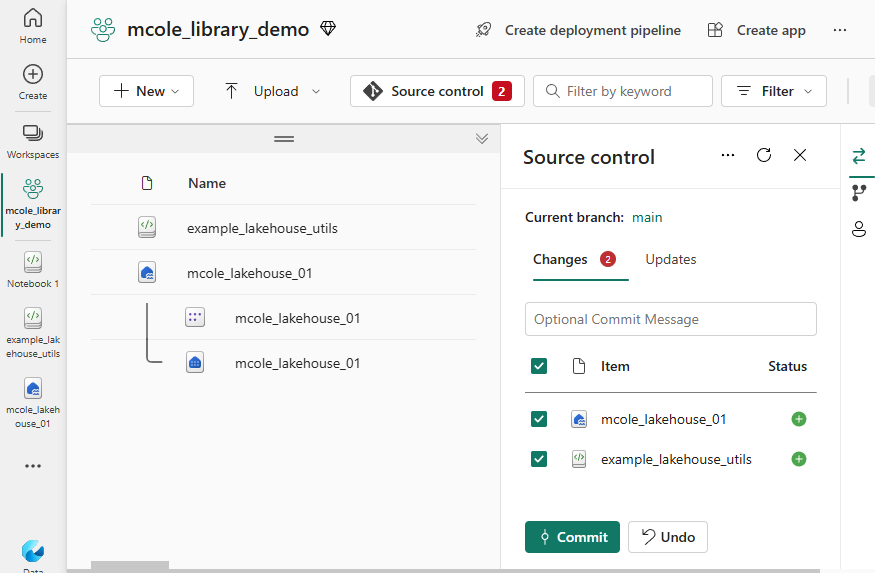
As of writing this post, you’ll notice that the Built-in resources (your library files) are not synced to the GIT provider. Until that time, you can open the Notebook in VS Code locally and package the library from there.
About The Author
I’m a Principal Program Manager at Microsoft, while a Spark specialist by role, I have deep knowledge and experience with everything lakehouse to data warehouse design, tuning, CI/CD automation, data modeling, visualization, and API development. I started off my career writing VB script to automate business processes and reporting then eventually Power BI was released and I quickly became shadow IT. After successfully implementing Power BI and starting a BI center of excellence, I was on-boarded into IT and given the opportunity of building my companies’ first cloud data warehouse. Now after dozens of implementations, I love to share what I’ve learned and talk modern data architectures.
Cole, M. (2024). Elevate Your Code: Developing Python Libraries Using Microsoft Fabric. Available at: Elevate Your Code: Developing Python Libraries Using Microsoft Fabric | Miles Cole [Accessed: 15th August 2024].


 Using a SharePoint Online list as a Knowledge source via ACTIONS in Copilot AI Studio
