Certificate-based authentication for Microsoft Graph PowerShell enables you to authenticate to Microsoft Graph and run PowerShell scripts in the application context without having to store or retrieve a client secret.
This can be beneficial in scenarios where you need to run a script from a privileged device but do not want to store a client secret within the code. Scenarios may include running a script from a privileged devices, or using Azure Automation.
In this tutorial, I am going to show you how to use certificate-based authentication with Microsoft Graph PowerShell.
Recommended
- Obtain an Access Token for Graph API PowerShell Using a Device Code
- How To Assign User Licenses With Microsoft Graph PowerShell
- Protect Microsoft Graph PowerShell Logins with Conditional Access
Scenario
In this scenario, I use an Azure Automation Runbook in my primary tenant (Tenant 2). I need to authenticate to Microsoft Graph in another tenant (Tenant 1) using PowerShell to manage resources.
For this use case, I will use certificate-based authentication with Microsoft Graph PowerShell.
Create a new self-signed certificate
You first need to generate a new self-signed certificate on your local workstation. When you do this, the private key is also stored on your local device. This can be removed once you are done.
The below command will create a new certificate named AzureAutomation that will expire in 12 months.
$certname = "AzureAutomation"
$cert = New-SelfSignedCertificate -Subject "CN=$certname" `
-CertStoreLocation "Cert:\CurrentUser\My" `
-KeyExportPolicy Exportable `
-KeySpec Signature `
-KeyLength 2048 `
-KeyAlgorithm RSA -HashAlgorithm SHA256 `
-NotAfter (Get-Date).AddMonths(12)
Copy
To export the certificate without the private key (to upload to your application in Microsoft Entra), use the below command and change the path as desired.
Export-Certificate -Cert $cert -FilePath "C:\cert\$certname.cer"
Copy
To export the certificate with the private key (to upload to your Automation Account), use the below command and change the path as desired. Ensure you change the password I have specified below!
$mypwd = ConvertTo-SecureString -String "Password123" -Force -AsPlainText
Export-PfxCertificate -Cert $cert -FilePath "C:\cert\$certname.pfx" -Password $mypwd
Copy
Once the files are exported, you can remove the certificate from the device is was created on.
$cer = Get-ChildItem -Path "Cert:\CurrentUser\My" | Where-Object {$_.Subject -Match "$certname"} | Select-Object Thumbprint, FriendlyName
Remove-Item -Path Cert:\CurrentUser\My\$($cer.Thumbprint) -DeleteKey
Copy
Create a new app registration
You will need to create a new app registration in Microsoft Entra; this will facilitate access to Microsoft Graph resources in the destination tenant (or tenant 1).
Follow the below steps to create a new app registration and assign the necessary permission.
1. In Microsoft Entra, select Applications > App registrations > New registration.
2. Enter a name and click Register.
Assign Graph API permissions
You can now assign the required permissions to the application. I will assign the groups.readwrite.all permission.
1. Under Manage, select API permissions.
2. Click Add a permission.
3. Select Microsoft Graph > Application Permissions.

Upload the public certificate
You will now need to upload the public certificate you exported in .cer format to the application.
1. Under Manage, select Certificates & secrets.
2. Click Certificates > Upload certificate, then upload your certificate. Mine was named AzureAutomation.cer.
Upload the private key to your Azure Automation Account
At this stage, the application in tenant one has been prepared, and you now need to upload the certificate with the private key to the Azure Automation Account in tenant 2.
1. Log in to the portal.azure.com
2. Find your Automation Account and open it.
3. Under Shared resources, select Certificates.
4. Click Add a certificate, then define a name for the certificate and upload the .pfx file you previously exported. You will be prompted for the password you specified when you created the certificate.
Connect to Microsoft Graph with Certificate-based authentication
Now both resources have been prepared, you can now use the necessary connection commands to authentication to Microsoft Graph PowerShell in your Runbooks.
Before you go any further! You must import the Microsoft Graph PowerShell modules into your Automation Account. View the steps I have written here.
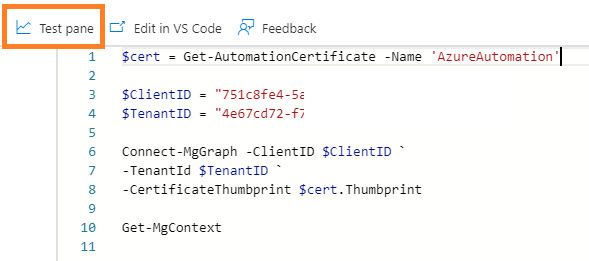
Copy the below code and add the ClientID and TenantID from the application in tenant one. Get-MgContext is used so you can visually confirm authentication is successful.
$cert = Get-AutomationCertificate -Name 'AzureAutomation'
$ClientID = ""
$TenantID = ""
Connect-MgGraph -ClientID $ClientID `
-TenantId $TenantID `
-CertificateThumbprint $cert.Thumbprint

Get-MgContext
Now paste your code into your Runbook and click Test pane.
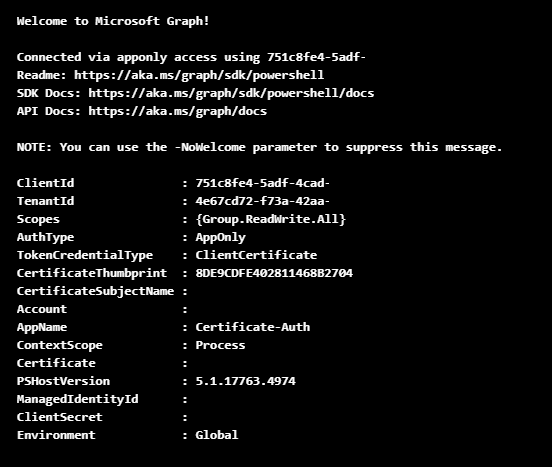
Click Start, then when the Runbook completes you should see an output on the screen confirming your have a successful connection.
When the certificate expires, simply create a new certificate and follow the same process to replace it.
This blog is part of Microsoft Azure Week! Find more similar blogs on our Microsoft Azure Landing page here.
About the author:

Dedicated engineer with a passion for cloud, security and learning.
Reference:
Bradley, D. (2024) Connect to Microsoft Graph PowerShell Using Certificates with Azure Automation. Available at: Connect to Microsoft Graph PowerShell Using Certificates with Azure Automation (ourcloudnetwork.com) [Accessed on 24/06/2024]