Managed Service Identity is pretty awesome for accessing Azure Key Vault and Azure Resource Management API without storing any secrets in your app. If you are new to AAD MSI, you can check out my earlier article. There is also one I wrote on integrating AAD MSI and Key Vault with ASP.NET Core’s configuration.
But how could we call other APIs secured by Azure AD? If you think about it, MSI provides service identity, so it should be able to use application permissions to call other APIs. But since there is no app registration in AAD, there is no UI where you could require permissions. So in this article we will look at how we can achieve this, which will involve some PowerShell.
Setup
I have a Web App, called joonasmsitest running in Azure. It has Azure AD Managed Service Identity enabled.
First we are going to need the generated service principal’s object id. Many ways to do that, but I got it from Azure Active Directory -> Enterprise applications. Change the list to show All applications, and you should be able to find the service principal.
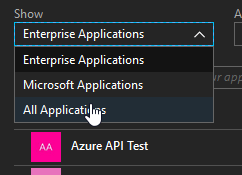
All applications
Once you find it, click on it and go to its Properties. We will need the object id.
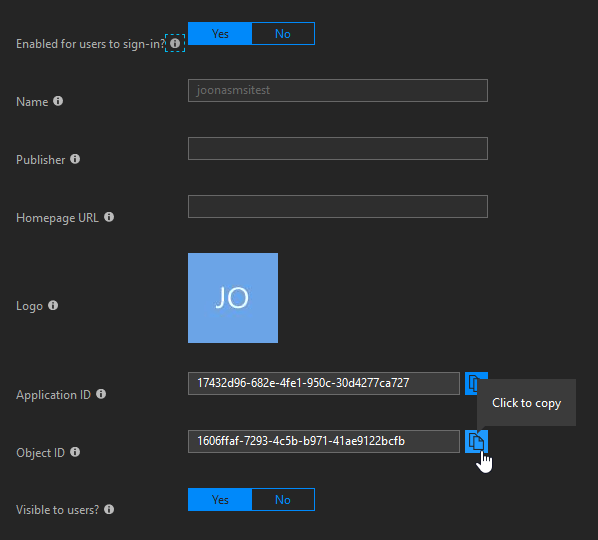
Object ID
As a side note, it’s kind of funny that it has an application id, though you won’t be able to find that app anywhere. The service principal does not have the id of the tenant from which it came from, nor the app display name. It also has "servicePrincipalType": "ServiceAccount", so I suppose it is a bit different from the “usual” service principals which require an application to be registered.
Now we have the identifier for the principal the permission should be assigned to. Next we are going to define an API that has an application permission. I added a new application registration in Azure AD with the Web app/API type.
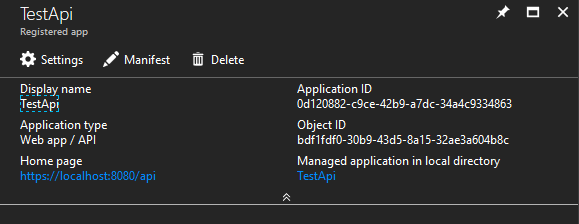
In its manifest, I defined an app permission:
{
  "appRoles": [
    {
      "allowedMemberTypes": [
        "Application"
      ],
      "displayName": "Read all things",
      "id": "32028ccd-3212-4f39-3212-beabd6787d81",
      "isEnabled": true,
      "description": "Allow the application to read all things as itself.",
      "value": "Things.Read.All"
    }
  ]
}
App permissions are really roles applied to service principals in AAD
If you want to learn more about custom permissions, check out Defining permission scopes and roles offered by an app in Azure AD.
We will also need the role’s id, so put it next to the MSI service principal’s id. The final piece of the puzzle is the id for the API app’s service principal. We can find it by clicking on the link that has the API’s name and says Managed application in local directory above it. Then go to Properties, and get the object id. Note that we could also get this from Enterprise applications like earlier.
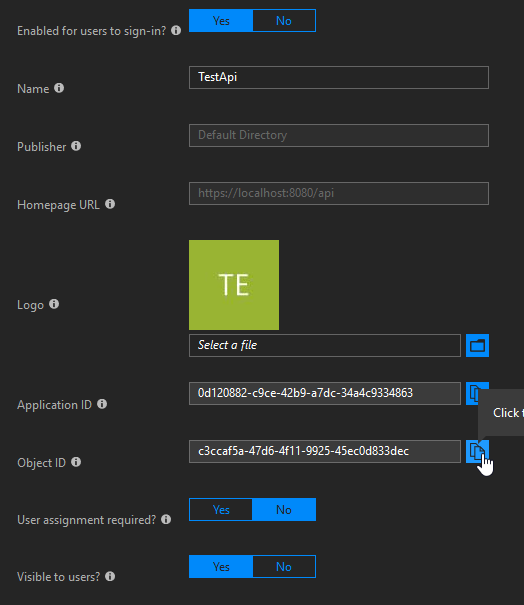
TestApi
Now we have all the info necessary! For the next step you will also need the Azure AD PowerShell module.
Assigning the permission
First, we need to connect to the Azure AD.
Connect-AzureAD
Now assigning the permission/role to the MSI-enabled app is just one command:
New-AzureADServiceAppRoleAssignment -ObjectId 1606ffaf-7293-4c5b-b971-41ae9122bcfb -Id 32028ccd-3212-4f39-3212-beabd6787d81 -PrincipalId 1606ffaf-7293-4c5b-b971-41ae9122bcfb -ResourceId c3ccaf5a-47d6-4f11-9925-45ec0d833dec
A careful reader might notice there are in fact four parameters:
-ObjectId-Id-PrincipalId-ResourceId
But we only have three identifiers:
- MSI-generated service principal object id
- API service principal object id
- API permission/role id
But you might notice one of the arguments in the example is used twice. The ObjectId and PrincipalId are both the MSI-generated service principal’s id. Id is the id of the role. ResourceId is the id for the API service principal.
https://graph.windows.net/tenant-id/servicePrincipals/1606ffaf-7293-4c5b-b971-41ae9122bcfb/appRoleAssignments?api-version=1.6.
And the request body looks like this:
{
    "id":"32028ccd-3212-4f39-3212-beabd6787d81",
    "principalId":"1606ffaf-7293-4c5b-b971-41ae9122bcfb",
    "resourceId":"c3ccaf5a-47d6-4f11-9925-45ec0d833dec"
}
So -ObjectId is the id that goes in the URL 
You can also assign roles to users with a similar request, though you need to POST to a user’s appRoleAssignments, and make the principalId the user’s id. Here is actually one of my Stack Overflow answers showing just that. There is also a corresponding PowerShell cmdlet for that: New-AzureADUserAppRoleAssignment.
Getting an access token using AAD MSI
The main thing you need is the Microsoft.Azure.Services.AppAuthentication NuGet library. But we will also need the API’s App ID URI. It is used to tell MSI (and by extension, AAD) which API we want a token for. You can also use the API’s client id/application id, I just prefer using the URI.
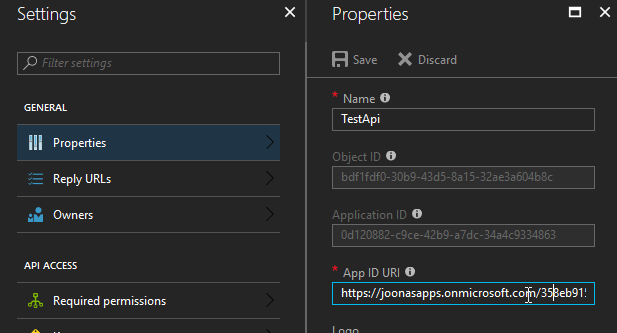
API’s client id/application id
Then getting the token is done like so (running in the MSI-enabled Web App):
var azureServiceTokenProvider = new AzureServiceTokenProvider();
string apiToken = await azureServiceTokenProvider.GetAccessTokenAsync("https://joonasapps.onmicrosoft.com/358eb915-816a-4f74-860b-eb0906ab0b0d");
If we inspect the token received in a tool like jwt.ms, we can see that the access token contains the necessary roles claim:
{
  "aud": "https://joonasapps.onmicrosoft.com/358eb915-816a-4f74-860b-eb0906ab0b0d",
  "roles": [
    "Things.Read.All"
  ]
}
We can now attach the token to a request to the API, and get secure access to it without ever specifying any secrets in the app itself.
For development environments, you will have to do a slightly different approach. Since in there you can only use the AppAuthentication library to get a user context access token. That works well for things like Azure Key Vault, but in this case we are using app permissions, which won’t apply to the user.
One hack that might work, would be to make the app role (app permission) assignable to users as well, and assign it to the user you are using in the dev environment. But that is a bit of a hack.
Might be easier to use client id + client secret in dev, and have at least two separate app registrations in AAD for the API. That way you can assign the app used in development environments permissions to the dev API without giving those keys access to production environments.
Summary
This was something I thought of that might be possible when AAD MSI was published, and I am happy it was relatively easy to implement. You do need to do some digging to find all the identifiers, but you get better at knowing where to find those as you gain experience.
About the Author:
Joonas is a software developer and Azure MVP specialising in Azure AD and Azure’s PaaS offerings for Web applications.
Reference:
Westlin, J (2018) Calling your APIs with Azure AD Managed Service Identity using application permissions. Available at: https://joonasw.net/view/calling-your-apis-with-aad-msi-using-app-permissions. [Accessed 31 July 2018]

