
In our previous blog post (Create your own Copilot), we walked through the process of creating a chat assistance using Azure AI Studio. We deployed it as a web app and laid the foundation for the prompt flow.
Now, let’s dive into this exciting lab and put our skills to the test!
- Overview:
- Demo:
- High-level steps:
- Prerequisites
- Create compute and runtime that are needed for prompt flow
- Create a runtime
- Create a prompt flow from the playground
- Customize prompt flow with multiple data sources
- Evaluate the flow using a question-and-answer evaluation dataset
- Deploy the flow
- Use the deployed flow
- Clean up resources
- Conclusion:
- References:
Overview:
In this lab, we will build upon our previous work by enhancing the prompt flow and adding new features to our chat assistance. By completing this lab, you will gain a deeper understanding of the capabilities of Azure AI Studio and further develop your skills in creating conversational AI applications.
We will use generative AI and prompt flow to build, configure, and deploy a copilot for your retail company called Contoso. Your retail company specializes in outdoor camping gear and clothing.
The copilot should answer questions about your products and services. It should also answer questions about your customers.
For example, the copilot can answer questions such as
“How much do the TrailWalker hiking shoes cost?“
“How many TrailWalker hiking shoes did Daniel Wilson buy?“.
To understand what Prompt Flow is and how to build your first Prompt Flow, refer my post Build your first Prompt Flow
We will be using Prompt flow available in Azure AI Studio (LLM).
Demo:
High-level steps:
- Create an Azure AI Studio project.
- Deploy an Azure OpenAI model and chat with your data.
- Create a prompt flow from the playground.
- Customize prompt flow with multiple data sources.
- Evaluate the flow using a question-and-answer evaluation dataset.
- Deploy the flow for consumption.
To complete Step 1 and Step 2, please refer previous Post Create your own Copilot
Prerequisites
- An Azure subscription
- Access granted to Azure OpenAI in the desired Azure subscription.
- You need an Azure AI hub resource and your user role must be Azure AI Developer, Contributor, or Owner on the Azure AI hub resource.
- Your subscription needs to be below your quota limit to deploy a new model in this tutorial.
- You need a local copy of product and customer data.
- Azure/aistudio-copilot-sample repository on GitHub contains sample retail customer and product information that’s relevant for this scenario.
Clone the repository or copy the files from 1-customer-info and 3-product-info.
Step by step:
With above steps (#1 and #2), you have configured your Chat Assistant with your own data, lets now jump to Create Prompt Flow.
To know more about Prompt Flow and create the basic Prompt flow, refer link Build your first Prompt Flow
Create compute and runtime that are needed for prompt flow
In Azure AI Studio, you can create and manage prompt flow runtimes. You need a runtime to use prompt flow.
A prompt flow runtime has computing resources that are required for the application to run, including a Docker image that contains all necessary dependency packages.
In addition to flow execution, Azure AI Studio uses the runtime to ensure the accuracy and functionality of the tools incorporated within the flow when you make updates to the prompt or code content.
Azure AI Studio supports the following types of runtimes:
| Runtime type | Underlying compute type | Life cycle management | Customize packages |
| Automatic runtime | Serverless compute | Automatic | Easily customize Python packages |
| Compute instance runtime | Compute instance | Manual | Manually customize via Azure Machine Learning environment |
If you’re a new user, we recommend that you use an automatic runtime. You can easily customize the environment for this runtime.
If you have a compute instance, you can use it to build your compute instance runtime.
Create a runtime
I created Compute Instance using the link Create and manage prompt flow runtimes – Azure AI Studio | Microsoft Learn

Create a prompt flow from the playground
Now that your deployed chat model is working in the playground with your data, you could deploy your copilot as a web app from the playground.
But you might ask “How can I further customize this copilot?“
You might want to add multiple data sources, compare different prompts or the performance of multiple models.
A prompt flow serves as an executable workflow that streamlines the development of your LLM-based AI application. It provides a comprehensive framework for managing data flow and processing within your application.
You can create a prompt flow from the playground by following these steps:
- If you aren’t already in the Azure AI Studio playground, select Build from the top menu and then select Playground from the collapsible left menu.
- Select Open in prompt flow from the menu above the Chat session pane.

Within a flow, nodes take center stage, representing specific tools with unique capabilities. These nodes handle data processing, task execution, and algorithmic operations, with inputs and outputs.
By connecting nodes, you establish a seamless chain of operations that guides the flow of data through your application.
On facilitate node configuration and fine-tuning, a visual representation of the workflow structure is provided through a DAG (Directed Acyclic Graph) graph.
This graph showcases the connectivity and dependencies between nodes, providing a clear overview of the entire workflow.
The nodes in the graph shown here are representative of the playground chat experience that you exported to prompt flow.

In prompt flow, you should also see below options.
Save
Runtime
Tool

Customize prompt flow with multiple data sources
Earlier in the Azure AI Studio playground, you added your data to create one search index that contained product data for the Contoso copilot. So far, users can only inquire about products with questions such as “How much do the TrailWalker hiking shoes cost?”.
But they can’t get answers to questions such as “How many TrailWalker hiking shoes did Daniel Wilson buy?”
To enable this scenario, we add another index with customer information to the flow.
Create the customer info index
You need a local copy of example customer information. For more information and links to example data, see the prerequisites.
Follow these instructions on how to create a new index:
Select Index from the left menu. Then select + New index.
On the Source data page, select Upload folder from the Upload dropdown. Select the customer info files that you downloaded or created earlier

Add customer information to the flow
Now, you have reached to the most important part of demo where you need to add customer information to the flow.
return to your prompt flow and follow these steps to add the customer info to the flow:
- Select the RetrieveDocuments node from the graph and rename it RetrieveProductInfo. Now the retrieve product info node can be distinguished from the retrieve customer info node that you add to the flow.

Select + Python from the top menu to create a new Python node that’s used to retrieve customer information.

- Name the node RetrieveCustomerInfo and select Add.
- Copy and paste the Python code from the RetrieveProductInfo node into the RetrieveCustomerInfo node to replace all of the default code.
- Select the Validate and parse input button to validate the inputs for the RetrieveCustomerInfo node. If the inputs are valid, prompt flow parses the inputs and creates the necessary variables for you to use in your code.

Edit the RetrieveCustomerInfo inputs that prompt flow parsed for you so that it can connect to your customer-info index.
The inputs are case sensitive, so be sure they match these values exactly:
| embeddingModelConnection | Azure OpenAI | Default_AzureOpenAI |
| embeddingModelName | string | None |
| indexName | string | customer-info |
| queries | string | ${ExtractIntent.output.search_intents} |
| queryType | string | simple |
| searchConnection | Cognitive search | contoso-outdoor-search |
| semanticConfiguration | string | None |
| topK | int | 5 |

Format the retrieved documents to output
Now that you have both the product and customer info in your prompt flow, you format the retrieved documents so that the large language model can use them.
- Select the FormatRetrievedDocuments node from the graph.
- Copy and paste the following Python code to replace all contents in the FormatRetrievedDocuments code block.
from promptflow import tool

@tool
def format_retrieved_documents(docs1: object, docs2: object, maxTokens: int) -> str:
  formattedDocs = []
  strResult = ""
  docs = [val for pair in zip(docs1, docs2) for val in pair]
  for index, doc in enumerate(docs):
    formattedDocs.append({
      f"[doc{index}]": {
        "title": doc['title'],
        "content": doc['content']
      }
    })
    formattedResult = { "retrieved_documents": formattedDocs }
    nextStrResult = str(formattedResult)
    if (estimate_tokens(nextStrResult) > maxTokens):
      break
    strResult = nextStrResult

  return {
          "combined_docs": docs,
          "strResult": strResult
      }

def estimate_tokens(text: str) -> int:
  return (len(text) + 2) / 3
Select the Validate and parse input button to validate the inputs for the FormatRetrievedDocuments node. If the inputs are valid, prompt flow parses the inputs and creates the necessary variables for you to use in your code.
Edit the FormatRetrievedDocuments inputs that prompt flow parsed for you so that it can extract product and customer info from the RetrieveProductInfo and RetrieveCustomerInfo nodes.

Updates these inputs:
| Name | Type | Value |
| docs1 | object | ${RetrieveProductInfo.output} |
| docs2 | object | ${RetrieveCustomerInfo.output} |
| maxTokens | int | 5000 |
- Select the DetermineReply node from the graph.
- Set the documentation input to ${FormatRetrievedDocuments.output.strResult}.

- Select the outputs node from the graph.
- Set the fetched_docs input to ${FormatRetrievedDocuments.output.combined_docs}.

Select Save
Chat in prompt flow with product and customer info
Excellent!
By now you have both the product and customer info in prompt flow. You can chat with the model in prompt flow and get answers to questions such as “How many TrailWalker hiking shoes did Daniel Wilson buy?”
Before proceeding to a more formal evaluation, you can optionally chat with the model to see how it responds to your questions.
Error!

No worries, lets check the error and fix it 
Let’s explorer where the error is, see blow:

I had provided wrong name as “customer-info” and now fixed it with “customer-info-index”

Ask Again!
How many TrailWalker hiking shoes did Daniel Wilson buy?

This time you will see the correct response.
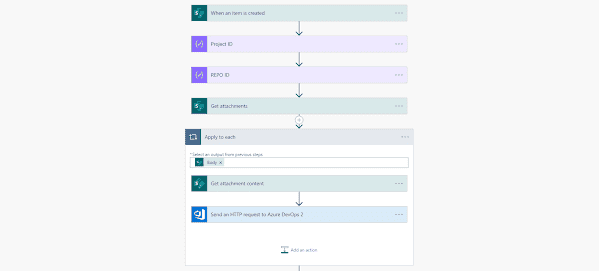
Below is the Flow:

Evaluate the flow using a question-and-answer evaluation dataset
In Azure AI Studio, you want to evaluate the flow before you deploy the flow for consumption.
In this section, you use the built-in evaluation to evaluate your flow with a question and answer evaluation dataset. The built-in evaluation uses AI-assisted metrics to evaluate your flow: groundedness, relevance, and retrieval score.
Create an evaluation
You need a question and answer evaluation dataset that contains questions and answers that are relevant to your scenario. Create a new file locally named qa-evaluation.jsonl. Copy and paste the following questions and answers ("truth") into the file.
| {“question”: “What color is the CozyNights Sleeping Bag?”, “truth”: “Red”, “chat_history”: [], } {“question”: “When did Daniel Wilson order the BaseCamp Folding Table?”, “truth”: “May 7th, 2023”, “chat_history”: [] } {“question”: “How much does TrailWalker Hiking Shoes cost? “, “truth”: “$110”, “chat_history”: [] } {“question”: “What kind of tent did Sarah Lee buy?”, “truth”: “SkyView 2 person tent”, “chat_history”: [] } {“question”: “What is Melissa Davis’s phone number?”, “truth”: “555-333-4444”, “chat_history”: [] } {“question”: “What is the proper care for trailwalker hiking shoes?”, “truth”: “After each use, remove any dirt or debris by brushing or wiping the shoes with a damp cloth.”, “chat_history”: [] } {“question”: “Does TrailMaster Tent come with a warranty?”, “truth”: “2 years”, “chat_history”: [] } {“question”: “How much did David Kim spend on the TrailLite Daypack?”, “truth”: “$240”, “chat_history”: [] } {“question”: “What items did Amanda Perez purchase?”, “truth”: “TrailMaster X4 Tent, TrekReady Hiking Boots (quantity 3), CozyNights Sleeping Bag, TrailBlaze Hiking Pants, RainGuard Hiking Jacket, and CompactCook Camping Stove”, “chat_history”: [] } {“question”: “What is the Brand for TrekReady Hiking Boots”, “truth”: “TrekReady”, “chat_history”: [] } {“question”: “How many items did Karen Williams buy?”, “truth”: “three items of the Summit Breeze Jacket”, “chat_history”: [] } {“question”: “France is in Europe”, “truth”: “Sorry, I can only truth questions related to outdoor/camping gear and equipment”, “chat_history”: [] } |
Now that you have your evaluation dataset, you can evaluate your flow by following these steps:
- Select Evaluate > Built-in evaluation from the top menu in prompt flow.
Follow the steps as mentioned here: Build and deploy a question and answer copilot with prompt flow in Azure AI Studio – Azure AI Studio | Microsoft Learn

View the evaluation status and results
Now you can view the evaluation status and results by following these steps:
- After you create an evaluation, if you aren’t there already go to Build > Evaluation. On the Metric evaluations page, you can see the evaluation status and the metrics that you selected. You might need to select Refresh after a couple of minutes to see the Completed status.

Select the name of the evaluation that completed first (contoso-evaluate-from-flow_variant_0) to see the evaluation details with the columns that you mapped earlier.

Deploy the flow
Now that you built a flow and completed a metrics-based evaluation, it’s time to create your online endpoint for real-time inference. That means you can use the deployed flow to answer questions in real time.
Follow these steps to deploy a prompt flow as an online endpoint from Azure AI Studio.
- Have a prompt flow ready for deployment. If you don’t have one, see how to build a prompt flow.
- Optional: Select Chat to test if the flow is working correctly. Testing your flow before deployment is recommended best practice.
- Select Deploy on the flow editor.

Follow the steps to Deploy: Build and deploy a question and answer copilot with prompt flow in Azure AI Studio – Azure AI Studio | Microsoft Learn
Use the deployed flow
Your copilot application can use the deployed prompt flow to answer questions in real time. You can use the REST endpoint or the SDK to use the deployed flow.
To view the status of your deployment in Azure AI Studio, select Deployments from the left navigation. Once the deployment is created successfully, you can select the deployment to view the details.

Optionally, the details page is where you can change the authentication type or enable monitoring.

Select the Consume tab. You can see code samples and the REST endpoint for your copilot application to use the deployed flow.

Clean up resources
The below resources were created for this Post. Clean your resources.

Conclusion:
In the previous post, we covered the process of creating a chat assistance using Azure AI Studio and deploying it as a web application. To further enhance the functionality of the chat assistance, we now created a prompt flow.
We learned how to configure the prompt flow, to specify the input fields, validation rules, and responses for each question.
We also saw the use of conditional logic to branch the flow based on the user’s input.
Stay tuned for more exciting posts in the AI section as we continue to explore the capabilities of Azure AI Studio and other AI technologies.
References:
https://learn.microsoft.com/en-us/azure/ai-studio/how-to/prompt-flow
https://learn.microsoft.com/en-us/azure/ai-studio/how-to/flow-develop
https://learn.microsoft.com/en-us/azure/ai-studio/how-to/prompt-flow-tools/llm-tool
Use this end-to-end walkthrough video: https://youtu.be/Qes7p5w8Tz8
About the Author

Cloud Solution Architect @ Microsoft | Digital & App Innovation | GenAI
Reference:
Singh, R (2025). Build and deploy a Q&A Copilot with Prompt Flow. Available at: Build and deploy a Q&A Copilot with Prompt Flow – Rajeev Singh | Coder, Blogger, YouTuber [Accessed: 27th March 2025].


 Using a SharePoint Online list as a Knowledge source via ACTIONS in Copilot AI Studio
