Want to transform your company into an Agile powerhouse? To do that you’ll need to start with a solid foundation built on the ideas and concepts of a DevOps culture. Once you have that foundation established you can look to technical solutions to convert your company’s culture and technology.
This article introduces DevOps concepts and terminology, then introduces each of the features and services available from Microsoft’s Azure DevOps suite of services and connects each service to the concepts of a DevOps culture.
Let’s begin by defining “DevOps”. DevOps is a culture whose goal is to change the way developers and IT staff collaborate to deliver software. The DevOps culture allows a software development team to better respond to business requirements, increase confidence in the software it delivers, and rapidly deploy high-quality software.
DevOps influences Application Lifecycle Management (ALM) through its planning, developing, delivering, and operating phases. Each phase is dependent upon its prior phase. Phases are not role specific. Collaboration is key in a true DevOps culture. To that end, each role is involved in all phases to some degree. The four phases are described below.
Planning
A software project starts at the planning phase. During this phase teams generate ideas, define the project, and describe the application and capabilities. Backlogs and sprints are used to manage the project. Progress can be tracked at differing levels of granularity, from single-product tasks to tasks that span many products. Scrum and Kanban boards are used to visualize progress using dashboards and reports.
Developing
During the development phase all aspects of application development take place, including code writing, testing, reviewing, and the management of source code. Development teams practicing a DevOps culture use Continuous Integration (CI) to achieve the goals of the developing phase. Continuous Integration is the practice of automating code merging and testing. CI helps a team to identify issues early in the development cycle, making them less expensive to resolve. The CI process typically includes automated tests which help to ensure code quality.
Delivery
The delivery phase includes the deployment of applications into various environments in a consistent and reliable way. Releases are controlled with manual approvals. Automation moves applications between environments all the way up to production. Teams implement Continuous Delivery (or Continuous Deployment) (CD) to meet the goals of the delivery phase.
Continuous Delivery is a process by which code is built, tested, and deployed to one or environments. Deploying and testing in multiple environments increases quality. The entire delivery process is scalable, repeatable, and controllable using automation. CD produces outputs which are deployable. Assets like executables, configuration files and even infrastructure can be included in the CD output. Teams use tools like Terraform, Bicep, or ARM templates to deploy infrastructure in a repeatable, reliable manner. These tools enable DevOps teams to create and tear down infrastructure via code, aka Infrastructure as Code (IaC). Monitoring and notification systems are constantly running to provide visibility into the whole CD process.
Operating
Teams adopting DevOps practices aim to ensure their systems are reliable, available, secure, and compliant. The operating phase involves maintaining, monitoring, and troubleshooting applications in production environments. DevOps teams look to identify issues in production before they affect the end-user’s experience. They want to mitigate issues as soon as they occur. To meet these goals, teams require notifications and robust application logging.
What is Azure DevOps?
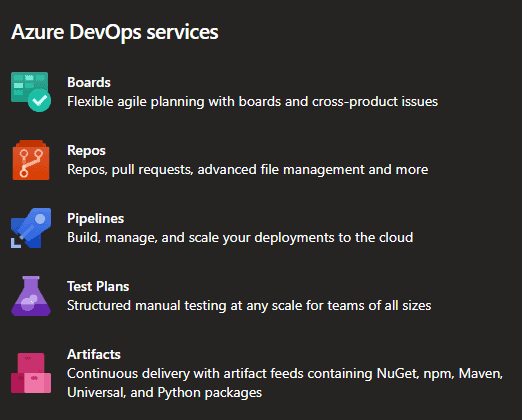
Once a company buys into the DevOps culture it needs a toolset to implement the Agile principles of delivering high-quality software. This is where Microsoft’s Azure DevOps suite of services fits in. Azure DevOps provides tools for every phase of ALM including planning, development, delivery, and operations. You can choose how many of the Azure DevOps services to implement, from one to all. The services available within Azure DevOps are shown in the figure below.
Azure DevOps is available in two flavors, Azure DevOps Server and Azure DevOps Services. Azure DevOps Server is a self-hosted, on-premises installation of Azure DevOps. This version shares the same features as the cloud offering, Azure DevOps Services but makes you responsible for security, configuration, and all the other responsibilities of maintaining software in your data center. Organizations may choose Azure DevOps Server because compliance or security requirements necessitate the need to keep data within its data center. Integrating with other on-premises services like SQL Server Analysis Server would be another use case for choosing the on-prem version. Those use cases are exceptional. Most development shops will choose Azure DevOps Services.
Azure DevOps Services
Azure DevOps Services is a cloud-based, Software-as-a-Service (SaaS) offering. The SaaS version is part of the Microsoft Azure cloud platform. It reaps all the benefits of a SaaS offering, including 24×7 availability, automatic updates, and Azure AD security. Azure DevOps Services requires no extra configuration. Getting started is quick and easy, using your Microsoft account to sign up and create an organization (domain), a project, and add a new user.
The Azure DevOps Web portal provides access to all features You can use all the services included with Azure DevOps or choose just what you need to compliment your existing workflows.
Organization
Azure DevOps is arranged in a hierarchical structure. At the top of the hierarchy sits the organization. An Azure DevOps organization is a container of one or more related projects. Each Azure DevOps account can contain one or more organizations. A good rule of thumb is to start with one organization and add others as needed based on factors like security models, business units within the company, and the company’s development teams. Organizations are isolated from one another. It is easier to partition an organization using projects than it is to combine different organizations. A good rule of thumb is to stick with one organization when possible.
Each organization has its own URL in the form of https://dev.azure.com/<Organization Name> and gets its own set of free tier resources (more to come on these resources in a bit) including:
- Jobs for executing a CI/CD pipeline
- Tools for tracking work items, defects using Kanban or Scrum
- An unlimited amount of private Git repos
- 5 free users (basic)
- 2 GiB Artifact storage
Organizations can be created using an Azure Active Directory (Azure AD) or a Microsoft account. The account used influences the organization’s security model. Use an MS account when you don’t need to authenticate with an Azure AD. For stricter control, create an organization using an Azure AD account. This restricts access to the organization to only those AD users who are members in that directory. Removing a user from AD removes his/her access from the organization. This provides richer security because the Azure AD is managed by the administrator and can be controlled company wide. Users can be administered using Azure AD groups, further facilitating access control.
Projects
The next level down in the hierarchy is the Project. An Azure DevOps project is a grouping of services and features that are available through the Web portal or an IDE client, like Visual Studio. When you create your organization, a default project is created for you.
The screen shot below shows the options available during when creating a new project. The choices made during creation will influence the behavior and functionality of the tools within the project.
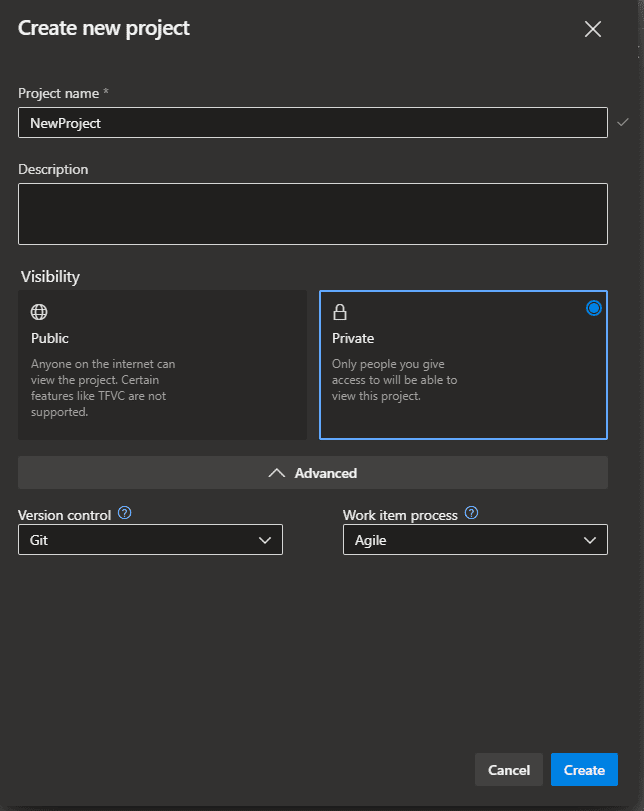
A project can be made available to the public or a private group. The Version control choice under the Advanced drop down determines the type of source control repository. There are two options, Git and Team Foundation Version Control. Most teams will choose Git. The Work item process drop down allows you to choose the project’s process model. This link provides detailed information about process models. The table below summarizes each option available.
| Process Model | Description |
|---|---|
| Basic | Provides the simplest model that tracks work through Issues, Tasks, and Epics |
| Agile | Supports Agile planning methods including Scrum, and tracks development and test activities separately. This process works great if you want to track user stories and (optionally) bugs on the Kanban board, or track bugs and tasks on the taskboard |
| Scrum | Tracks work using product backlog items (PBIs) and bugs on the Kanban board or viewed on a sprint taskboard. This process supports the Scrum methodology as defined by the Scrum organization |
| Capability Maturity Model Integration (CMMI) | Supports a framework for process improvement and an auditable record of decisions. With this process, you can track requirements, change requests, risks, and reviews. This process supports formal change management activities |
An organization can have one or more projects. Much like the decisions to create multiple organizations, several factors should be considered when determining to create multiple projects. Unique security and access control requirements, staggered release schedules, disparate code bases, and diverse development teams are some reasons why you would create multiple projects. Single projects are great for aligning multiple teams along the same cadence, with common goals and release schedules. Be cautious using a single project for your entire enterprise. Poorly organized folder structures or bad naming conventions can make searching across a single project difficult. A best practice here is to create one project per source code repository.
Beneath the project hierarchy lies five child services, Boards, Repos, Pipelines, Test Plans, and Artifacts. An individual project has its own set of services which are isolated from the other projects. The list below describes each of the standalone services available within a project. These may differ depending upon the options you selected when creating the project:
- Boards: Tools for planning and tracking work items, code defects and issues using Kanban and Scrum methods are available from the Azure Boards service.
- Repos: source control is provided by the Azure Repos service.
- Pipelines: Build pipeline for Continuous Integration and Continuous Deployment (CI/CD) functionality.
- Test Plans: Tools for testing applications, both manual and automated.
- Artifacts: The sharing of integrated packages like npm and NuGet is available from the Azure Artifacts service.
Boards
The set of tools available under the Azure DevOps Boards category are useful for managing a project during the ALM planning phase. The tools provide a rich set of capabilities including support for Agile, Scrum, and Kanban processes. Tools like workflow items, backlogs, sprints, and configurable dashboards are used for tracking and reporting a project’s progress. These tools are designed to scale as the business grows and help the team to plan and manage a project throughout its lifecycle.
When starting a new project, teams will begin with setting up the “board”. Everything begins with a work-item. The Work Items link is used for creating items that represent a task. Work-items contain details about the task, such as its type – it can be a bug, task, epic, or a user story, its priority, risk level, assignee, any related child or parent tasks, and various dates. The following screenshot shows a task I created for writing this post.
The DevOps team sets up all the work-items for a project. Views show the work items in various stages of development. The stage names are customizable by the team. The default stages are “New”, “Active”, “Resolved” and “Closed”. The following screen shot shows the boards link in my sample project.

The Backlogs link provides a visual method for assigning work-items to a sprint. Using the backlog, work-items can be dragged to the Planning cards and dropped into an Iteration. An iteration is the default name for sprints in Azure DevOps. The iteration name is customizable. In the screen shot below, I moved my “Create Post Outline” task to the first sprint in the project.
Additional planning features are provided by the Sprints, Queries, and Delivery Plans links. Each tools provides functionality for managing the project. For example, items moved to a planning iteration are visible under the Sprints link. This view lets teams track the status of the work-items in a specific sprint.
Repos
Version control software like Git and Subversion enable teams to track changes made to code over time. As code is modified during the development phase, the version control system retains history of the changes. The version control system can also coordinate code changes across your team. A snapshot can be recalled later for comparison, restoration, and/or deployment. Regardless of project or team size, it is a good practice to use a version control solution.
Azure DevOps offers the Repos suite of version control tools. These tools allow DevOps teams to collaborate on development using free public and private repositories. As mentioned above, Azure Repos provides two version control systems to choose from: Git and TFVC. Primarily teams decide to use Git as it is a decentralized source control system and will receive most of the attention from Microsoft in the future. It also enables the greatest amount of flexibility and integrates with almost all tools in the developer ecosystem. A project can contain an unlimited amount of Git repos.
Azure DevOps Repos offers a tremendous amount of functionality. Highlighted below are some of the more relevant features.
- Code can be shared using command-line, VS Code, or Visual Studio, among other IDEs.
- Code reviews are performed with pull requests to ensure that changes build without errors and pass tests before being merged into the main branch.
- Work-items can be linked to pull requests for project tracking.
- Policies and permissions can be applied to individual branches.
- Azure Functions can be used to create custom branch policies.
In projects where the Azure Repos service is enabled, clicking on the Repos link shows the following configuration options for initializing a repository.
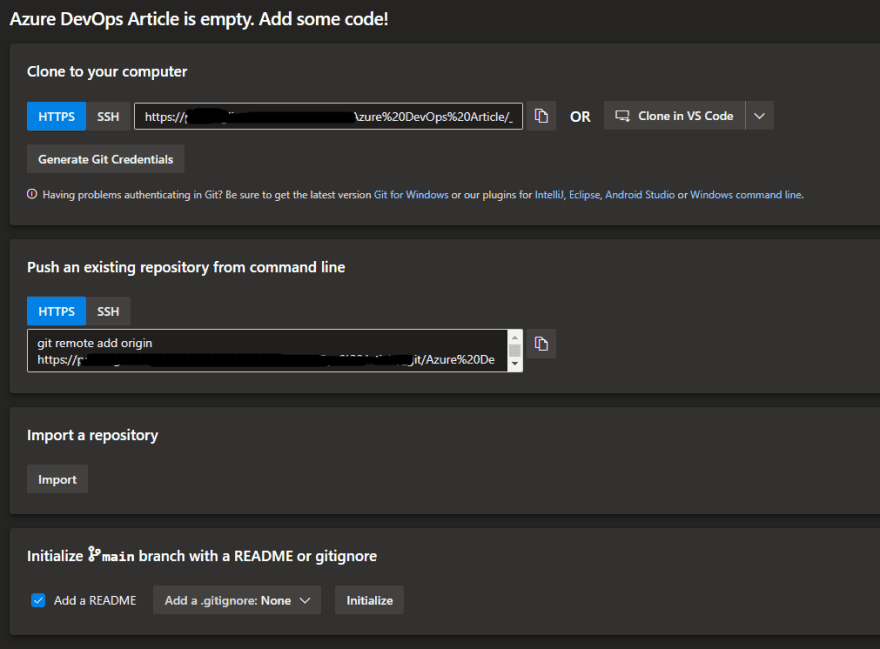
These options initialize a project’s repository. An empty repository can be created, or the repository can be initialized with existing code via upload. Options are also available for creating a readme file and a .gitignore file, which is a file that ensures certain files are not tracked by Git. Each development language has its own files to ignore. The setup options allow you to create a language specific .gitignore file.
| Concept | Description |
|---|---|
| Clone | Cloning from your local PC creates a complete working copy of a repository on your local workstation. Changes made to the local repository can be pushed to the remote repository in Azure DevOps. |
| Commit | A commit is a set of related code changes made to your local repository. These changes can be pushed or rolled back as a set. |
| Branch | Branches keep a history of commits and isolate code changes from the main branch. Branches are isolated, so committing changes to a branch doesn’t affect other branches. |
| Pull Request | Pull requests allow the team to review code and provide feedback on changes before they are merged into a branch. |
| Fork | A fork is a repository copy of a repository. The copy includes all files, commits, and (optionally) branches from the remote. Files and branches in a forked repo are not shared between repositories. A pull request is required to merge forked files back into the main branch. |
An Azure DevOps repository has a default branch named “main” or “master”. The default branch should be protected from code that doesn’t build properly. As a best practice, set up a branch policy that requires all merges into the default branch to be performed with a pull request (PR). This policy provides two benefits. First, it prevents changes to the main branch directly. This helps to ensure code quality by requiring a code review before changes are merged into the default branch. Second, the PR forces a clean build of the merged code before it is merged. Branching and release strategies are important concepts to understand. To learn more see “Adopt a Git branching strategy”. Branches and PRs can be managed via the Branches and Pull requests links, respectively.
As mentioned above, a project can have multiple Git repositories. Multiple repositories are useful for projects that have independent deployment schedules. Multiple repositories will require separate security permissions, separate release schedules, and make sharing code across those repositories difficult. In most cases a single repository is the best approach. The overhead of maintaining multiple repositories isn’t worth the effort vs. a single repository.
Forks are useful in specific scenarios such as when working with developer teams that should not have direct access to update the main repository. Forks can also be useful when used in an open-source project.
Pipeline
As discussed in the delivery phase, CI/CD plays an important role in a DevOps organization. The Pipelines service helps teams to set up and manage CI/CD for their projects. The ability to integrate code being worked on among many developers, and deploy releases through automation is a cornerstone of ensuring a quality product. Pipelines is flexible in that it works with many languages and project types. The pipeline itself is code, comprised of a series of stages, jobs, and steps, typically written using YAML. YAML is a human-readable, easy to understand language for creating configuration files. Azure pipelines integrates with Azure deployments, can build across platforms (Windows, Linux, or Mac), and can deploy to multiple environments. Azure pipelines is free for public projects. For private projects Azure provides 30 hours of pipeline jobs for free per month.
Creating a new pipeline is done via the pipelines link. This starts a wizard. The first step in the wizard is to provide the location of the source code repository. Choices are Azure Git Repos, GitHub, Bitbucket, Subversion, among others. Next, a repository from that location is chosen. The third step is to initialize the pipeline, using either a “starter pipeline” or an existing pipeline. Reviewing and saving the pipeline are the final steps in the wizard. The result is a file named “azure-pipelines.yml” which is automatically added to the project’s repository. The following screenshot shows the azure-pipelines.yml file created by the starter pipeline wizard.
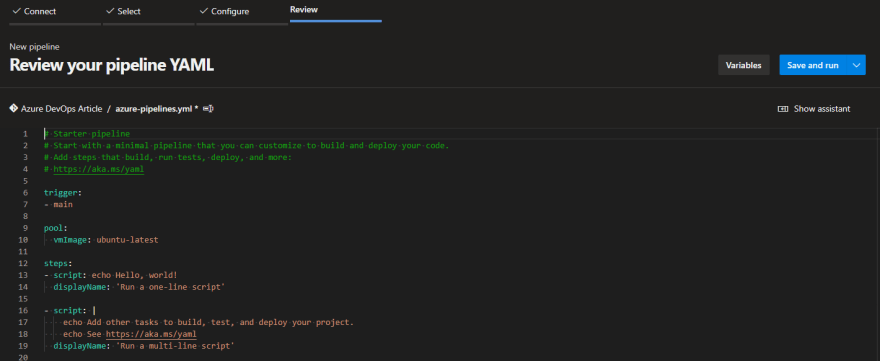
The starter pipeline mimics a typical “hello world” application. Running the pipeline outputs the string “hello world” as shown below.
There are two methods for creating pipelines, hand coding the azure-pipelines.yml file or choosing from a list of pre-defined tasks and configuring those tasks using a wizard. Azure provides a rich set of tasks to choose from. To learn more about the capabilities of a pipeline, spend some time reviewing the task list that is available in the portal.
It is essential to understand the basic terms and components of a pipeline. This knowledge is necessary to deliver code more efficiently and in a reliable manner. For brevity I will describe a some of the relevant pipeline concepts below. You can read more about pipeline components here.
| Term / Component | Description |
|---|---|
| Agents | Agents effectively are virtual machines with installed agent software that run one job at a time. |
| Approvals | Approvals are a set of validations that are required to pass before a deployment runs. |
| Environment | A collection of resources, i.e., VMs, containers, or other services that are used to host the application. After a completed build, a pipeline may deploy changes to one or more environments. |
| Stage | A stage is a group of related jobs and steps. Stages run sequentially and can use conditional logic to determine if a stage should execute or be skipped. |
| Job | A job is a collection of steps that run together on the same agent. |
| Release | Branches keep a history of commits and isolate code changes from the main branch. Branches are isolated, so committing changes to a branch doesn’t affect other branches. |
| Step | A step is the most granular task within a pipeline. It can be either a task or a script. |
| Deployment | A collection of steps that are executed sequentially. |
Pipelines can include tasks for building out infrastructure, deploying code to cloud services, performing tests, and generating output assets. Outputs are referred to as “Artifacts” and can become input to downstream tasks or processes. Artifacts can be deployed with the application to an environment.
More information about pipelines can be found here.
Test Plans
An important part of the development process is the ability to test and validate the project deliverables. The Test Plans category offers a central location where the team can coordinate all of its manual test activities, track progress, and gain key insights. Using the Test Plans toolset, teams can create tests for user stories and run the tests directly on the Kanban board. Creating, configuring, and running tests involves many steps. Review the resources available at this link for a complete guide. For now, let’s walk through the basics.
Test cases are created from work-items off the Board. This is a bit counterintuitive as you may be inclined to think tests would be created via the Test Plans link. To create a test, select a work-item from the Board and click on the three dots. This action opens a context menu. Choose Add Test from the menu as shown in the following screen shot.
Existing tests are available from the Test Plans link. The Test Plans dashboard lists all tests and provides a portal for running and managing tests.
Editing a test is accomplished via the context menu for each test case item. The form used to edit tests is shown below. The form provides places to enter test steps and to create parameters among other things.
The context menu also provides options for running tests and reviewing test results.
Robust reporting can be found under the Progress link. Details like the number of test plans, the percentage of tests that have passed, and the names of specific tests are useful for teams looking to ensure the highest quality software is delivered. Additional information and test executions are available under the Runs link.
Artifacts
Azure Artifacts provides a mechanism for developers to share and consume packages from different feeds and public registries. DevOps teams can consume packages from well-known package managers like NuGet, and npm, or can create and share their own packages. Sharing can be scoped to the same team, organization, or publicly.
Depending on usage, teams may incur a cost when using Artifacts. Artifacts is billed on a consumption basis and is free up until 2 GiB of storage. Once the 2GiB storage limit is reached, no new artifacts can be uploaded. For storage beyond 2GiB, a billing account must be setup.
Packages are organized into “Feeds” which allow the team to group packages and control sharing permissions as a cohesive unit. Public feeds enable packages to be shared publicly with anyone on the Internet. Literally anyone can access the packages, even if they don’t have an Azure DevOps account or are not part of the company. Organization-scoped feeds are only viewable and accessible in the Azure Artifacts hub from projects within your organization. Packages that are shared via a feed are immutable.
Teams may decide to use Azure Artifacts to consume the artifact in a release, or as part of a deployment the build needs additional packages stored in Azure Artifacts, i.e., NuGet.
Azure DevOps Benefits/Advantages
The value proposition Azure DevOps brings is in its cohesive toolset. Everything a team needs to adopt a DevOps culture can be found within the Azure DevOps services. This is one of its biggest advantages over the alternatives. Other players offer similar features and services, but Azure DevOps brings them all together under one SKU.
Azure DevOps Alternatives
The list below includes some alternatives to Azure DevOps. This is not a comprehensive list. Many of these players are top alternatives, but none seem to provide the breadth of services that Azure DevOps offers.
| Service Name | Description |
|---|---|
| GitHub | Provides tools for Git repositories, CI/CD, collaboration, and automation. |
| AWS | AWS offers ala carte services for DevOps teams. Included in their offerings is AWS CodePipeline. CodePipeline is a CI/CD service for application and infrastructure. AWS CodeDeploy CodeDeploy is a service which automates deployment to AWS or on-premises infrastructure. AWS CodeCommit CodeCommit is a source control solution. |
| BitBucket | Provides teams one place for source control repositories, project management and deployment. |
| Jenkins | An open source automation server which uses plugins to support building, deploying and automating any project. |
Congratulations, you made it to the end of the article! Along the way you learned what is necessary for a software team to adopt a DevOps culture. Planning, Development, Delivery, and Operating are all key phases of that culture. Azure DevOps provides tools and services for teams to implement DevOps principles into their ALM software development process. In Azure DevOps it begins with the creation of an organization, and projects within organizations. This provides a wealth of tools for teams to use to track progress and report status, manage source control, set up a CI/CD pipeline, perform tests, and monitor the entire process. While alternatives exist, Azure DevOps is a best-in-class set of services and should be a serious consideration for any team looking to adopt a DevOps culture.
Interested in more blogs? Check out all the latest blogs today.
About the Author:
I’m a brownfield developer in a greenfield world, working in development since the mid-90s. I continually study to hone my cloud and DevOps skillset
Reference:
Delcogliano, P. (2022). An Introduction to DevOps with Azure DevOps. Available at: https://dev.to/pdelcogliano/an-introduction-to-devops-with-azure-devops-332i [Accessed: 26th September 2022].


