Power BI is a powerful business intelligence tool that allows organizations to visualize data and gain actionable insights. With Power BI React APIs, developers can integrate these dynamic reports and dashboards into their React applications, enabling real-time interactivity and custom solutions tailored to user needs. This guide walks you through the initial steps to get started with Power BI React APIs.
Step 1: Create a Microsoft Entra (Azure Active Directory) Account
Before you can access Power BI React APIs, you need a Microsoft Entra ID (formerly Azure AD). This serves as the foundation for authentication and app registration.
Follow these steps to create a Microsoft Entra ID:
- Visit Microsoft Entra ID Setup.
- Sign in with your Microsoft account or create a new one.
- Follow the steps to set up your organization and directory.
Note: Keep Multifactor authentication off, or else this process will give an error.
Step 2: Register Your Application in Power BI
Now that you have an Entra ID, the next step is to register your application in Power BI. This registration allows your app to access Power BI resources via APIs.
Here’s how:
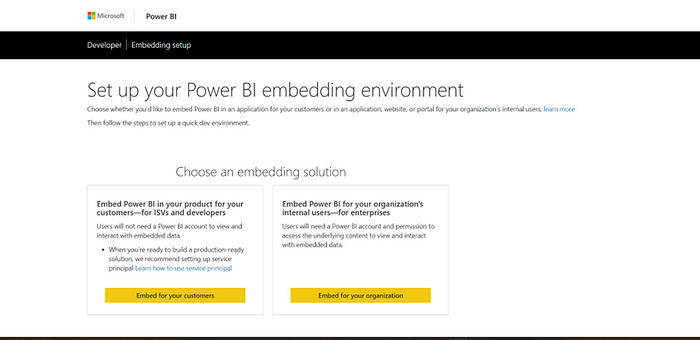
- Visit the Power BI Embed Setup Page:
Go to Power BI Embed Setup. - Choose Your Account Type:
- Customer Account: Use this if the application will be used for customers outside your organization.
- Organization Account: Use this if the application is for users within your organization.
3. Provide Workspace Details:
- Select or create a workspace where your Power BI reports are hosted.
- Upload your Power BI (.pbix) file to the chosen workspace if you haven’t done so already.
4. Complete App Registration:
After entering the required details, Power BI will register your app in your Microsoft Entra account.

Step 3: Capture Essential App Details
Once the app is registered, you will receive key identifiers that are critical for future integration steps:
- Client ID: A unique identifier for your application.
- Tenant ID: Links your app to your Microsoft Entra directory.
- Client Secret: A secure key used for authentication.
- Workspace ID: The unique identifier for the Power BI workspace where your reports are hosted.
- Report ID: Identifies the specific report you want to embed.
Ensure you store these details securely as they will be needed for authentication and embedding Power BI reports into your React app.
Step 4: Generating an Access Token for Power BI API
After registering your application and obtaining essential details such as Client ID, Tenant ID, and Client Secret, the next step is to generate an Access Token. This token authenticates your application and allows it to interact with the Power BI REST API.
You can generate an access token using two methods:
- Using Client ID, Tenant ID, and Client Secret
- Using Username, Password, Client ID, and Tenant ID
Method 1: Using Client ID, Tenant ID, and Client Secret
import msal

# Replace these placeholders with your application details
app_id = 'your_client_id'
tenant_id = 'your_tenant_id'
client_secret = 'your_client_secret'

# Authority URL for Azure authentication
authority_url = f'https://login.microsoftonline.com/{tenant_id}'

# Scopes for Power BI API
scopes = ['https://analysis.windows.net/powerbi/api/.default']

# Create an MSAL ConfidentialClientApplication instance
client = msal.ConfidentialClientApplication(
    client_id=app_id,
    authority=authority_url,
    client_credential=client_secret
)

# Acquire the access token
response = client.acquire_token_for_client(scopes=scopes)
access_token = response['access_token']

print(f"Access token: {access_token}")
Method 2: Using Username, Password, Client ID, and Tenant ID
This method is more suitable for applications that require user-level access. Here’s how you can implement it:
import requests
import msal

# Replace these placeholders with your application details
app_id = 'your_client_id'
tenant_id = 'your_tenant_id'

# Replace with your Power BI user credentials
username = 'your_username'
password = 'your_password'

# Authority URL for Azure authentication
authority_url = f'https://login.microsoftonline.com/{tenant_id}'

# Scopes for Power BI API
scopes = ['https://analysis.windows.net/powerbi/api/.default']

# Create an MSAL PublicClientApplication instance
client = msal.PublicClientApplication(app_id, authority=authority_url)

# Acquire the access token using username and password
response = client.acquire_token_by_username_password(
    username=username,
    password=password,
    scopes=scopes
)

# Get the access token
access_token = response['access_token']
print(f"Access token: {access_token}")
Key Points
- Protect Your Credentials: Never expose sensitive details like Client ID, Tenant ID, Client Secret, or user credentials in public repositories or unencrypted formats. Use environment variables or secure vaults to store these values.
- Choose Method Based on Use Case:
- Use Method 1 for server-to-server interactions.
- Use Method 2 if you need user-specific access to Power BI resources.
Once the access token is generated, it can be used in subsequent API calls to interact with Power BI, such as embedding reports or fetching data.
Step 5: Executing Queries Using Power BI API and Access Token
Once the access token is generated, it can be used to interact with Power BI APIs to fetch or manipulate data. One of the key use cases is querying a dataset. Below is a modified and structured function for executing queries on a Power BI dataset using the generated access token.
Step 6: Integrating Query Execution into Your Server
Once you’ve successfully set up the function to execute Power BI dataset queries, you can integrate it into your existing server application. This allows seamless interaction with Power BI datasets through your backend.
Steps to Integrate
- Run Your Server
Start the Python server using the Flask framework (or any other framework you prefer). This will expose the /execute_query endpoint. - Call the API from Your Application
Use an HTTP client like Postman, cURL, or even frontend JavaScript (Axios/Fetch) to call the /execute_query API endpoint with the required payload.
Example API Call in Postman:
- URL: http://your_server_address/execute_query
- Method: POST
- Headers: Content-Type: application/json
{
"dataset_id": "your_dataset_id"
}- Verify the Query
- Ensure the dataset ID and query match the schema and structure of your Power BI dataset.
- Check the logs or response JSON for data retrieval status.
Testing Queries in Microsoft Documentation
For more information on how to structure and test queries, you can refer to Microsoft’s official documentation:
👉 Power BI REST API — Execute Queries
This page provides examples and a code execution environment where you can:
- Explore sample queries.
- Test how the API interacts with datasets.
- Understand query result formats and potential errors.
Try in Microsoft API Explorer
- Go to the API Explorer.
- Authenticate using your Microsoft Entra ID credentials.
- Input your dataset ID and query in the provided fields.
- Execute the query to preview results and troubleshoot any issues before integrating into your application.
About the Author:

Naveen Kumar S
Data Scientist @FRESHONTABLE | Enhancesys Innovation | MTech in AI | Power Bi | Enterprise Analyst | Microsoft Certified Azure AI Engineer Associate.
Kumar, N (2024). Getting Started with Power BI React APIs. Available at: Getting Started with Power BI React APIs. | by Naveen Kumar S | Dec, 2024 | Medium [Accessed: 11th December 2024].


